Last updated on June 16th, 2025 at 12:00 pm

Dealing with low back strain, whether it’s from hours of sitting at the office or engaging in household chores, is a common issue that many of us face.
However, regular physical therapy exercises for the lower back strain can help reduce strain, pain and decrease the chances of experiencing it in the future. In this article, we’ll walk you through a series of exercises to help you combat low back pain effectively.
- Physical therapy exercises for lower back strain that actually work
- 1. Bridging exercises for lower back pain
- 2. Knee rotation for low back pain relief
- 3. Stretches for lower back pain: Diagonal leg pull
- 4. Chest and head lift to strengthen upperback muscle
- 5 Single leg raise in prone for lower back strengthening
- 6 Double Leg Lift (Naukasana)
- 7. Cat-camel physical therapy exercises for lower back strain
- 8. Hand and leg raise in quadruped position
- Conclusion
Physical therapy exercises for lower back strain that actually work
Before we go into the exercises, it’s crucial to understand why they work. You are likely aware that a sedentary lifestyle and weak lower back muscles are common culprits behind lower back pain.
Backed by research1, it is known that a sedentary lifestyle is associated with an increase in low back strain in almost all age groups, including long hours of desk jobs, doing household chores like sweeping, and cooking etc. puts lots of stress on the lower back.
This causes stiffness to develop in the muscles of the lower back. In old and chronic back pain, this muscle becomes stiff and weak. These exercises specifically target these areas, which helps strengthen these muscles and release stiffness.
This, in turn, provides relief and prevents future discomfort. In addition to these exercises, we also recommend adopting desktop ergonomics to minimise stress on the back. So, let us start with bridging exercises.
For exercises like bridging and knee rotations, we recommend using a non-slip yoga mat for comfort and stability. A thick (6mm) mat like this premium option provides cushioning for sensitive backs.

- LIGHTWEIGHT & THICK YOGA MAT: These durable, yet lightweight exercise yoga mats are extra thick for the additional cushi…
- STICKY NON SLIP TEXTURE: Yoga mat features a textured sticky non slip surface for excellent traction and superior grip a…
- NON TOXIC & 6P FREE PVC yoga mat is a healthier choice for you and the planet and free of DEHP, DBP, BBP, DINP, DIDP and…

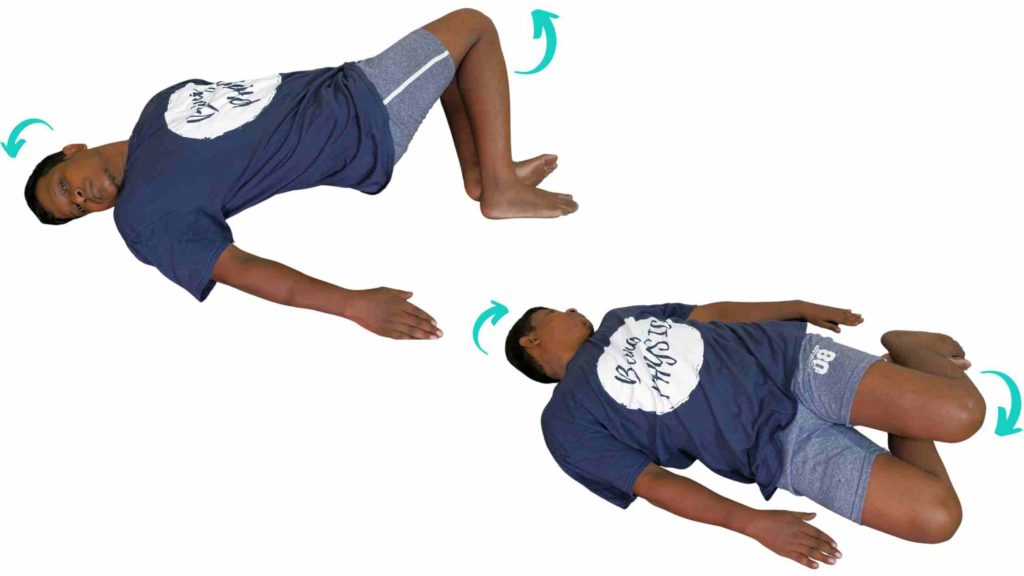
1. Bridging exercises for lower back pain

The first physiotherapy exercise for lower back strain is the Bridging Exercise. This is the easiest way to strengthen the core muscles.
- To begin, lie down on your back, fold both knees and place your hands by your sides.
- Now, lift your hips upward as high as possible. Then hold this position for 5 seconds, the easiest way is to count 1 to 5.
- After this lower down to the initial position slowly and smoothly.
- Repeat the process. This exercise strengthens your lower back muscles, a key factor in preventing pain.
- Aim for at least 15-20 repetitions to maximise its benefits.
2. Knee rotation for low back pain relief
Our next exercise for low back pain is knee rotation.
- The starting position for this exercise will remain similar to the first exercise, with the knee bent.
- Staying in the same position, move your knees together to one side. As you rotate your knees to one side, turn your face in the opposite direction.
- For example, if I rotate my knees to the left side, rotate my head to the right side.
- Now, slowly rotate the knee to the other side, i.e. in our example to the right side and simultaneously rotate the head to the left side.
- Smoothly and slowly repeat this movement to reduce stiffness in the lower back.
- Doing 15-20 reps on each side will yield the best results.
3. Stretches for lower back pain: Diagonal leg pull
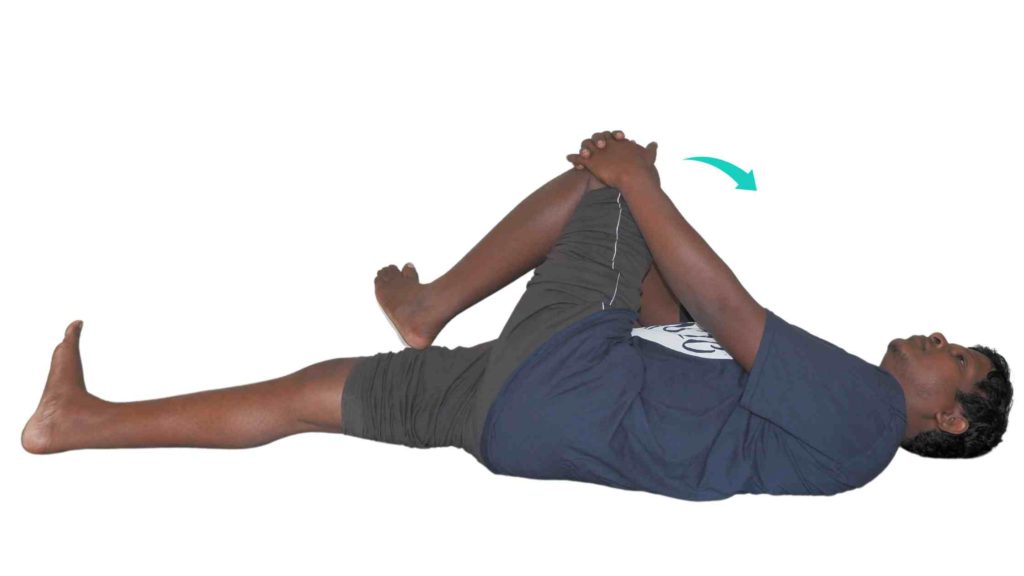
For individuals who experience stiffness in the muscles on the sides of their hips, this stretching can give almost immediate relief.
- The starting position lower back stretching exercise will be lying on your back in a comfortable and relaxed manner.
- Keep your legs straight and by your side. Now, focus on one leg at a time. For the sake of this explanation, let’s start with the right leg.
- Slowly bend your right leg at the knee, bringing it upward towards your chest and grab the knee with both hands.
- While keeping your right leg bent, gently guide it diagonally across your body towards the opposite shoulder.
- As your right leg approaches the opposite shoulder, use your hands to apply a gentle but steady pull. At this point, you should feel a comfortable stretch along the side of your hip and lower back.
- Maintain this position for a minimum of 30 seconds. If you feel more comfortable, you can hold the stretch for up to a minute.
- After this, release the tension in your leg and lower it back to the starting position.
- Now, perform the same sequence with your left leg, bending it, pulling it diagonally towards the opposite shoulder, holding it for the desired duration, and then relaxing.
- It’s advisable to repeat this sequence 3-4 times for each leg.
4. Chest and head lift to strengthen upperback muscle
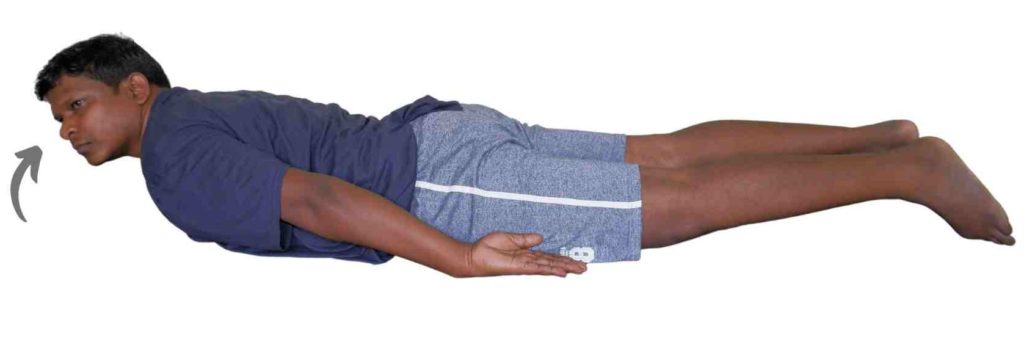
The next exercise is chest and head lift. This is a very effective exercise to strengthen the muscles in your upper back.
- Your starting position would be lying straight on your tummy face down on a flat surface. Your legs should be extended straight behind you, and your toes should be pointed away from your body. Place your hands by your sides.
- Initiate the movement by gently lifting your chest and head off the ground.
- Lift your chest and head as high as you can while keeping your lower body and pelvis grounded. Your gaze should be directed downward or slightly forward to maintain a neutral neck position.
- At this point, hold this position for 5 seconds and squeeze your shoulder blades together.
- Perform this exercise for at least 15-20 repetitions.
5 Single leg raise in prone for lower back strengthening
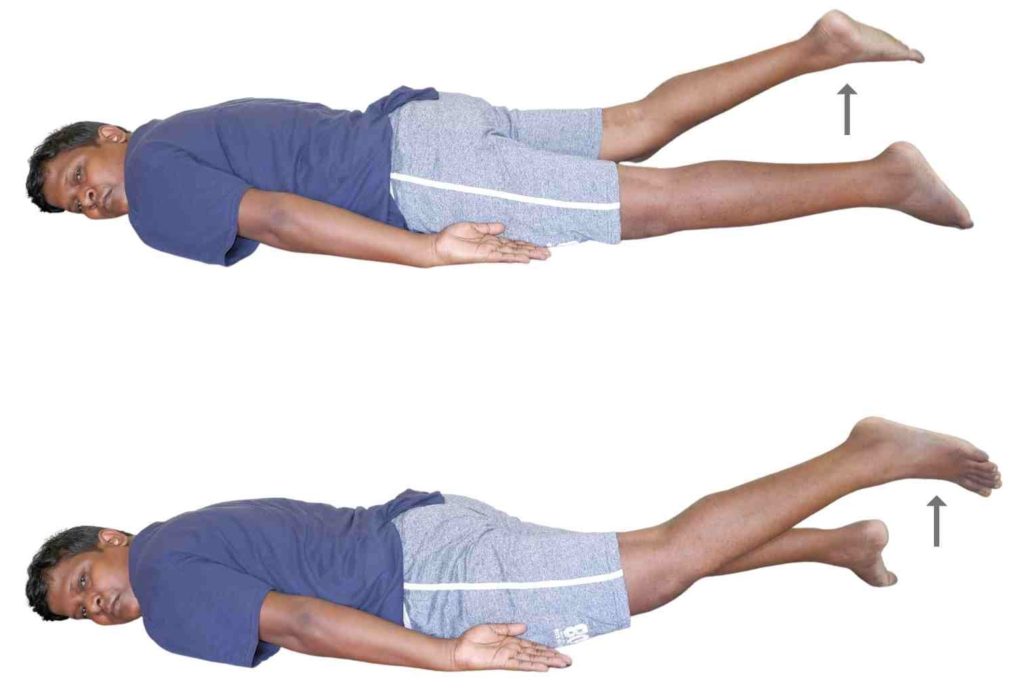
Our next exercise is a single leg raise in prone lying.
- Your starting position should be lying flat on your tummy. Keep your legs straight and position your arms by your sides. Your legs and arms should be in a neutral, relaxed position.
- Lift one leg off the ground. The lift should be controlled and smooth, emphasizing the use of your lower back muscles. While lifting make sure that the knee doesn’t bend.
- Lift the leg as high as possible and hold the position for 5 seconds.
- Then slowly lower it down slowly and smoothly back to the starting position.
- Now, switch to the other leg. Repeat the same process—lifting the leg, holding for 5 seconds, and then lowering it down with control.
- Repeat this process alternately on the left and right leg for 10 repetitions on each side.
6 Double Leg Lift (Naukasana)
In this exercise, you have to lift both your legs and chest simultaneously.
- Your starting position for this exercise will be lying flat on your abdomen. Extend both legs straight behind you, and place your hands by your sides.
- Now, simultaneously raise both legs and your chest off the ground. Raise it slowly and smoothly in a controlled manner. As you lift, point your toes away from your body and reach your arms forward.
- Hold the lifted position for a few seconds, ideally aiming for 5 seconds.
- Now, slowly lower both legs and your chest back down to the starting position.
- Aim to complete at least 10 repetitions of the.
7. Cat-camel physical therapy exercises for lower back strain
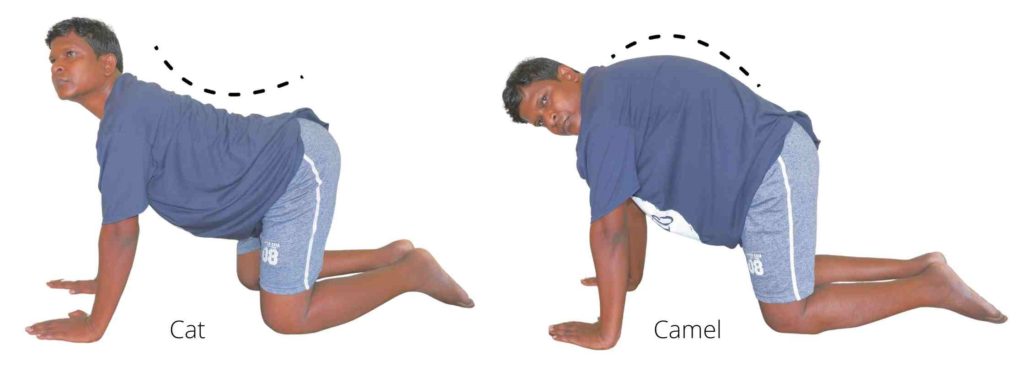
This exercise helps improve mobility and help gain flexibility in your spine. Cat-camel exercise is performed in the quadruped position.
- Start the exercise in quadruped position, your wrists should be aligned with your shoulders, and knees aligned with your hips. Maintain a neutral spine position, neither arched nor rounded.
- For cat pose, gently arch your back downwards towards the floor. Lift your head and tailbone upward as your belly drops towards the ground. This movement creates an arch in your back resembling a cat’s posture.
- Your gaze should be directed forward or slightly upward.
- Hold this pose for a few seconds. Feel the gentle stretch along your spine.
- Then, slowly transition into the camel pose. For camel pose round your back upwards towards the ceiling while tucking your chin towards your chest.
- Imagine creating a humpback-like shape in this posture, similar to a stretching camel. This movement flexes your spine in the opposite direction from the camel pose.
- Hold the position for 5 seconds. You’ll feel a stretch along your spine and an engagement of your abdominal muscles.
- Continue to alternate between the camel and Cat poses smoothly and gradually.
- Repeat this sequence several times. A minimum of 5 to 10 rounds of this sequence is recommended, however, the more you do the better it is.
8. Hand and leg raise in quadruped position
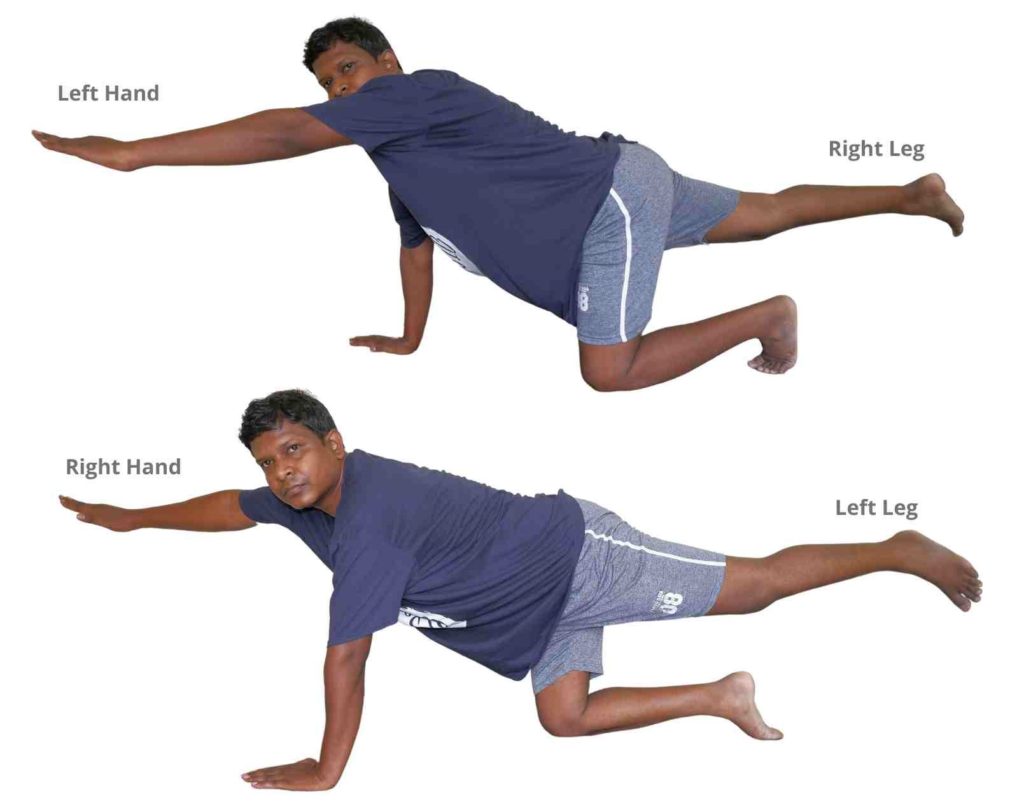
- Your starting position will be the quadruped position.
- In this position, extend one arm forward while simultaneously extending the opposite leg backwards. Ensure that your arm and leg remain straight. Imagine creating a long, diagonal line from your fingertips to your toes.
- Hold this raised position for 5 seconds. Then slowly lower your raised arm and leg back down to the starting position.
- Repeat the same sequence—raising the opposite arm and leg, holding for 5 seconds, and then lowering them down with control.
- We recommend performing at least 10 repetitions on each side, alternating between raising the right arm and left leg, and then the left arm and right leg.
While these exercises strengthen your back, pairing them with proper lumbar support during sitting (like this orthopedic cushion) can accelerate recovery by maintaining neutral spine alignment.

- NEVER FLATTENS – give yourself superior lumbar support with our back support pillow. Designed to hold its shape even aft…
- JUST THE RIGHT SUPPORT – the high-grade memory foam is perfectly firm, so you won’t find it too soft or too hard. Design…
- IMPROVE YOUR SITTING POSTURE – if you sit for long hours at a time in an office or drive long distances on a regular bas…
Conclusion
These exercises offer a comprehensive approach to managing low back pain. However, if you have specific conditions like a slipped disc, disc hernia, or sciatica, it’s crucial to consult a healthcare professional for exercises tailored to your needs.
You can also find more information on these conditions in articles, “4 Easy Stretching Exercises for Sciatica for Instant Pain Relief” and “7 L5 S1 Exercises to Avoid with Bulging Lumbar Disc”
Remember, consistency is key when it comes to these exercises. Incorporating them into your daily routine can significantly improve the health of your lower back and reduce the discomfort associated with it.
Bookmark this guide and do these exercises daily for relief! Share your progress in the comments below!
Keep Reading: Back pain belt: How to use, select fit size for yourself
FAQs: Getting the Most From Your Back Pain Exercises
The author is a physiotherapist who has been practising for the last 17 years. He holds a Bachelor's in Physiotherapy (BPT) from SVNIRTAR (Swami Vivekananda National Institute of Rehabilitation and Research), one of the prestigious physiotherapy schools in India.
Whatever he learns dealing with his patient, he shares it with the world through blogs and e-books. He also owns a YouTube channel, "Sunit Physiotherapist" with over 8 lakh active subscribers. Here, he shares everything he gets to learn serving the patient.