Last updated on July 8th, 2025 at 10:18 am
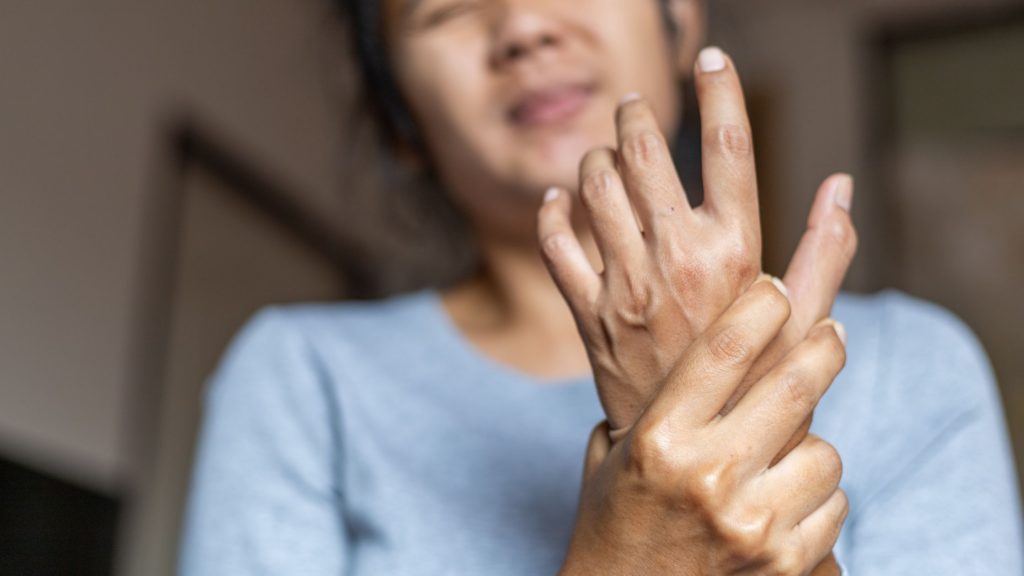
- A scaphoid fracture is a type of wrist fracture that occurs in the scaphoid bone, which is located near the base of the thumb.
- It is a common injury, especially among young adults and athletes who engage in high-impact activities.
- Physiotherapy exercises can be essential in treating a scaphoid fracture, helping improve joint mobility, reduce pain and inflammation, and prevent further injury.
- These exercises can include a range of motion exercises, stretching and strengthening exercises, and functional activities to help patients regain full use of their wrists and hands.
Treatment for scaphoid fracture depends on whether the fracture is displaced or undisplaced; the displaced fracture needs surgical reduction.
However, an undisplaced fracture can be managed conservatively by cast immobilization for six weeks to as long as six months, depending on the site of the fracture.
After the immobilization period, physiotherapy for scaphoid fracture is crucial to regain full wrist motion and return to work. This article will cover physiotherapy rehabilitation exercises after the union of scaphoid fractures in the wrist. So, let’s get started.
- Scaphoid Fracture Rehabilitation: Phases, Exercises & Recovery Timeline
- Best Physiotherapy Exercises for Scaphoid Fracture Recovery
- Phase 1: Early Rehab (Weeks 1–3) – Regaining Wrist Mobility
- Phase 2: Strengthening (Weeks 4–8) – Restoring Grip & Function
- Scaphoid Fracture Recovery Tips: When to Return to Sports
- FAQ
Scaphoid Fracture Rehabilitation: Phases, Exercises & Recovery Timeline
The scaphoid is the most common carpal bone fracture in athletes, accounting for up to 70% of all carpal bone fractures.
Males between the ages of 20–24 are associated with a higher rate of scaphoid fracture, likely secondary to participation in extreme sports and work that involves manual labour1.
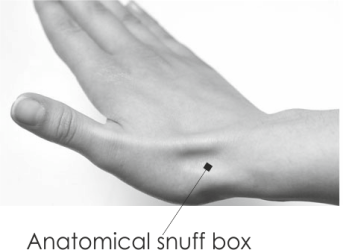
- Pain and tenderness in an anatomical snuff box.
- Pain and weakness of grasp.
- Painful pinching, i.e. between the thumb and index finger, is painful.
Scaphoid Fracture Symptoms & Anatomy: Why Proper Diagnosis Matters
The wrist comprises eight carpal bones arranged into a proximal and distal row—the scaphoid functions as a link between these two rows. Approximately 80% of the scaphoid is covered by articular cartilage, which limits the area for vascular supply and ligamentous attachments.
Most of the blood supply to the scaphoid is from the dorsal carpal branch of the radial artery1.
Scaphoid bone has a peculiar blood supply. In the distal (upper) 2/3rd bone, there is equal distribution of blood vessels (see figure), and in the proximal 1/3rd, no blood vessel directly enters the bone.
So there is an increased chance of fracture happening at proximal 1/3rd bone may degenerate and fracture may not unite.
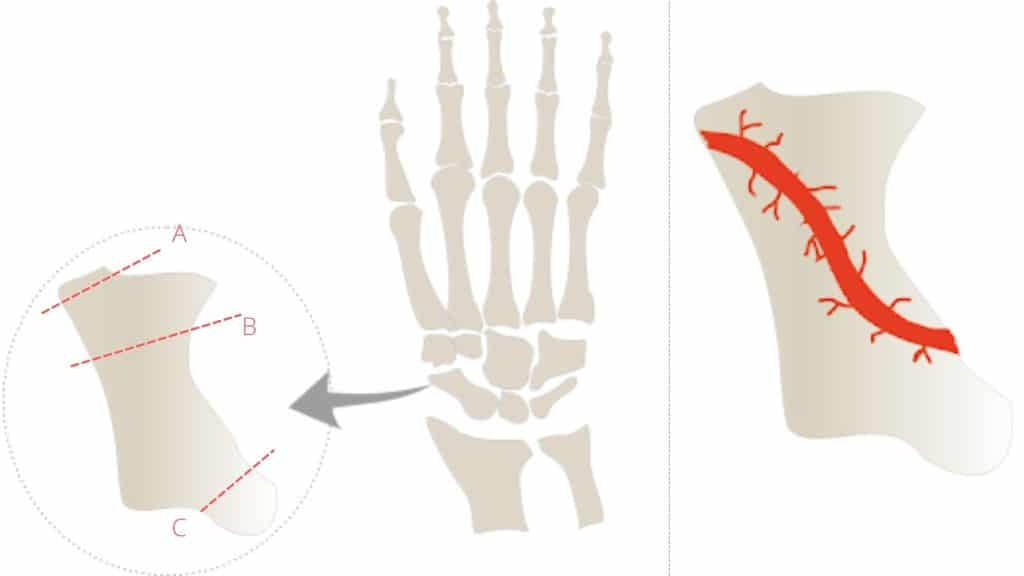
A) Distal pole 10%.
B) Waist 70% (most common).
C) Proximal pole 20%
Scaphoid Fracture Treatment Options: Surgery vs. Non-Surgical Methods
Therapeutic options consist of direct functional treatment (In case of a clinically suspected fracture without radiological signs of a fracture), cast immobilisation (In case of an occult or stable fracture) of the fracture and joints, and operative treatment (in case of displaced fracture).
Cast immobilisation is still the therapy of choice in occult or stable scaphoid fractures. The duration of immobilisation varies, depending on the fracture type and the outcome of repeated radiological check-ups, which serve as an estimation of fracture consolidation.
Generally, a cast treatment of 6 weeks should be sufficient in most non-displaced and stable fractures2.
After six weeks of immobilization, physiotherapy exercises are prescribed to treat common complications like pain, weakness around the wrist joint, and wrist joint stiffness.
Best Physiotherapy Exercises for Scaphoid Fracture Recovery
After removing the Plaster cast immobilization, the most common complication is wrist and finger joint stiffness and weakness. Without normal wrist movement and strength, it is challenging to carry out sports activities, and it also affects the activity of daily living.
So, the rehabilitation aims to regain the range of motion of wrist and finger joints and strengthen the weak wrist joint, mainly focusing on grip strength.
Scaphoid fracture rehabilitation can be divided into three different phases. The first phase focuses on regaining the range of motion of the wrist joint, and the second phase is aimed at regaining the strength of the wrist and hand.
The third phase consists of a sports-specific rehabilitation program.
Also Read: Easy Hand Blast Injury Physiotherapy Exercise to Get back to job early
Phase 1: Early Rehab (Weeks 1–3) – Regaining Wrist Mobility
The first phase begins immediately after removing the Plaster cast and lasts from 1st to 3rd week. During this phase, the primary purpose is to maintain the available joint range of motion of the wrist and to regain the lost joint range of motion by following passive ROM and active ROM exercises, respectively.
To begin with, we will focus on performing passive joint range of motion exercises for the wrist. In these exercises, the individual or athlete uses the power of their other hand to maintain or regain the available range of motion in the joint.
The passive range of motion exercises includes flexion, extension, radial and ulnar deviation of the wrist.
#1 How to Do Passive Wrist Flexion for Scaphoid Fracture Rehab
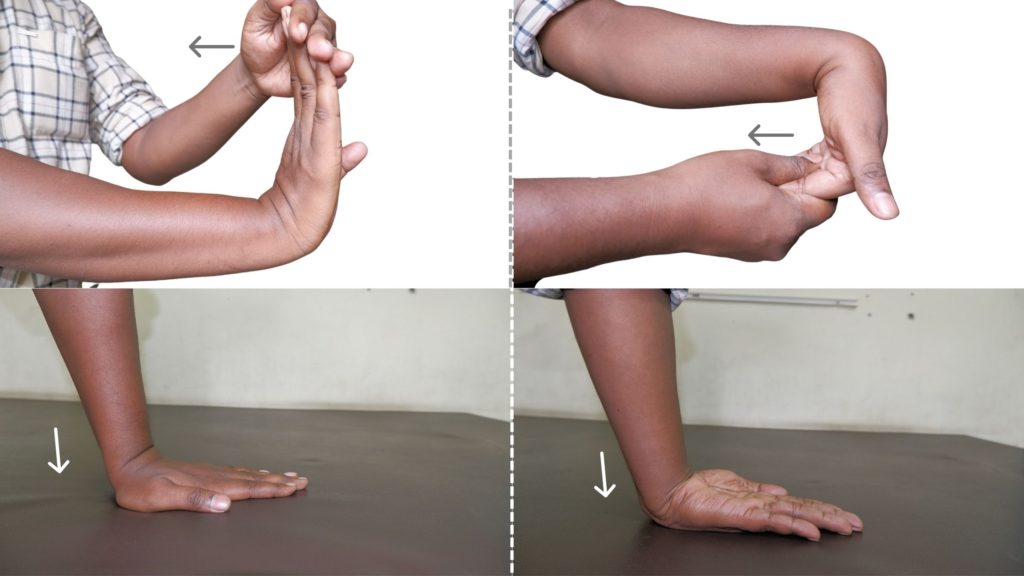
- For the passive wrist flexion exercise, you have to use your opposite hand. Take your opposite hand and hold the fingers, as shown in the figure.
- Now, slowly bend your wrist joint passively by pulling with the other hand. The wrist flexion should be within the pain-free range and pull it to the point where you can tolerate it.
- At the endpoint, give a gentle stretch for 5 seconds and then let it relax. This will stretch the wrist extensor muscles.
- Repeat this process 10 to 15 times in a single session.
There is another way to perform passive wrist flexion exercises. As you can see in the figure you just need to press the back of the palm over the table.
Press it to a point where you can tolerate the wrist flexion; here, you have to keep in mind that do not overpress it, which can cause increased pain.
#2 Passive wrist extension exercise
Likewise, for the wrist passive extension range of motion exercise, use your other hand and move your wrist joint passively into the extension within the pain-free range. Follow these easy steps to perform this exercise.
Extend it to a point where you can tolerate it and give a gentle stretch at the endpoint. Now, repeat this process 10 to 15 times in a single session.
Alternately, you can also perform this exercise passively by keeping your palm on the table and pressing it down to a pain-free range. Give a gentle stretch at the end range. Do not over-press it so that it becomes painful for you.
#3 Passive wrist ulnar and radial deviation
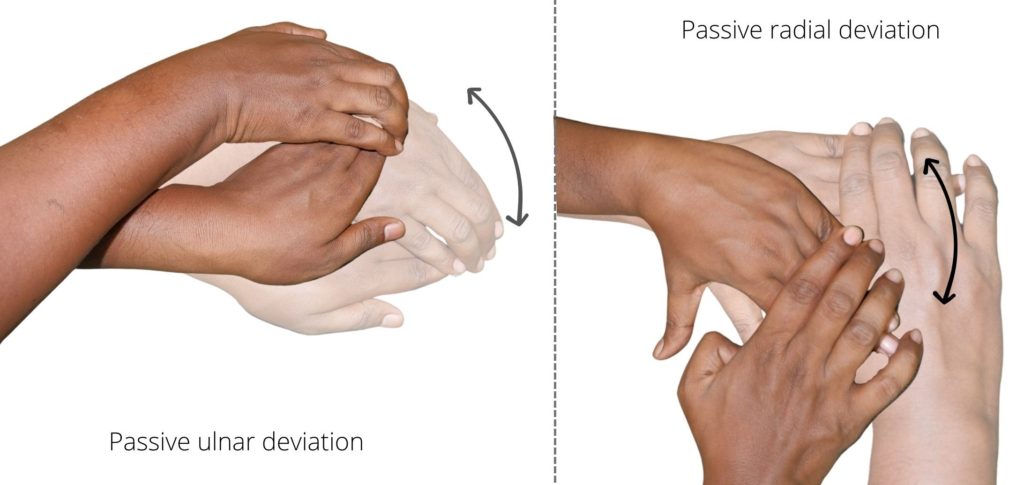
When you bend the wrist towards the thumb side, we call it radial deviation. When we turn it to the little finger side we call it ulnar deviation. This movement is probably the most painful movement for the scaphoid fracture sufferer.
- So, for this exercise, you must first place your forearm flat over the table.
- Use your opposite hand to pull and bend the wrist onto the thumb side, bringing the wrist into radial deviation. Pull it gently within the pain-free range and take it at the end range to the point where you can tolerate it.
- Repeat this process 10-15 times in a single session.
#4 Active wrist flexion-extension exercise
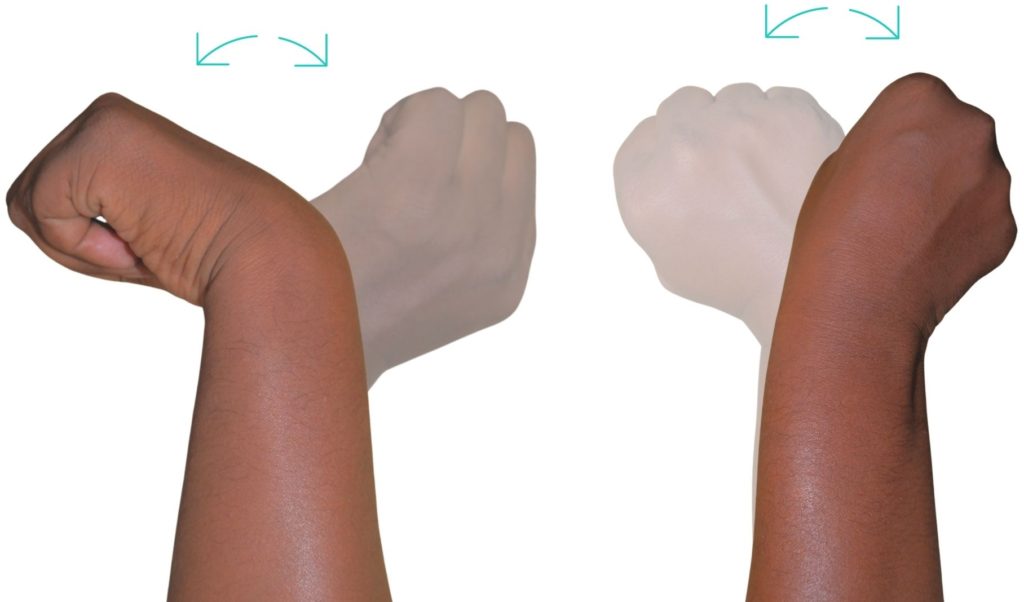
Once you can perform the passive wrist flexion and extension motion without any pain, you can progress to active wrist flexion and extension exercise.
As the name suggests, you must actively do this motion without external help.
- Begin by sitting comfortably in a chair with your forearm resting on a table or armrest with your palm facing up.
- Slowly lift your hand upwards towards the ceiling, keeping your wrist straight.
- Pause at the top of the movement, then slowly lower your hand back to the starting position.
- Repeat the exercise for 10-15 repetitions.
Should do flexion and extension of the wrist 10 to 15 times in a single session; you can do as much as possible
#5 Active wrist radial and ulnar deviation
The same wrist radial and ulnar deviation motion we just discussed should be done actively without the help of the other hand or any external help.
- To perform active wrist radial and ulnar deviation exercises effectively, you must ensure that your forearm is kept flat over the table.
- Maintaining this position, actively move your wrist in ulnar and radial deviation.
- Repeat it 10 to 15 times in a single session; the more you do, the better it is.
This exercise is highly effective in building the flexibility and strength of your wrist and forearm muscles. Regularly practising this exercise can help prevent injuries and greatly improve your physical fitness.
#6 Active pronation and supination
To perform active pronation and supination exercises of the forearm, follow these
- Sit or stand with your arm extended in front of you and your palm facing down.
- Slowly rotate your forearm so that your palm faces up. This is the supination movement.
- Hold this position for a few seconds, then slowly rotate your forearm back to the starting position with your palm facing down.
- Hold this position for a few seconds, then slowly rotate your forearm so that your palm faces down. This is the pronation movement.
- Hold this position for a few seconds, then slowly rotate your forearm back to the starting position with your palm facing down.
- Repeat these steps for 10 to 15 repetitions.
Remember to perform the exercise slowly and smoothly, and stop if you experience any pain or discomfort. This exercise is great for strengthening the muscles of the forearm and improving wrist mobility.
Phase 2: Strengthening (Weeks 4–8) – Restoring Grip & Function
When you are comfortable with the above exercise, we can progress to phase 2. This phase lasts from 4 to 8 weeks. By this time, the fracture is healed, and we can progress with all the above exercises by adding resistance.
Strengthening exercises help to facilitate the remodelling of the healing fractured bone. They can begin with grip strength exercises and progress to exercises by holding a 1 to 3-pound dumbbell or simply holding a litre water bottle.
#7 Essential Grip Strengthening Exercises
Grip strength is essential for performing daily activities and continuing with sports activities, so to regain grip strength exercise, we need a sponge ball or a gel ball. To perform the grip strength exercise using a gel ball, follow these steps.
- Choose a gel ball that is appropriate for your strength level. Gel balls come in various resistance levels, so pick one that feels challenging but manageable.
- Hold the gel ball in one hand and squeeze it as hard as possible for 5-10 seconds.
- Relax your grip for a few seconds, then repeat the squeeze for another 5-10 seconds.
- Repeat the squeeze and release process for 10-15 repetitions.
- To make the exercise more challenging, try holding the squeeze for extended periods or increasing the number of repetitions.
- You can also perform variations of this exercise, such as squeezing the gel ball between your fingers or holding it between your palms and squeezing.
- The 3-in-1 LiteTour hand squeeze balls are great for athletes, office staff, students, musicians and more who do trainin…
- The squeeze balls are made from premium silicone material that is odorless and latex free.
- The tool kit comes in three resistance levels for gradual practices; come with a portable keeping bag so that you can ca…

Other strengthening exercises
When an athlete can perform the previous stretching exercises without pain, resistance can be added to them to help build strength in their fingers, wrist, and forearm.
Scaphoid Fracture Recovery Tips: When to Return to Sports
Activities that place large amounts of stress through the forearm flexors should be minimized; these include racket sports, gripping activities, opening jars, cans or doors, and carrying or lifting.
Resting from aggravating activities ensures the body can begin healing without further tissue damage. Once the patient can perform these activities pain-free, a gradual return to these activities is indicated, provided there is no increase in symptoms.
Keep reading: What Is Best Exercise For Tennis Elbow Pain?
FAQ
The author is a physiotherapist who has been practising for the last 17 years. He holds a Bachelor's in Physiotherapy (BPT) from SVNIRTAR (Swami Vivekananda National Institute of Rehabilitation and Research), one of the prestigious physiotherapy schools in India.
Whatever he learns dealing with his patient, he shares it with the world through blogs and e-books. He also owns a YouTube channel, "Sunit Physiotherapist" with over 8 lakh active subscribers. Here, he shares everything he gets to learn serving the patient.

Pingback: What's Dinner Fork Deformity? Colle's Fracture Physiotherapy Management - Physiosunit