Last updated on March 28th, 2025 at 12:43 pm

- Monteggia fracture is a type of forearm fracture that involves both the ulna and the radius bones.
- Physical therapy is typically recommended after surgery or immobilization for a Monteggia fracture to restore range of motion, strength, and function.
- Monteggia fracture exercises may include stretching, range of motion, and strengthening exercises.
- These exercises may be performed with the assistance of a physical therapist or at home under their guidance.
- Following a proper exercise program is important to prevent complications and achieve optimal recovery.
Monteggia Fracture and Dislocation is a fracture of the proximal (upper third) part of the ulna bone with a dislocation of the radius bone of the forearm. It is common in children but can happen to anyone. In children, non-surgical closed reduction is the preferred method of treatment.
However, an adult person may need surgical reduction with an internal plate and screw fixation. Whatever the mode of treatment, rehabilitation and exercises are crucial after immobilization to gain strength and joint motion.
This article will cover the exercise part after your doctor removes the posterior slab and sutures. Please remember that you must proceed with exercises once your doctor has recommended.
We will also cover the common causes and available treatment options for better insight.
- Monteggia fracture & dislocation
- Treatment of Monteggia fracture
- Monteggia fracture rehabilitation exercises
- 1) Elbow Flexion and Extension Exercises for Monteggia Fracture Recovery
- 2) Forearm pronation supination using a wand
- 3) Pendulum exercise for shoulder stiffness in Monteggia fracture
- 4) Shoulder elevation exercise
- 5) Wrist flexion-extension home exercises for Monteggia fracture
- 6) Wrist circumduction
- 7) Grip strengthening exercise for Monteggia fracture recovery
- Final statement
Monteggia fracture & dislocation
It is the fracture of the
The Monteggia lesion is a typical example of a double bone injury characterized by a radial dislocation and a fracture of the ulna2.
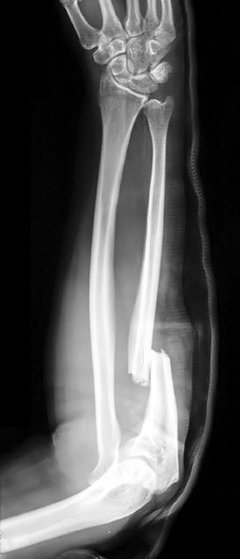
As you can see from the radiography below, there is a fracture of the ulna bone on the upper third (near the elbow).
Here, the ulna bone aligns with our little finger, and the radius bone aligns with the thumb.
Contrary to this, a fracture in the lower part of the radius bone is termed Colle’s fracture, which we have already discussed in one of our articles.
Monteggia fracture type: bado classification
The Bado classification system, developed in 19673, further categorized Monteggia lesions based on the direction of radial head dislocation and the angulation of the fractured ulna:
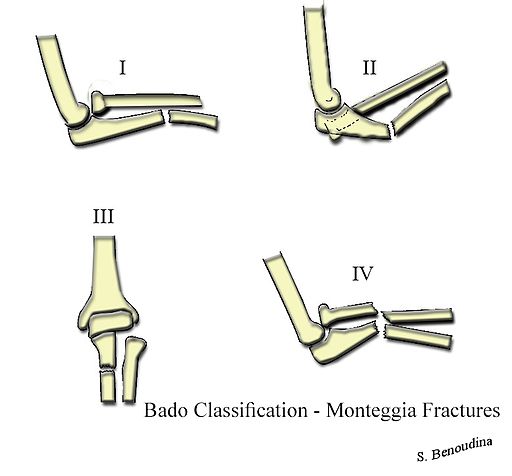
- Type 1: Anterior dislocation of the radial head with apex anterior deformity of the ulna shaft.
- Type 2: Posterior dislocation of the radial head with apex posterior deformity of the ulna.
- Type 3: Lateral dislocation of the radial head with fracture about the ulnar metaphysis.
- Type 4: Anterior dislocation of the radial head with associated fracture of the radius and ulna.
It’s important to note that in adults, Type 2 is the most common, and it can sometimes occur with fracture of the coronoid and radial head.
Causes of Monteggia fracture
There are two leading causes of these types of fractures; a direct impact on the wrist causes both. Let us try to understand these two leading causes.
1) Hand with forceful pronation of arm
This can happen during the fall on an outstretched hand. When someone falls from a stand or walks, it triggers a protective reflex mechanism resulting in a hand outstretched to protect the body from the impact of the fall.
But, when falling causes the forearm to be exposed to the excessive impact of pronation force, it results in Monteggia Fracture.
2) Direct blow on hand
This is an uncommon cause with a direct blow on the lower end of the forearm. The blow could be an assault with weapon or a stick from the backside.
Treatment of Monteggia fracture
In children, conservative management is usually the first choice of treatment in which the surgeon reduces the fracture and dislocation without any surgical intervention.
For an adult person with an unstable fracture, conservative management may not work. Therefore, surgical intervention of early open reduction internal fixation is required3.
In the surgical procedure, the fractured ulna is fixed by screw and plate immobilization. Immobilization is done for 4- 6 weeks. Radial head excision is done after 2-3 weeks of the ulna having healed. It is done in case of associated fracture radial head, unreduced dislocation.
Monteggia fracture rehabilitation exercises
After six weeks of surgery, the exercises and physiotherapy must begin. The exercises aim to regain the strength of muscle and elbow joint motion.
Elbow joint stiffness is the most common complication after the immobilization period. Swelling of hands and fingers is a common complaint for and you can follow a few practical home tips for hand swelling.
However, in my clinical practice, I have found that most of them develop frozen shoulder issues in the concerned upper limb. They also develop stiffness in the wrist and small joints of the finger.
So, while planning exercises, a holistic approach is necessary to address all these issues.
So, without delay, let’s begin with exercises.
1) Elbow Flexion and Extension Exercises for Monteggia Fracture Recovery
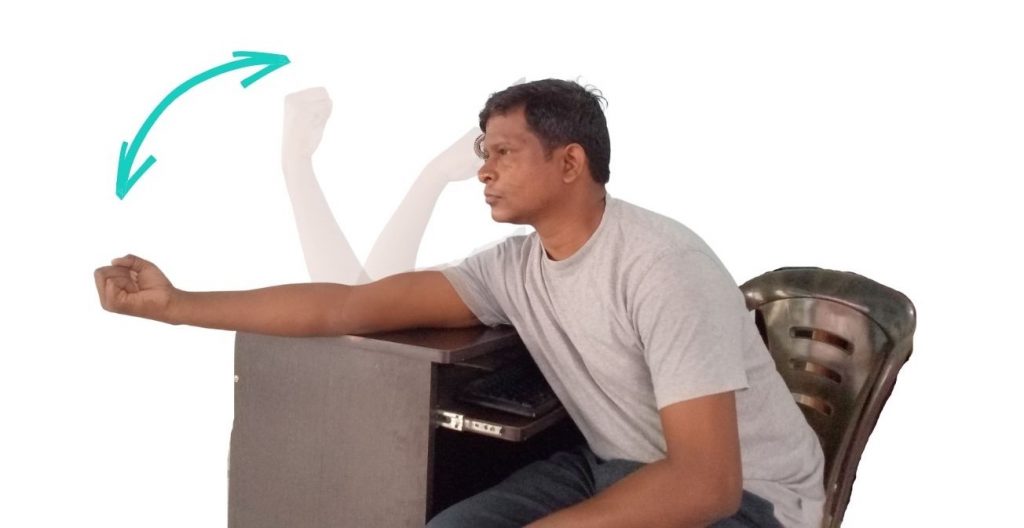
The bending and straightening of the elbow joint are called elbow flexion extension. To treat elbow stiffness, particular focus must be given to exercises, and it is recommended to start these exercises immediately after removing the splint.
Initially, due to pain, it is essential to be cautious while doing elbow flexion-extension by stabilizing the arm.
- To do this, you can sit with a table in front of you and place your affected arm flat on the table to stabilize it. The elbow should be at the table’s edge to allow for sufficient movement.
- Slowly move the forearm to bring a bending and straightening motion to the elbow. You may hold the arm with your other hand for better stability.
- Initially, the movement should be limited to the pain-free range, and as you progress, the range must be increased.
- Over time, you can do this exercise freely without needing a table to support it.
2) Forearm pronation supination using a wand
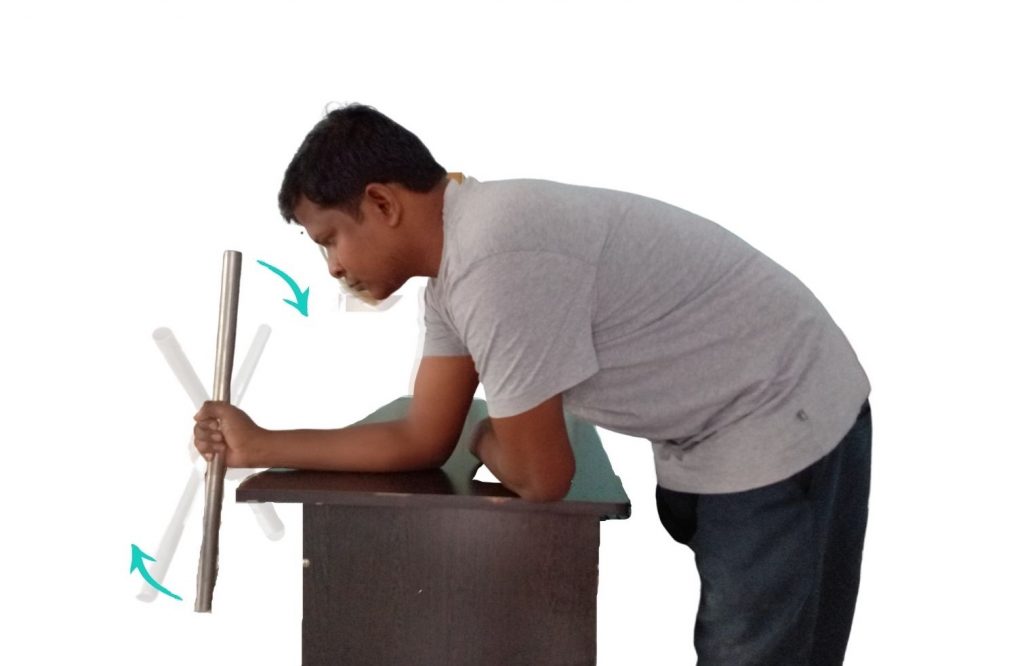
Many individuals often ignore forearm pronation-supination motion. This exercise is designed to improve the range of motion and flexibility in your forearm muscles and your wrist and hand.
- To begin, find a table or other flat surface where you can sit comfortably with your arm extended and your forearm resting flat on the surface.
- Your wrist should be positioned at the table’s edge, leaving enough space to move a cane or similar object.
- To start the exercise, grasp a cane or similar object and rotate it clockwise, keeping your forearm flat on the table.
- Repeat this motion several times, keeping the movement pain-free.
- Once you feel comfortable with this motion, switch to rotating the cane in an anti-clockwise direction.
- As you progress, you can incorporate more aggressive pronation-supination motions, which involve twisting your forearm and wrist in opposite directions.
This will help to improve your overall range of motion and flexibility, allowing you to perform daily tasks with greater ease and comfort.
3) Pendulum exercise for shoulder stiffness in Monteggia fracture
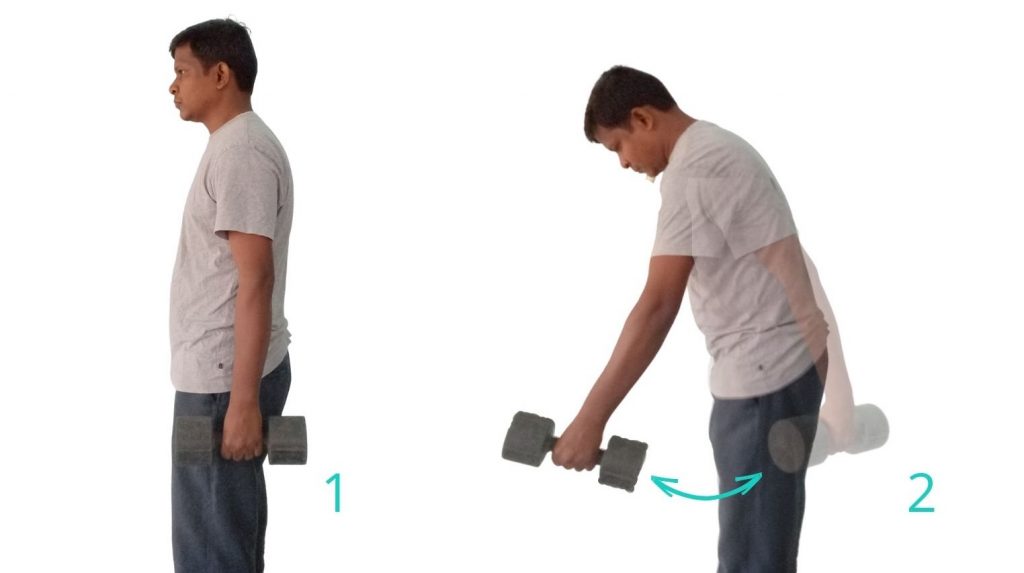
For the shoulder pendulum exercise, you’ll need dumbbells weighing 1.5 to 2 kg if you’re an adult and 1 kg if you’re a child.
- For this exercise, stand firmly with your feet shoulder-width apart. Grip the dumbbell with the hand affected by shoulder stiffness or pain.
- Next, relax the muscles around your elbow and arm so that the weight of the dumbbell has a pulling effect on your elbow. This will allow you to move your shoulder without using the muscles in your arm.
You have two options for performing this exercise: hold the dumbbell in the starting position for 30 seconds or swing it back and forth like a pendulum.
If you swing the dumbbell, start with small movements and gradually increase the range of motion. Make sure to keep your body still and only move your arm.
This exercise can help increase the range of motion in your shoulder and alleviate pain and stiffness. However, if you experience discomfort during the exercise, stop immediately and consult your doctor or physical therapist.
This is a very effective exercise to straighten the elbow joint fully.
4) Shoulder elevation exercise
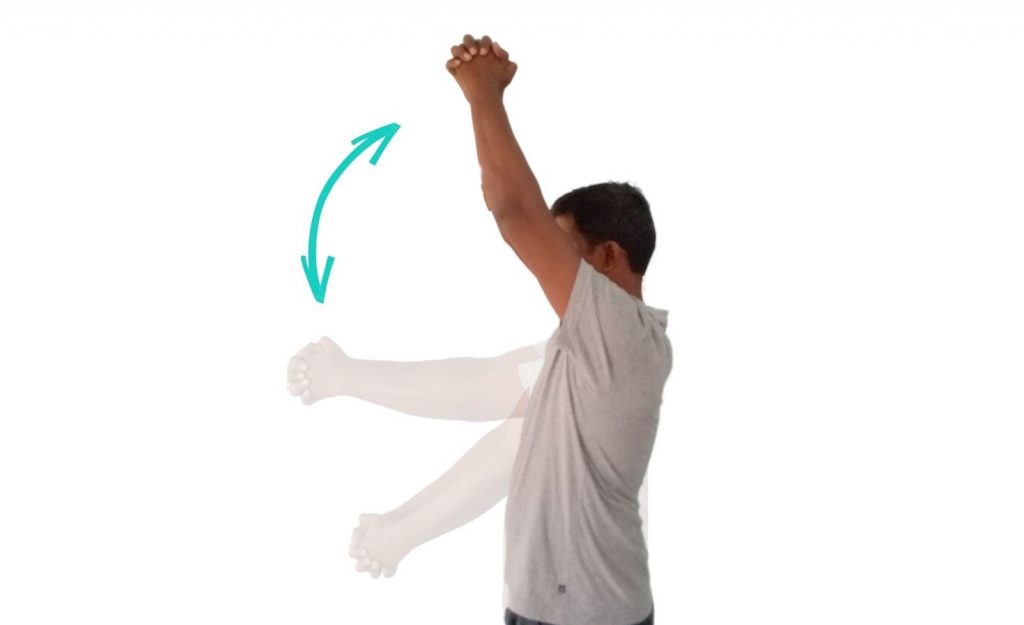
Post-immobilisation, shoulder pain with stiffness is very common in Monteggia fractures. Out of the number of shoulder exercises, I would recommend shoulder elevation exercises.
The shoulder elevation exercise is a simple yet effective exercise that can help improve your shoulder flexibility and strength.
- To perform this exercise, stand up straight with your arms at your sides. Then, clasp both hands together behind your back, keeping your elbows straight.
- Next, slowly raise your shoulders towards your ears, as high as you can comfortably go without experiencing any pain.
- Hold this position for a few seconds, then slowly lower your shoulders to the starting position.
- Repeat this exercise several times, trying to increase the range of motion with each repetition. As you become more comfortable with the exercise, you can also try holding the elevated position for longer.
For other useful shoulder stiffness exercises, please read this article, “shoulder stiffness exercises“.
5) Wrist flexion-extension home exercises for Monteggia fracture
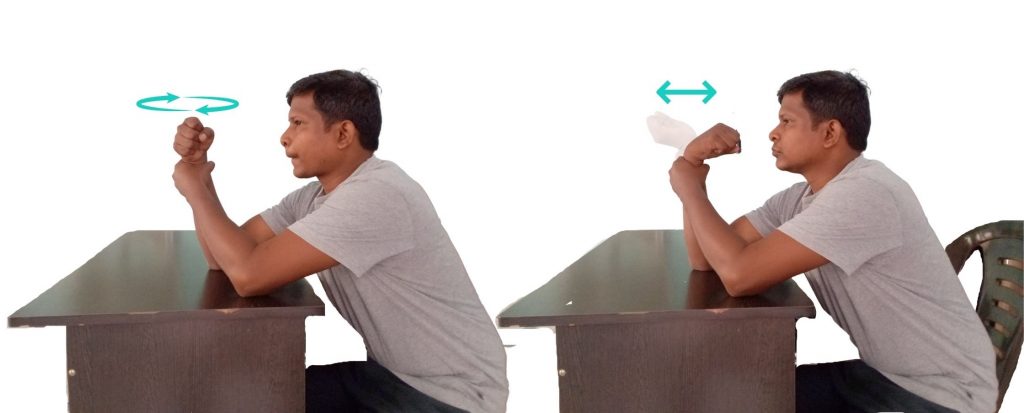
You will need a table or desk in front of you to perform this exercise.
- Start by sitting down and placing your arms on the table with your forearms at a 90-degree angle to the table surface.
- As shown in the figure, use your other hand to stabilise your forearm below the wrist joint.
- Next, bend your wrist forward and backward, flatting your arm and hand on the table.
- Repeat this motion at least 20 to 30 times in a single session.
You may initially feel some resistance or stiffness in the wrist, but this is normal and should improve with consistent practice. This exercise helps improve wrist mobility and reduce stiffness.
6) Wrist circumduction
To perform the wrist circumduction exercise, follow these steps:
- For this exercise, your starting position will be sitting comfortably with your arm extended in front of you, palm facing down.
- Gently rotate your wrist clockwise as if you were turning a doorknob. Continue this motion for 1-2 minutes.
- Next, rotate your wrist in an anti-clockwise direction for another 1-2 minutes.
- Repeat the exercise with your other arm.
- Keep your movements slow and controlled, and avoid any jerky or sudden motions.
- If you experience any pain or discomfort during the exercise, stop immediately and consult with a medical professional.
7) Grip strengthening exercise for Monteggia fracture recovery
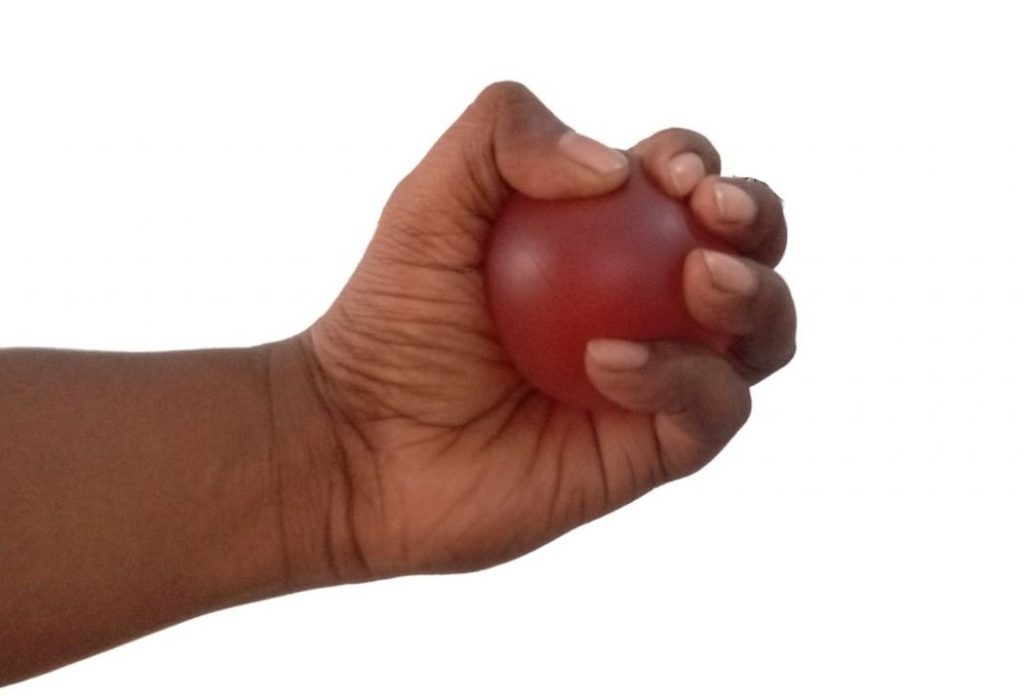
Patients who experience weakness of grip strength and finger joint stiffness, particularly after immobilization, may benefit from a simple gel exercise ball exercise.
- To perform this exercise, the patient should start by selecting a gel exercise ball appropriate for their level of strength.
- They should then grip the ball as tightly as possible, using all their fingers and thumb, and hold the grip for a few seconds before releasing.
- The patient should repeat this exercise as many times as possible, gradually increasing the number of repetitions over time as their grip strength improves.
This exercise is a simple and effective way to improve grip strength and finger joint flexibility in patients who have experienced weakness and stiffness due to immobilization or other causes.
- The 3-in-1 LiteTour hand squeeze balls are great for athletes, office staff, students, musicians and more who do trainin…
- The squeeze balls are made from premium silicone material that is odorless and latex free.
- The tool kit comes in three resistance levels for gradual practices; come with a portable keeping bag so that you can ca…

Final statement
Exercises are very important after a Monteggia fracture to regain strength and mobility in the affected arm and return to work early. These exercises guide a person who underwent this fracture and surgery.
However, we highly recommend following these exercises under a qualified physiotherapist’s supervision. We recommend performing these exercises at least twice a day.
The author is a physiotherapist who has been practising for the last 17 years. He holds a Bachelor's in Physiotherapy (BPT) from SVNIRTAR (Swami Vivekananda National Institute of Rehabilitation and Research), one of the prestigious physiotherapy schools in India.
Whatever he learns dealing with his patient, he shares it with the world through blogs and e-books. He also owns a YouTube channel, "Sunit Physiotherapist" with over 8 lakh active subscribers. Here, he shares everything he gets to learn serving the patient.


Nice post, Thank you for sharing valuable information. I enjoyed reading this post. The whole blog is very nice found some good stuff and good information here Thanks for sharing…Also visit my page.
Premium Folding Wheelchair
There are a lot of school f thoughts which have their own preferred ways to handle the dislocation of the fracture but Chiropractor North Ryde has its own as it is the pain that hurts and we need to capture the pain which in result will bring some relief tot he patient and the healing process can get faster.