Last Updated on January 23, 2026 by Sunit. S. Ekka

Key Takeaways
- Early Phase (0-6 weeks): Focus on wrist/hand exercises (flexion, circumduction, grip strengthening) while immobilized in a sling to prevent stiffness.
- Post-Sling (6+ weeks): Start gentle shoulder mobility drills (elevation, pulley exercises) to restore range of motion. Avoid forceful movements.
- Pain Management: Use ice for acute pain (first 72 hours), then switch to heat and pendulum exercises to reduce stiffness.
- Healing Timeline: Most fractures heal in 6-12 weeks. Displaced fractures (>5mm) may require surgery.
- Sleep Support: Prop yourself up with pillows and avoid lying on the injured side to protect the healing fracture.
Pro Tip: Consistency is key! Perform exercises 2-3x daily for optimal recovery. Consult a physiotherapist for personalized guidance.
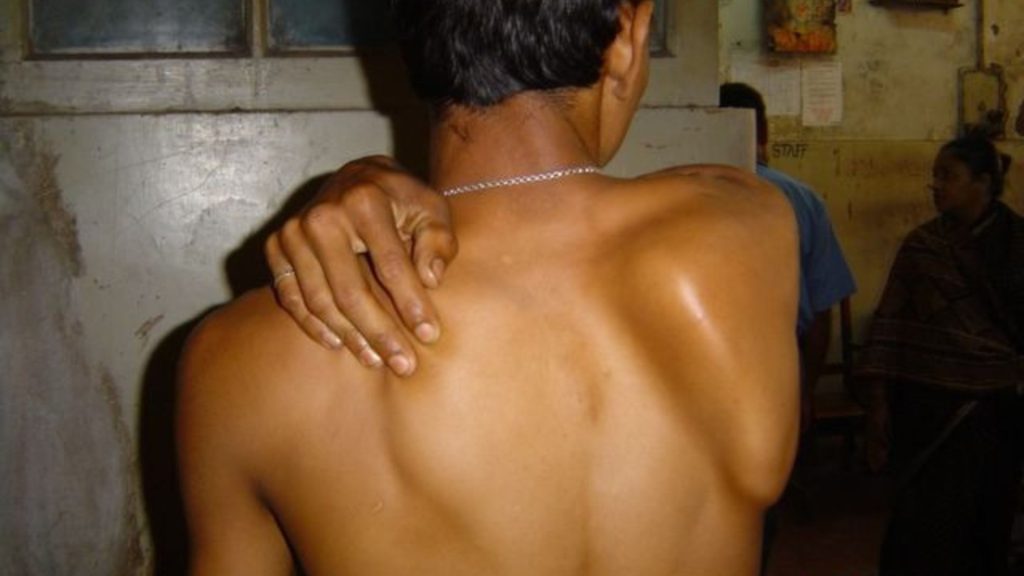
The most common complaint in greater tuberosity fracture, and after removal of the shoulder sling, is pain and stiffness of the shoulder. You are unable to comb your hair, and it becomes difficult to hold a glass of water. This is why greater tuberosity fracture rehabilitation is very important after sling removal.
In this article, we will discuss greater tuberosity fracture physiotherapy and rehabilitation in detail, but let us start with this case study, which you can relate to.
Greater Tuberosity Fracture Rehabilitation: Causes, Symptoms & Recovery Timeline
Although this fracture can occur in all age groups, but is commonly seen in the elderly. Greater tuberosity is a plateau-like projection on the upper end of the humerus (arm bone).
It is the insertion point for the muscle around our scapula ( Supraspinatus muscle, Infraspinatus muscle, Teres minor muscle). In a greater tuberosity fracture, this plateau-like structure is fractured.

Depending on the force and cause of fracture, the fracture segment may remain displaced or undisplaced. But before going deeper into it, let us first take a case study to better connect with it.
Greater Tuberosity Fracture Case Study: Real-Life Recovery Journey
A 40-year-old female school teacher came to us with a complaint of a painful left shoulder with restriction of shoulder movement. She had a history of injury on the top of the shoulder around 2 months back when she fell down from the rickshaw.
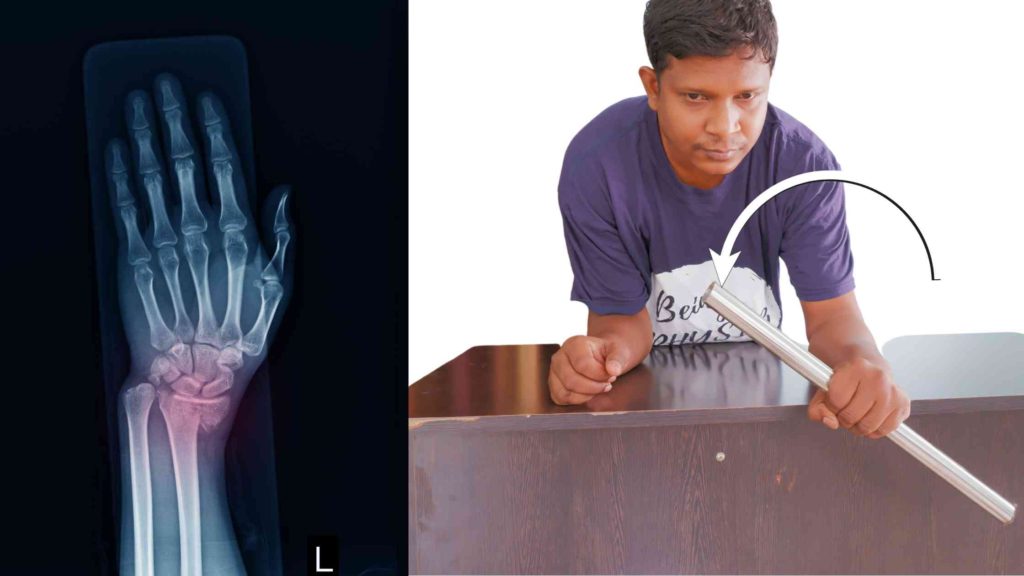
Upon examining the X-Ray doctor came to a diagnosis of a fracture greater tuberosity of the humerus bone. The doctor immobilised the shoulder using a shoulder sling for 3 weeks.
After the removal of the sling, the shoulder joint was in great pain with severe stiffness. The slightest joint movement would trigger great pain, and the daily chorus was almost impossible.
What Causes a Greater Tuberosity Fracture? (2 Common Mechanisms)
1. Direct Impact (Contusion Injury)
Contusion injury occurs due to a direct blow to the tip of the shoulder. It can be, fall on the tip of the shoulder as described in the case study discussed in the introduction. Or it may be due to direct assault.
This type of injury results in an undisplaced fracture where the fractured segments remain undisplaced.

2. Muscle Pull (Avulsion Injury)
This occurs when the shoulder muscle contracts violently and the arm goes into forceful adduction. The two forces result in the pull of a chunk of bone (GT) from the insertion point. It gives rise to a displaced fracture where the fracture segment gets displaced from each other.
Greater Tuberosity Fracture Exercises: Step-by-Step Rehab Protocol
After the fracture, the shoulder joint is immobilised in a sling for roughly one to one and a half months. It is during this immobilisation period that most of the complication develops, and the most common of them is joint stiffness and pain.
Sometimes swelling also develops in the forearm and hand. These complications are manageable if we start an early joint movement when the shoulder is still in the sling.
Phase 1: Early Recovery Exercises (While in a Sling)
Although we do not permit movement around the shoulder joint, we recommend starting range of motion exercises immediately in the distal joint to avoid joint stiffness.
Since the shoulder needs to be at rest, during the period of immobilisation, wrist and finger movement is encouraged. Here are a few exercises that I commonly prescribe to our patients.
Exercise 1: Wrist Flexion & Extension to Prevent Stiffness

With a shoulder sling on, we can do a number of wrist joint exercises. The most common movements of the wrist joint are flexion and extension of the wrist. Here is the step-by-step process of doing this exercise:
- Stabilise your shoulder and forearm firmly inside the shoulder sling.
- Place the forearm so that the palm faces the floor.
- Make a normal fist and move it upwards to the point where you can take it to maximum. This is called wrist extension.
- Similarly, bend your wrist and move your fist downwards to a point where you will feel a stretch on the dorsal wrist and forearm.
- Repeat this for a minimum of 20 to 30 times in a session. However, the more you do, the better it is.
Perform this exercise whenever it is possible; there’s no specific count. This will not only prevent stiffness of the wrist joint but also help improve blood circulation in and around the forearm.
Exercise 2: Wrist Circumduction for Improved Mobility

This is another wrist joint exercise important for maintaining the wrist joint range of motion. Follow these easy steps:
- Stabilise your forearm inside the sling. You can use your opposite hand to hold just proximal to the wrist joint to give a nice base of support for the exercise.
- Now, slowly rotate your wrist.
- Start with the clockwise (or anticlockwise) direction and rotate your wrist smoothly.
- Then take a brief pause, and then rotate it in an anticlockwise direction.
- Do it for a minimum of 20 to 30 times in a session; however, the more you do, the better. Do it whenever you are idle or simply watching television.
Grip strength exercise

Sling immobilisation for 6 weeks can make your grip strength weak. We need to take care of grip strength as well. Performing grip strengthening exercises from the initial stage is essential to prevent future complications like muscle atrophy, finger and wrist joint stiffness.
It also promotes blood circulation. For this exercise, you need a silicone gel, and the process is straightforward.
- Hold and grip the ball firmly with your hand in question.
- Then squeeze this ball as many times as possible while your forearm is comfortably supported inside the sling.

- The 3-in-1 LiteTour hand squeeze balls are great for athletes, office staff, students, musicians and more who do trainin…
- The squeeze balls are made from premium silicone material that is odorless and latex free.
- The tool kit comes in three resistance levels for gradual practices; come with a portable keeping bag so that you can ca…
Post-Sling Rehabilitation: Regaining Shoulder Mobility
After 3 weeks, the shoulder sling is removed, and after this, the most common complaint is shoulder pain & shoulder movement restriction. It is due to a condition known as painful arc syndrome.
When you go to your physiotherapist, they will devise a treatment plan to control pain and gain shoulder movement.
Exercise 1: Assisted Shoulder Elevation (Pain-Free Range)

This is the most basic shoulder stiffness exercise that is recommended for every shoulder condition.
- The starting position for this exercise is standing straight with both hands clasped in front of yourself.
- Now, slowly raise your shoulder to the maximum possible point and then lower it down slowly.
- Initially, for a few days, due to pain, you may not be able to raise the shoulder completely, but slowly, each day you need to increase it.
- Do it for a minimum of 15 to 20 repetitions in a single session.
Shoulder rope & pulley exercise

For this exercise, we need a shoulder rope and pulley system. As you can see in the figure, the subject is holding the rope and the pulley is fixed on the roof. Now pull one hand downward so that the other shoulder elevates, and take it to the maximum possible pain-free point.
After reaching the maximum possible point, lower this shoulder and pull the rope downwards so that the other side shoulder elevates. Repeat this alternate shoulder elevation a minimum of 20 times in a single session.

- 𝗙𝗮𝗰𝗶𝗹𝗶𝘁𝗮𝘁𝗲 𝗦𝗵𝗼𝘂𝗹𝗱𝗲𝗿 𝗥𝗲𝗰𝗼𝘃𝗲𝗿𝘆 𝘄𝗶𝘁𝗵 𝗘𝗮𝘀𝗲: Trusted by physical therapists, this shoulder pulley for physical therapy is per…
- 𝗘𝗳𝗳𝗼𝗿𝘁𝗹𝗲𝘀𝘀 𝗗𝗼𝗼𝗿 𝗜𝗻𝘀𝘁𝗮𝗹𝗹𝗮𝘁𝗶𝗼𝗻: The 2mm thick foam-padded door anchor ensures a secure fit that protects your door frame f…
- 𝗥𝗼𝗯𝘂𝘀𝘁 𝗗𝗲𝘀𝗶𝗴𝗻 𝗳𝗼𝗿 𝗦𝗵𝗼𝘂𝗹𝗱𝗲𝗿 𝗧𝗿𝗮𝗶𝗻𝗶𝗻𝗴: Constructed with high-quality nylon rope and a reinforced pulley wheel, this should…
Advanced Shoulder Stiffness Exercises (4-6 Weeks Post-Injury)
Exercises have to be carried out in line with shoulder stiffness exercises. One must make a routine to do the exercise once in the morning and once in the evening. About shoulder stiffness exercises we have already discussed in detail.
- 4 Best Shoulder wand exercises for painful, stiff shoulder
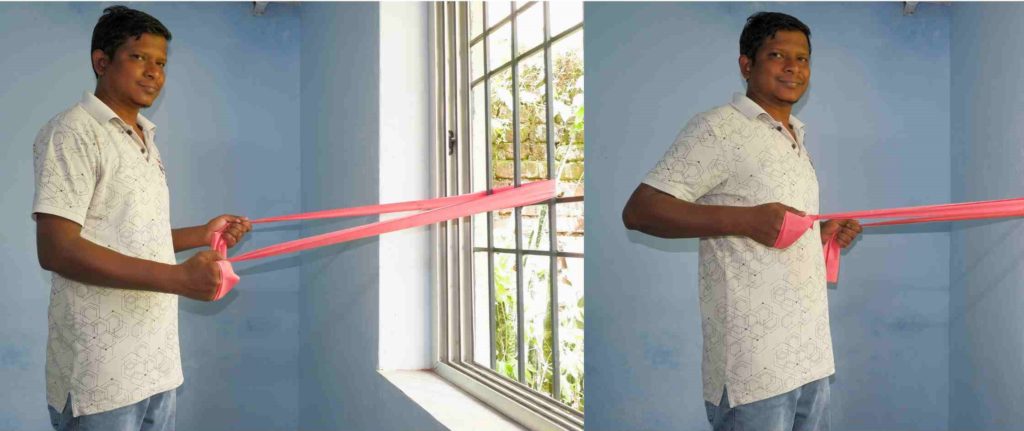
- Do These 5 Easy Band Exercises For Shoulders To Fix Pain Quickly
- How do you loosen tight shoulders?
FAQs About Greater Tuberosity Fracture Rehabilitation
The author is a physiotherapist who has been practising for the last 17 years. He holds a Bachelor's in Physiotherapy (BPT) from SVNIRTAR (Swami Vivekananda National Institute of Rehabilitation and Research), one of the prestigious physiotherapy schools in India.
Whatever he learns dealing with his patient, he shares it with the world through blogs and e-books. He also owns a YouTube channel, "Sunit Physiotherapist" with over 8 lakh active subscribers. Here, he shares everything he gets to learn serving the patient.


Some times it takes more than 6 months
hi still in pain 4 months on
an awesome article i have ever seen on internet medium wave brush
You completely match our expectation and the variety of our information.shoulder physical therapy exercises
In my opinion, top shoulder braces helps supporting the shoulder and helps reducing pain and inflammation, without causing any harm. Have tried it practically.