Last updated on May 8th, 2024 at 01:38 pm
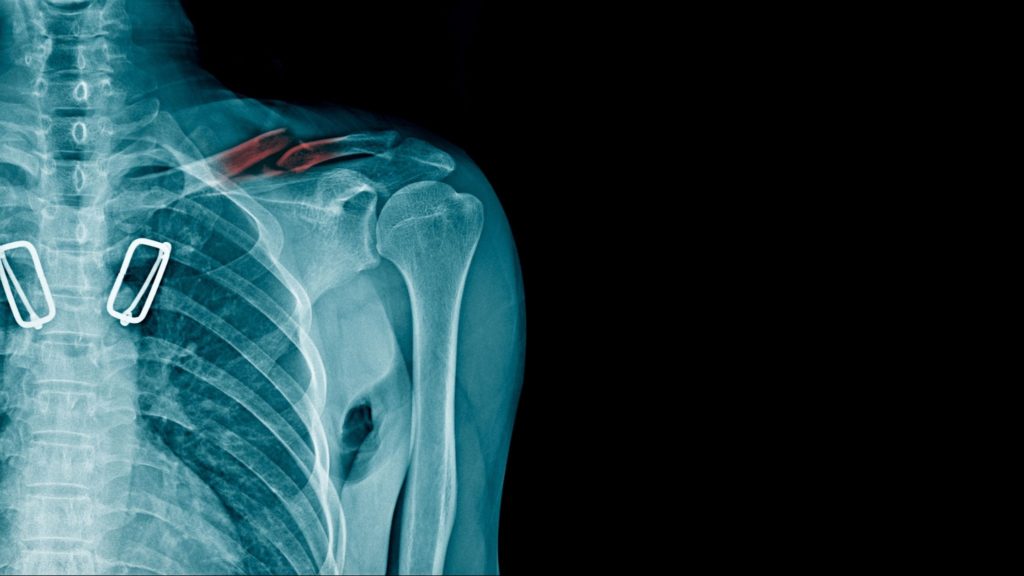
Clavicle fracture is a fracture of the collar bone and is relatively common in all age groups. It most commonly occurs when falling or landing over an outstretched hand. Treatment of a clavicular fracture depends upon whether the fracture is displaced or undisplaced. After the treatment and union of the broken bone, the most common complaint is stiffness and pain in the shoulder joint.
In this article, we will cover the types of clavicular fractures and their possible treatments, clavicle fracture exercises, and physiotherapy.
- Facts about clavicle fracture you should know
- Clavicle fracture rehab protocol
- 1) Week 0 to 4
- 2) Week 4 to 5
- Exe:4) Shoulder Pendulum exercise for clavicle fracture
- Exe:5) Wrist elbow range of motion exercises
- Exe:6) Static shoulder flexor strengthening exercises
- Exe:7) Static shoulder extensor strengthening exercises
- Exe:8) Static shoulder external rotators strengthening exercises
- Exe:9) Static shoulder internal rotators strengthening exercises
- 3) Week 5 to 7
- Week 7 onwards
- Final word
Facts about clavicle fracture you should know
Before we proceed to exercises to perform after the initial medical attention of a broken collarbone, here are some facts about it.
- A study reveals that the largest group of people who suffer from clavicle fractures are young males, making up about 68% of cases2.
- The most affected subgroup is those aged between 15 and 24, accounting for 21% of clavicle fractures.
- Females aged 65 years and above are the largest group who suffer from collarbone fractures.
- The most common cause of clavicle fractures is falling onto an outstretched hand, which causes the lateral fracture segment to move downwards due to the weight of the hand.
- Sometimes, fracture segments may overlap, leading to a shortening of the chest on the affected side.
- Additionally, clavicle fractures may also be associated with sternoclavicular joint dislocation.
Clavicle fracture rehab protocol
Most clavicle fractures do not require surgery and can be treated effectively with non-operative methods. Clavicle bones have a rich blood supply, facilitating fracture healing within 2-3 weeks.
Treatment options include wearing an arm sling, taking pain medication, and using a figure of eight bandages across the shoulders for mid-shaft fractures. These measures usually suffice to promote healing1.
However, in cases where the fracture is displaced, mal-union can occur, resulting in improper alignment, and thickening of the bone may occur over time.
Arm sling immobilisation is done for 4 weeks, during which physiotherapy intervention should start to prevent complications such as joint stiffness, restrictions, and muscle weakness.
We will discuss the rehabilitation protocol for clavicle fracture in a phased manner, depending on the period. Let us start with weeks 0 to 4 when the shoulder is still in the sling.
1) Week 0 to 4
We recommend that you start doing some exercises after one week while still wearing the shoulder sling. This will help prevent stiffness and weakness in your wrist and finger joints due to the extended period of rest.
It is important to begin with gentle exercises and gradually increase the intensity over time.
Exe:1) Grip strengthening exercise
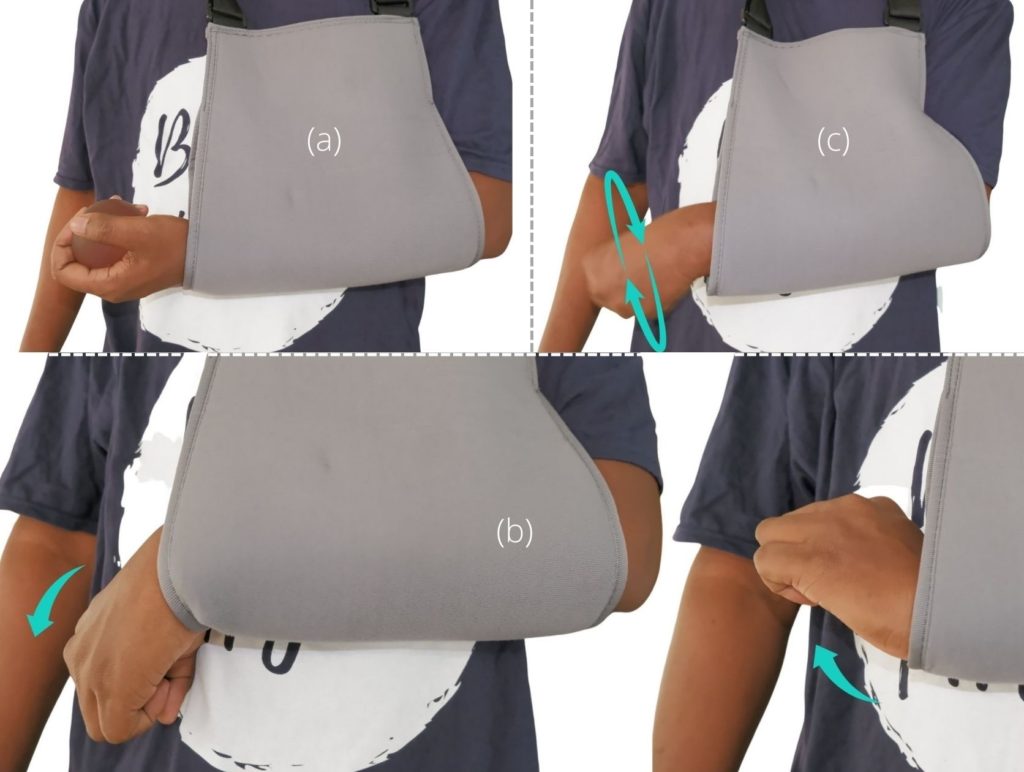
The finger grip exercise is a great way to improve the strength of your fingers and forearms while also boosting blood circulation. During this period, you must exercise with arms supported on the sling.
To perform this exercise (figure ‘a’), you’ll need a gel ball or sponge ball, which are easily available in the market.
- To start, take the ball in your hand and squeeze it as much as possible.
- As you do this, you’ll notice that the muscles in your forearm contract and relax, helping to strengthen your grip.
- You need to do no specific count or set number of repetitions for this exercise. Instead, squeeze the ball as much as you can.
- As you continue to perform this exercise regularly, you’ll notice that your grip strength improves, making it easier to perform everyday tasks that require dexterity and precision.
Exe:2) Wrist flexion-extension exercise for broken collarbone recovery
Moving on to the next exercise, which is the wrist movement exercise (figure ‘b’). This exercise can easily be done even if you are wearing a sling. All you need to do is:
- Slowly move your wrist downwards in a motion called flexion.
- Then, slowly raise your wrist and extend it.
- Repeat this motion by alternating between flexion and extension as much as possible while sitting at home.
- The wrist movement exercise helps contract and relax the surrounding muscles, improve blood circulation, and reduce stiffness.
Exe:3) Wrist circumduction
After completing the previous exercises, you can also perform the circumduction motion to further strengthen your wrist joint(figure ‘c’). This exercise involves rotating the wrist joint in a circular motion, which can be done in both clockwise and anti-clockwise directions.To perform this exercise:
- Begin your arm supported in the arm sling, and start rotating your wrist joint in a circular motion.
- Gradually increasing the size of the circle.
- You can do this for about 10 to 15 repetitions in each direction.
- Remember to keep your arm still while performing this exercise and focus on rotating only your wrist joint.
- This exercise can help improve the flexibility and range of motion of your wrist joint, making it a great addition to your wrist strengthening routine.
- To achieve maximum benefits, try performing this exercise regularly and gradually increasing the number of repetitions. With consistent practice, you will notice an improvement in the strength and flexibility of your wrist joint.
2) Week 4 to 5
After four weeks of wearing a shoulder sling, it’s time to start some exercises. If we divide the exercise routine according to the time frame, you have to do these exercises for a week after the sling is removed.
To begin with, the first exercise is the shoulder pendulum exercise.
Exe:4) Shoulder Pendulum exercise for clavicle fracture
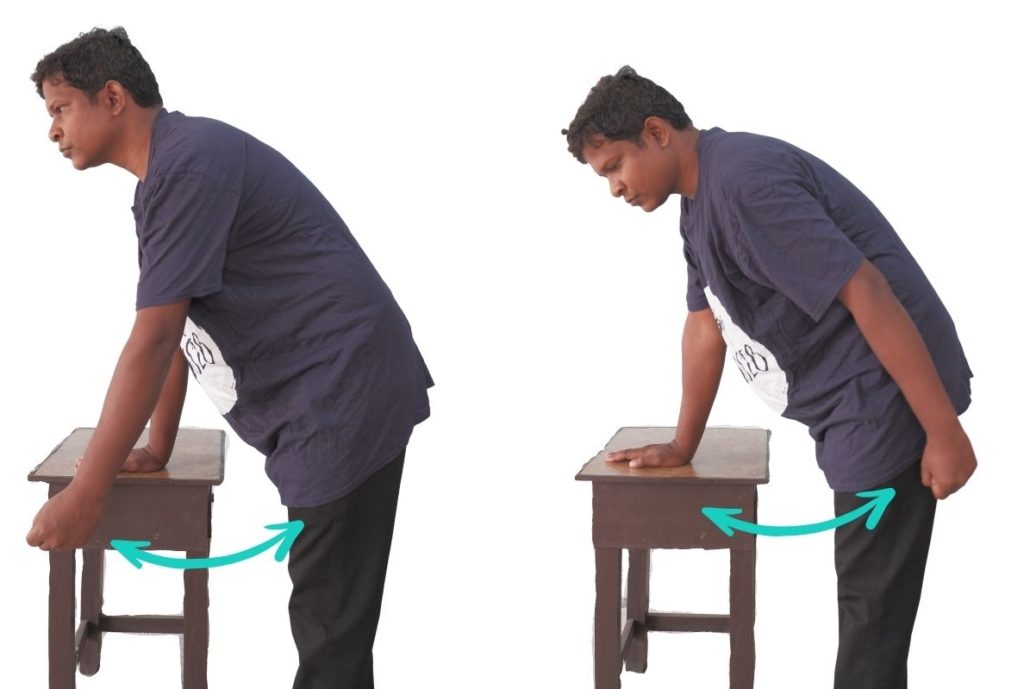
Step-by-step guide to the shoulder pendulum exercise:
- Stand before a table and lean your body on it for support. Position yourself so that your arm can swing freely like a pendulum.
- Swing your arm back and forth quickly, staying within a pain-free range. There is no specific count; swing your arm as much as possible.
- After swinging back and forth, rotate your arm in a circular motion. Rotate in both directions- clockwise and anti-clockwise.
- Continue this exercise for the first two to three days.
- Gradually progress by holding a water bottle or a lightweight dumbbell.
- Hold the weight in your hand and perform 20-25 circles in each direction.
- This exercise will help loosen up shoulder restrictions and improve mobility.
Exe:5) Wrist elbow range of motion exercises
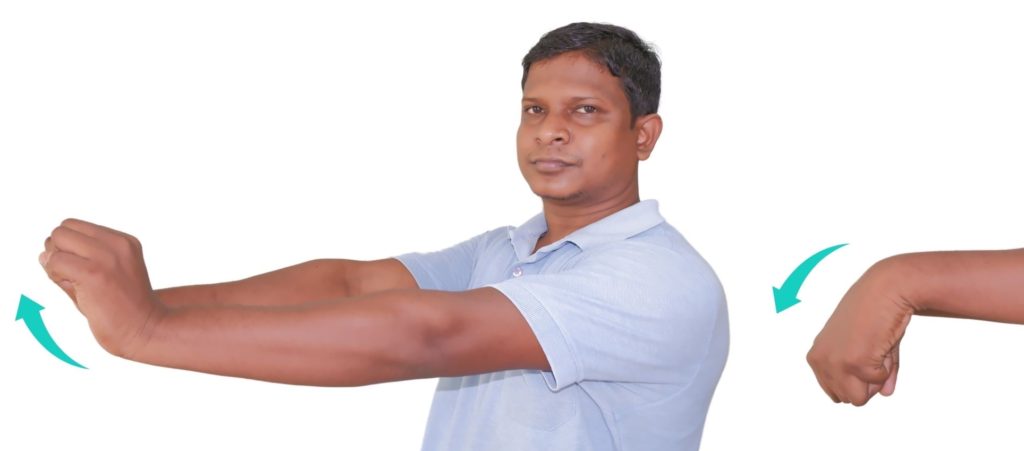
To take care of your wrist, there is a helpful exercise you can do.
- Hold your arm out in front of you, with your palm facing down.
- Gently move your wrist downwards into flexion.
- Hold this position for a few seconds, then move the wrist slowly upward in extension.
- Repeat this wrist flexion and extension motion alternately and smoothly. By doing these exercises regularly, you can improve the health and mobility of your elbow joint and wrist.
Exe:6) Static shoulder flexor strengthening exercises
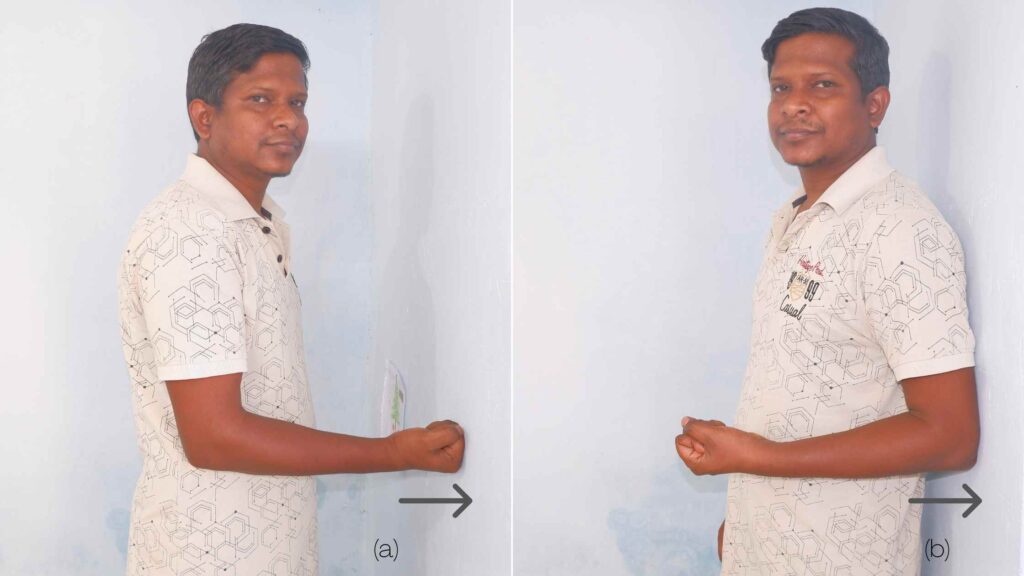
The static shoulder flexor strengthening exercise is an effective way to strengthen the muscles around the shoulder joint without causing any motion in the shoulder. To perform this exercise:
- Stand in front of a wall, make a fist with your hand, and place it against the wall, with your elbow slightly bent (figure ‘a’).
- Next, push your fist into the wall as hard as you can, using your shoulder muscles to generate the force.
- Hold this position for 5 seconds, counting slowly to yourself. Then, relax your muscles and release the pressure on the wall.
- Repeat this process for a minimum of 10 repetitions, taking a short break between each one if needed.
- As you progress, you can increase the duration of each hold or the number of repetitions to continue challenging your muscles and building strength.
Exe:7) Static shoulder extensor strengthening exercises
To perform the exercise for the extensor muscles:
- Begin by standing next to the wall, with your back facing the wall. Ensure your feet are shoulder-width apart and your back is straight (figure ‘b’).
- Next, flex your elbow to 90 degrees and place your arm flat against the wall, with your fingers pointing upwards.
- Now, push your arm back against the wall as if trying to take the wall away from you.
- Hold this position for 5 seconds, keeping your arm straight and your shoulder blades down. To make it easier, count 1, 2, 3, 4, 5 in your head.
- After 5 seconds, relax your arm.
- Repeat this movement, pushing your arm back against the wall for another 5 seconds. Then, relax again and repeat this process for a minimum of 10 repetitions.
Exe:8) Static shoulder external rotators strengthening exercises

To perform the shoulder external rotator strengthening exercise:
- Stand sideways against the arm with your arm bent at a 90-degree angle and your elbow at your side (figure ‘b’).
- Keep your forearm against the wall and rotate your shoulder away from your body, pushing your hand into the wall.
- Hold this position for five seconds, counting to five slowly (one-one-thousand, two-one-thousand, three-one-thousand, four-one-thousand, five-one-thousand), then relax.
- Repeat this process three times, holding the position for five seconds each time and relaxing in between.
- This exercise is excellent for strengthening the muscles that rotate your shoulder outward.
Exe:9) Static shoulder internal rotators strengthening exercises
To perform the static shoulder internal rotation exercise, please follow these steps:
- Stand upright and face a wall, keeping an arm’s length distance from it (figure ‘a’).
- Place your forearm against the wall at a 90-degree angle with your elbow close to your side.
- Now, rotate your shoulder internally, bringing your hand towards your stomach without moving your elbow away from your side.
- Hold this position for at least five seconds, counting in your head or using a stopwatch if you have one.
- After five seconds, relax your arm.
- Repeat this rotation and hold it for five seconds, then relax three more times for four repetitions.
- Keep your shoulder blade down and back as you perform the exercise, and avoid shrugging your shoulders.
3) Week 5 to 7
These were the exercises for weeks 4 to 5 after removing the shoulder sling. From week 5 to week 7, we will focus on the range-of-motion exercises for the shoulder joint. It is simple, so first, we will start with a finger walking exercise.
Exe:10) Finger walking exercise
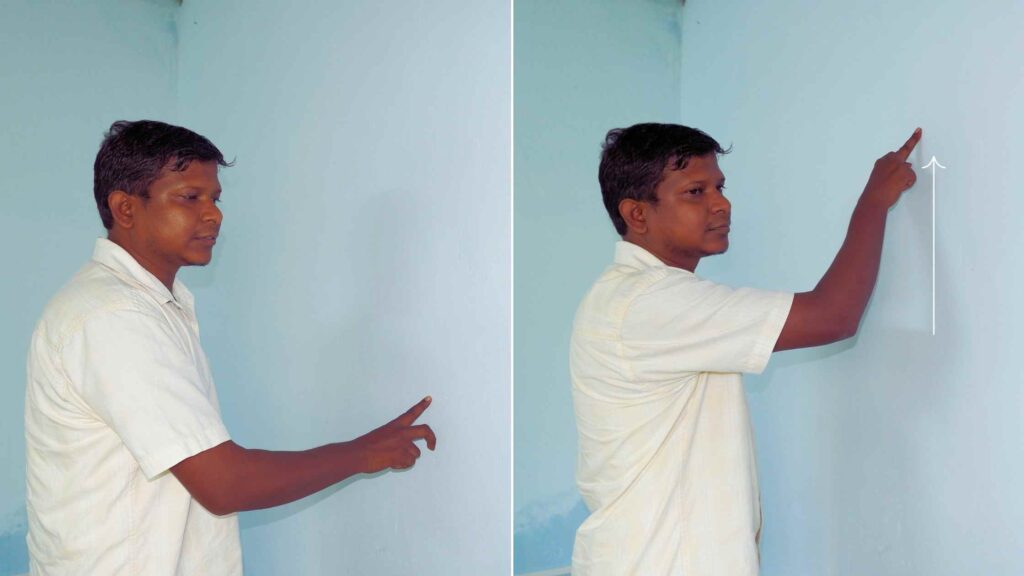
To perform the finger-walking exercise:
- Stand facing a wall with your arms at your sides. Place your fingertips on the wall at about shoulder height.
- Slowly walk your fingers up the wall as far as you comfortably can, keeping your feet planted firmly on the ground.
- Once you have reached your maximum height, hold that position for a few seconds, feeling the stretch in your arms and shoulders.
- Then, slowly walk your fingers back down to the starting position.
- As you continue this exercise, try to increase the height you reach each time, little by little.
- You can track your progress by marking the height on the wall each time you reach a new level.
- The finger-walking exercise is a great way to improve shoulder and arm flexibility. It can be done as often as you like.
Exe:11) Shoulder flexion-extension cane exercises
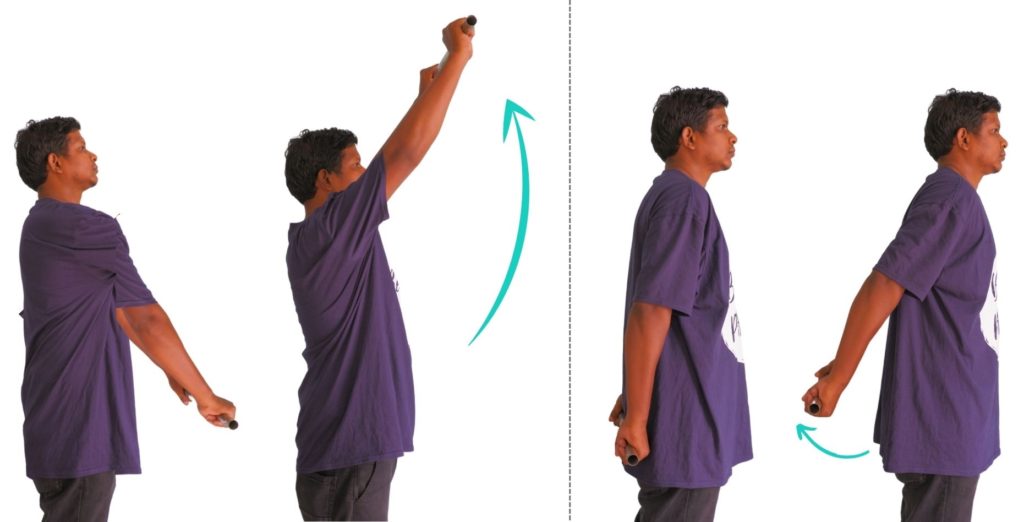
This shoulder exercise involves holding a wand or broomstick with both hands. There are other shoulder wand exercises, but let’s start with flexion and extension.
- Stand straight and hold the cane or wand at shoulder level, parallel to the ground.
- Next, slowly raise the cane above the head, keeping the arms straight.
- Hold for 2-5 seconds and slowly lower the cane.
- Repeat this for a minimum of 10-20 repetitions in a session.
Next is the shoulder extension exercise with a cane, which is intended to stretch the anterior portion of the shoulder muscles. To perform the exercise:
- Start by holding a cane from behind your body with your palms facing upwards.
- Slowly extend the cane upwards and backward until you feel a stretch in the anterior portion of your shoulder.
- Hold this position for 5 to 10 seconds, then release and repeat.
- Performing at least 10 to 20 repetitions in a single session is recommended. However, beginners should start with fewer repetitions and gradually increase the number as they become more comfortable with the exercise.
Exe:12) Shoulder Shrug Exercise
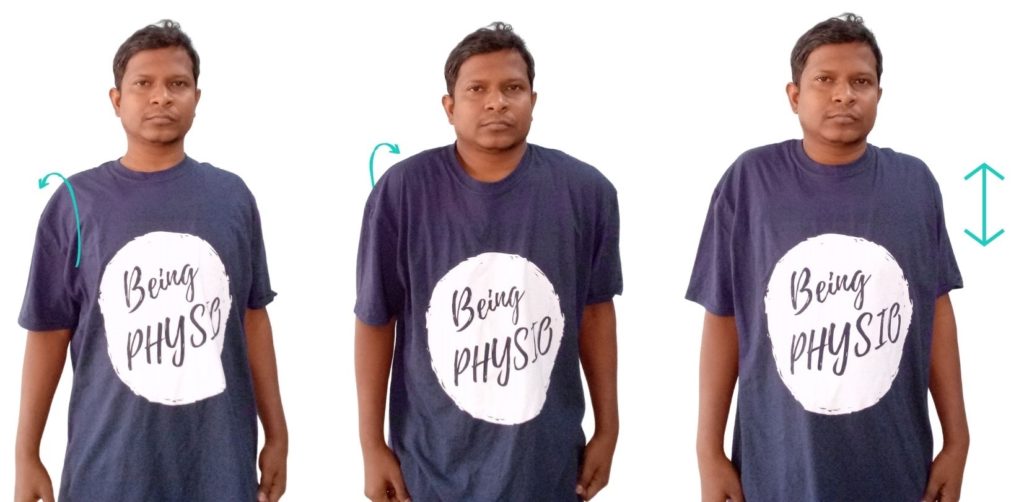
- Keep the hand by the side of your body. Slowly lift both shoulders upwards and hold for 1-2 seconds.
- Slowly lower the shoulders to the resting position.
- Repeat the exercise by forward rotation and backward rotation.
- 10-20 reps or until fatigue.
Exe:13) Internal Rotation – Standing
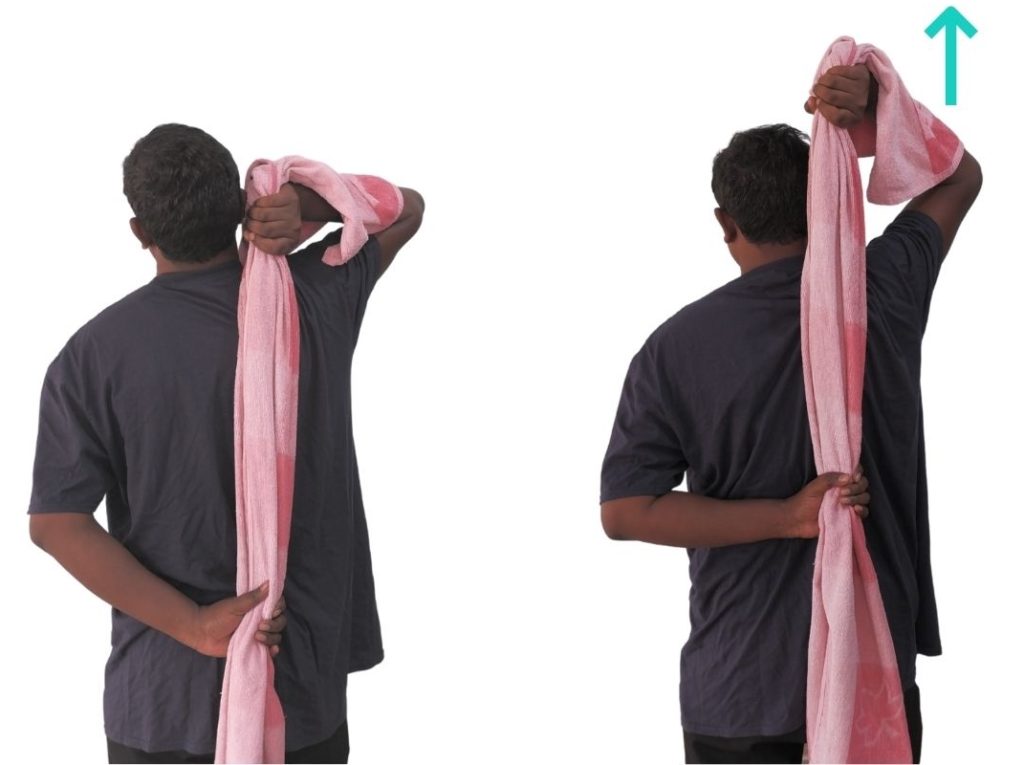
It’s important to approach this exercise with caution since it has the potential to worsen an already inflamed frozen shoulder. To get started:
- Stand with your feet shoulder-width apart and hold a towel behind your back with the hand of the affected arm. Using your other hand, grasp the end of the towel in the front.
- Now, gently pull the towel with your unaffected (front) arm downward and forward.
- This motion will gently stretch the affected shoulder muscles, so it’s essential to keep them relaxed and allow them to follow the upward motion of the towel slowly.
- Hold this position for 5 sec and then release the tension.
- Repeat the same process for 4 to 5 seconds.
Exe:14) Internal Rotation – Lying on the Side
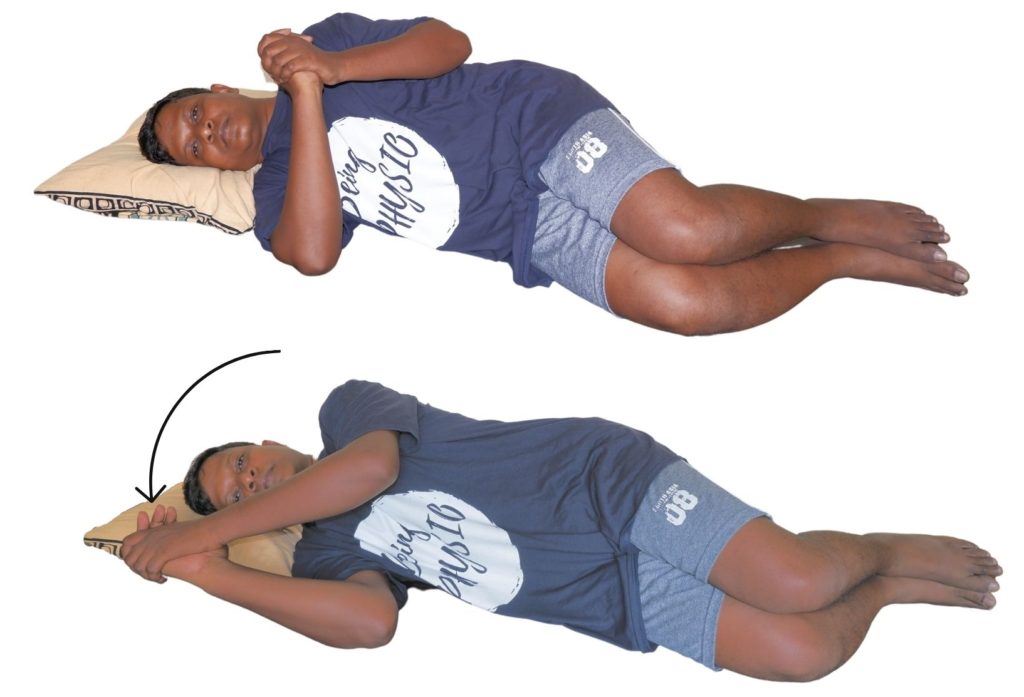
- Lie on your side, with the affected shoulder side down.
- If this position causes pain, discontinue this exercise. If discomfort is felt, proceed with caution.
- The affected shoulder should be abducted and flat against the floor. The elbow should be bent to 90°, perpendicular to the floor.
- Place the unaffected hand on the affected forearm and apply gentle downward pressure, slowly forcing the forearm to the floor.
- Hold that position – or however far the affected arm can move without pain – for 10-30 seconds.
- Repeat 5-10 times. Beginners should start slowly
Week 7 onwards
After the seventh week onwards, you can shift to more aggressive exercises. One of the exercises I recommend is the one with the resistance band. A resistance band is made of rubber and gives resistive force during exercises, and we can do several useful exercises using this.
Please check this article Do These 5 Easy Band Exercises For Shoulders To Fix Pain Quickly for a detailed description of all the exercises you can progress with.
Final word
As you can perform all these exercises with ease, you can proceed to more vigorous strengthening exercises like shoulder strengthening exercise using a resistance band. Shoulder stiffness takes some time to improve. Do not lose hope when it takes a longer period, just continue exercising under the guidance of your physiotherapist.
The author is a physiotherapist who has been practising for the last 17 years. He holds a Bachelor's in Physiotherapy (BPT) from SVNIRTAR (Swami Vivekananda National Institute of Rehabilitation and Research), one of the prestigious physiotherapy schools in India.
Whatever he learns dealing with his patient, he shares it with the world through blogs and e-books. He also owns a YouTube channel, "Sunit Physiotherapist" with over 8 lakh active subscribers. Here, he shares everything he gets to learn serving the patient.



Reliable Exchange Bitcoin To Bank Account instantly, Wire transfer bitcoin to checking account US bank of america chase wells fargo, PNC TD HSBC Indian Bank
Excellent and very exciting site. Love to watch. Keep Rocking. north york physiotherapy clinic
Are You looking Polo shirts
.
best Polo shirts When looking for the best yachting Polo shirts in 2017,
comfort should be one of the most important considerations. After all,
you would surely not want to be in a
situation wherein you would want to immediately get rid of your shirt because of the comfort that it provides.
luxurious organic bamboo sheets
luxurious bamboo sheets
100% bamboo bed sheets
silky bamboo sheets
with Deep Pockets 300 Thread Count per square inch are most likely the silkiest and softest sheets.
Exkash.org offers automatic and honest Bitcoin Exchange services worldwide.
Exkash.org is one of the best bitcoin exchanges in USA that is
mostly suggested and recommended by all bitcoin users. Sell more detail bitcoin nigerian
Exkash.org offers automatic and honest Bitcoin Exchange services worldwide.
Exkash.org is one of the best bitcoin exchanges in USA that is
mostly suggested and recommended by all bitcoin users. Sell more detail bitcoin american
Bitcoin Exchange
Amazon Product SEO is as yet essential, you ought to likewise be actualizing At your showcasing collection.
Before we get into the particular things you can do to rank higher on Amazon, it’s vital for you to comprehend the objective of amazon change rates. In the event that you’re posting will get Amazon more deals.That Will Exhibit To Amazon That Your Item Will Really Offer Once It Is Seen.