Last updated on March 24th, 2025 at 12:02 pm
- Iliotibial Band Syndrome (ITBS) is a common injury among runners and athletes.
- It occurs when the iliotibial band, a thick band of fascia that runs along the outside of the thigh, becomes tight and inflamed.
- ITBS can cause pain and discomfort in the knee and hip, making running or performing other physical activities difficult.
- Exercise is essential to treating and preventing ITBS, as it helps to stretch and strengthen the muscles around the affected area.
- Many different exercises can be done to help alleviate the symptoms of ITBS and prevent it from recurring in the future.
Iliotibial band syndrome, or IT band syndrome, commonly affects professionals involved in intense physical activity, like athletes, military personnel and cyclists. An example of such activity is sports, like playing hockey.
If you read this article all the way through, you’ll gain an understanding of how having a continuously flexed posture and incorrect biomechanics can lead to IT band friction syndrome.
Additionally, you’ll learn about 8 powerful IT band stretches that can help you manage this condition effectively and permanently. Let’s begin our discussion by defining what IT band friction syndrome is.
Where is IT band pain felt?
The iliotibial band syndrome is the primary cause of lateral knee pain in runners and accounts for nearly 12% of all running-related injuries. IT band pain can be caused by numerous factors, such as increased mileage, training on uneven surfaces, excessive pronation, and hip abductor weakness1.
I recently started working as a physiotherapist at one of the premier hockey academies in our city. One of the most common complaints I receive from players is pain on the outer side of their knee.
They describe the pain as sharp and intermittent, and it tends to worsen with activities that involve frequent knee flexion and extension. Some common symptoms of this type of pain include:
- Pain on the lateral side of the knee.
- Pain increases with activities involving knee flexion and extension.
- Tenderness.
- Snapping of the IT band.
- Overstress positive.
What is iliotibial band friction syndrome & its causes
IT band syndrome is a condition that causes pain on the outer side of the knee joint. It happens due to inflammation of the iliotibial band, which is a band of tissue that runs from the hip to the knee. This inflammation occurs when the iliotibial band rubs against the outer part of the thigh bone repeatedly.
The pain is typically felt on the outside of the knee and can be quite uncomfortable. To understand this condition better, we need to learn more about its causes and symptoms.
- What iliotibial band is?
- How it’s subjected to continuous friction?
Let us go deep into it by discussing the relevant anatomy of the iliotibial band.
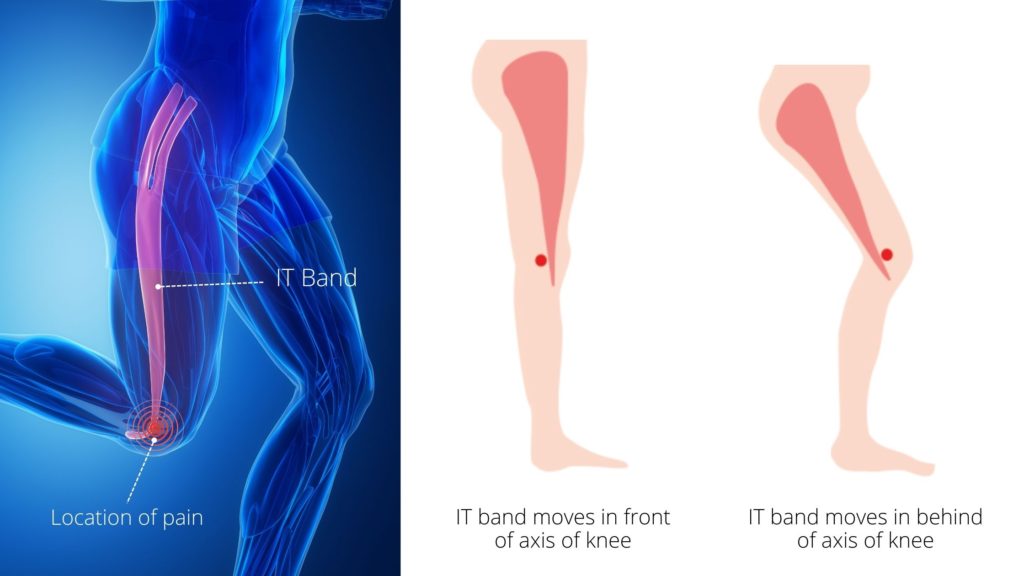
The iliotibial band or iliotibial tract is actually a thick band of fibrous tissue. It starts at the level of the greater trochanter of the femur and runs from the lateral hip to the lateral knee and can become irritated due to friction when the band crosses over the lateral femoral condyle, mainly during 30° of flexion1.
When the knee is fully straight (terminal knee extension), the IT band moves in front of the axis of the knee (axis of knee flexion and extension). This helps to maintain the knee in an extended position. But when the knee flexes to 30 degrees or more, the IT band moves backwards to the axis.
It is particularly in action when we are standing in a half-squat position. In half-squat standing, the knee is slightly flexed while bearing the weight of the body. In this position, the IT band is the only structure that maintains the position against
During flexion and extension of the
Another leading cause is muscle imbalances. This imbalance is caused because the quadriceps and hamstrings contract so frequently during running that the gluteus medius becomes weak. Because running occurs primarily in the sagittal plane, the muscles that work in the frontal plane (hip abductors) are not strengthened during normal running activity.
This leads to a muscle weakness seen within the hip abductors primarily the gluteus medius in runners. The gluteus medius has to exert a force 3 times the body weight in order to counteract the movement of the pelvis to maintain alignment1.
Other common conditions that can result in IT band friction syndrome are:
- Tight IT band.
- Limb length discrepancy: when the two legs are not of the same length, this problem may arise on the shorter side.
- Abnormal biomechanics with cavus foot, forefoot valgus, etc.
- Running on uneven ground with the affected limb down the heel.
As I just mentioned, the most common pain I deal with at our hockey academy is iliotibial band syndrome, now, we can explain the cause behind it. It is due to their body posture during the play.
Most of the time these players have to drag the ball with the stick in a semi-squat position. Semi-squat position means more stress on the IT band and its inflammation and pain.
8 powerful IT Bands Stretch & other exercises
Physiotherapy in conjunction with exercises gives better results for such pain. Physiotherapy is aimed at relieving the local symptoms of pain and inflammation by the use of Ultrasonic therapy and rest from precipitating factors.
For long-term treatment, we need to find out the causative factor and manage that factor accordingly2.
- Limb length discrepancy- in the case of limb length discrepancy, compensation is done by increasing the height of the sole on the shorter side.
- Foot deformity- managing foot deformities like flat foot, valgus foot and other foot deformities is important for long-term management of IT band pain. For example, a shoe insert for a flat foot works well in managing it.
- Stretching of the IT band.
#1 Upper trunk rotation to stretch the tight IT band
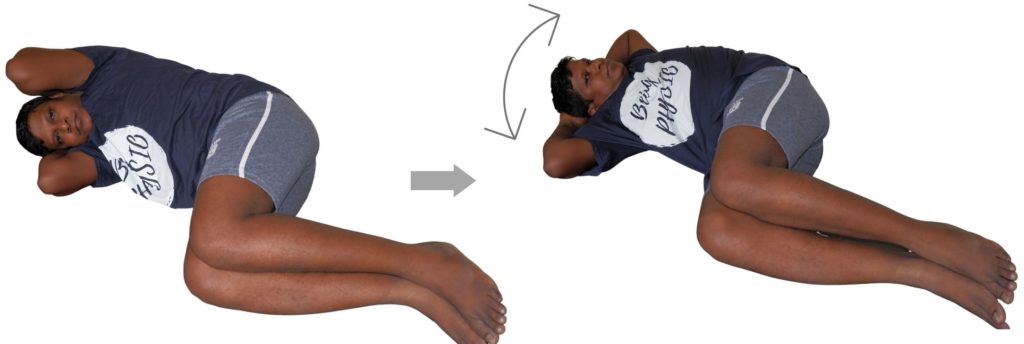
This is our first IT band stretch exercise. To perform the IT band stretch exercise, you’ll need to start by lying on your side with the affected leg on top. For example, if you’re experiencing pain on your left side, you’ll want to lie on your right side.
- Once in the side-lying position, keep your knee and hip in a fixed position, and place your hands behind your neck.
- Now, slowly rotate your shoulder and trunk towards the ceiling, keeping your back straight and your head aligned with your spine.
- Hold this position for a few seconds before slowly rotating back to your starting position.
- Repeat this movement 10-15 times, focusing on your breathing, and keeping your movements slow and controlled.
- If you’re experiencing pain on both sides, you can repeat this exercise on the other side by lying on your left side and performing the same movements.
#2 Lower trunk rotation IT bands stretch exercise
Our next exercise is also a stretching exercise by rotation of the lower trunk. For this exercise, you will start by lying on your side with your lower leg slightly bent and your upper leg straight out in line with your hip.
Your upper arm can be bent and placed in front of your body to support yourself.
- Now, in this position, you will move your upper thigh forward and backward without moving your lower thigh or upper trunk.
- This movement should be slow and controlled, with a focus on using your thigh muscles to guide the movement.
- You should repeat this procedure 10 to 15 times in a single session, taking breaks as needed.
- If you experience pain on both sides, you can repeat the same procedure on the right side by lying on your left side.
#3 Hip external rotation
Once again for this hip external rotation exercise, the starting position will be a side-lying position. So let me repeat it: if you need to exercise on the left side, then lie on the right side to keep the left side on the top. Bend both hip and knee, keeping the feet together.
So this is the starting position, in this position simply you have to raise your upper knee without losing contact with the foot. As you can see in the figure I have lifted the knee and my foot is still together.
Now, bring back to the normal position and repeat this process 10 to 15 times in a single session. Repeat this whole procedure on the other side as well if you have pain on the other side.
#4 Isometric hip adduction
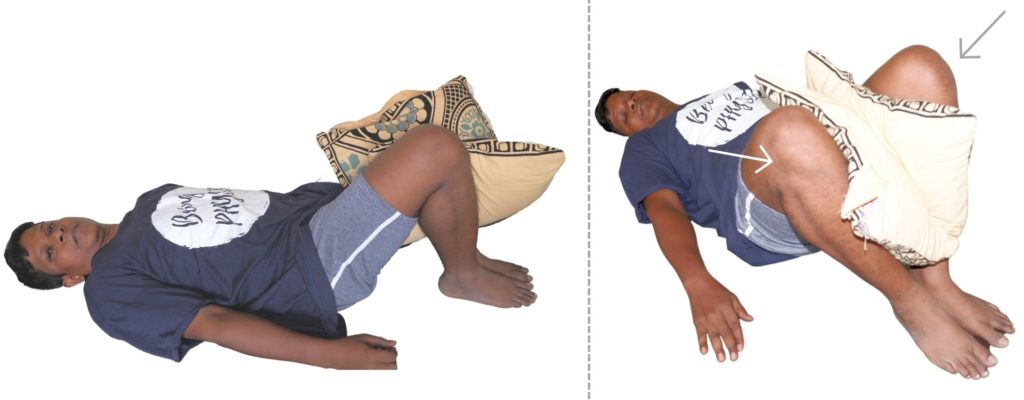
This exercise is a great way to strengthen the muscles on the inner side of the thigh, also known as the adductors of the hip joint. To properly perform this exercise:
- You should start by lying straight on your back in a supine position. Next, bend your knee at a 90-degree angle and keep your foot flat on the bed.
- To target your adductor muscles, place a layer of two pillows between your thighs. If you don’t have two pillows, you can also fold a single pillow and place it between your thighs.
- Once the pillows are in place, slowly press them together using your inner thigh muscles.
- Hold this position for 5 seconds, counting slowly from 1 to 5, and then release the pressure and relax.
- Repeat this process of pressing and holding the pillows for 5 seconds and then releasing and relaxing for 10 to 15 repetitions. This will help to strengthen your adductor muscles, which can be especially beneficial for athletes and anyone who wants to improve their lower body strength and stability.
#5 Half squatting
A very simple yet very effective exercise for Iliotibial band syndrome pain sufferers. The half squatting exercise is a great way to build strength in your lower body and improve your overall fitness.
- To perform this exercise, start by standing up straight with your feet shoulder-width apart and your arms by your sides.
- Then, slowly lower your body into a squatting position, keeping your back straight and your knees over your toes. Make sure that you only go halfway down so your thighs are parallel to the ground.
- Once you have reached the halfway point, pause for a moment and then push back up to a standing position.
- Repeat this movement for 10 to 15 repetitions, or as many as you can comfortably do.
- If you find this exercise too challenging at first, you can modify it by standing with your back against a wall.
Lean back against the wall and then perform the half-squatting exercise as described above. This will help support your body weight and make the exercise easier to perform.
Once you feel comfortable with this modified version, you can try the regular half-squatting exercise again.
#6 Prone opposite hand, leg raise exercise for hip & IT band pain
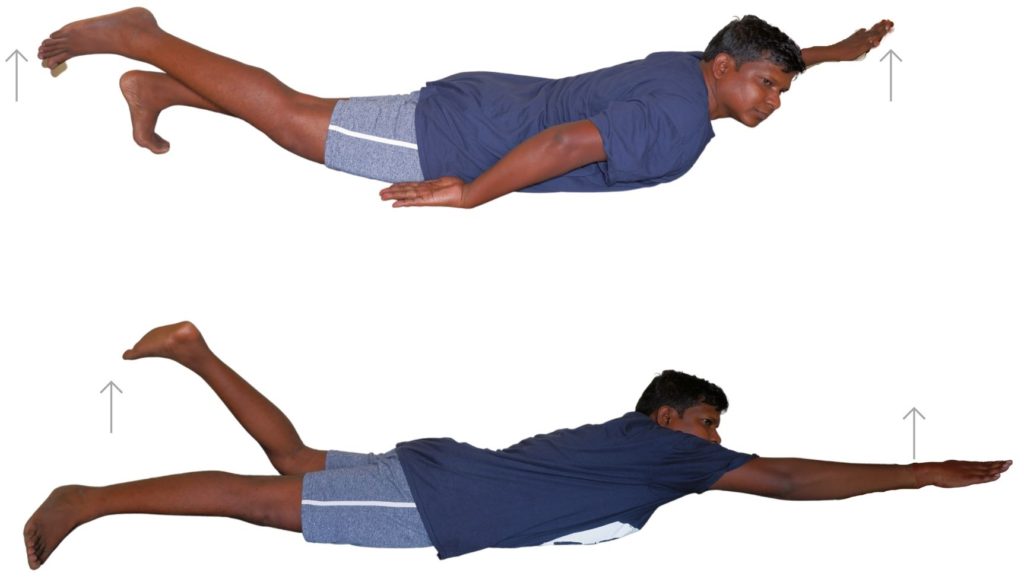
For this exercise, you need to lie down on your tummy flat on the floor. This position is known as the phone lying position. It should be your starting position. Make sure that your legs and arms are straight and your palms are facing downwards.
- Once you are in this position, you must raise one hand and one opposite leg simultaneously. For example, if you raise your left hand, you must raise your right leg simultaneously. While doing so, you must ensure that your hand and leg are completely straight while doing so.
- Raise them as high as possible and hold this position for 5 seconds.
- After holding for 5 seconds, you need to slowly lower your hand and leg down and return to the relaxed position.
- Repeat this process for 10 repetitions.
- Next, you need to follow the same exact procedure on the other side. That is, you need to raise your right hand straight and left leg straight simultaneously.
- Hold this position for 5 seconds and then slowly relax.
- Repeat this for 10 times in a single session.Make sure that you are not straining your neck while performing this exercise. Keep your head in a neutral position.
#7 Side-lying abduction
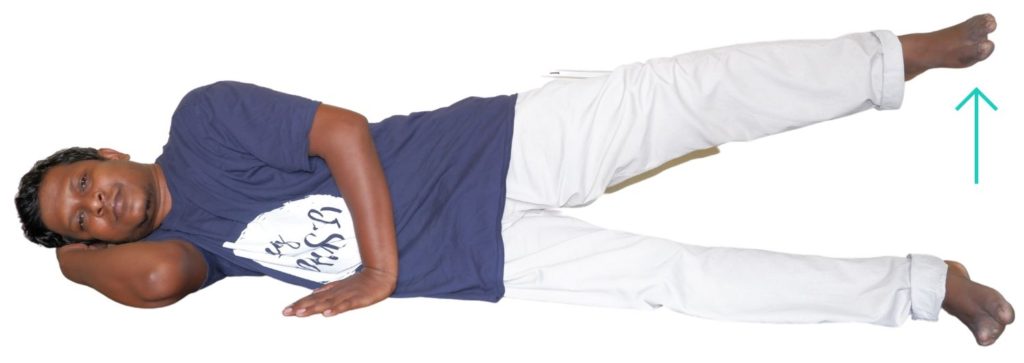
- To perform this exercise, start by lying down on your side. If you want to exercise your left side, lie down on your right side so that your left leg is on top. Keep your legs straight and stack them on top of each other.
- Next, raise your top leg (in this case, your left leg) to an angle of 30 degrees. Do not lift it too high; you want to maintain control throughout the exercise.
- Hold your leg in this position for 5 seconds before lowering it back to the starting position.
- Repeat this movement for a minimum of 10 times in a single session. You can take a short break in between if you need to, but try to keep the breaks brief so that you can maintain your momentum.
- To exercise your right leg, switch sides. Lie down on your left side so that your right leg is on top.
- Again, raise your top leg straight up to a 30-degree angle and hold it for 5 seconds.
- Lower it back down to the starting position and repeat for a minimum of 10 times in a single session.
#8 Lateral step down
This exercise is a great way to strengthen your legs and improve your balance.
- To begin, find a set of stairs and stand beside them, ensuring the steps are positioned to the side of your body. For example, if you want to exercise your left leg, stand on the left side of the steps.
- Next, place your left foot on the first step and use your leg muscles to lift yourself up onto the step.
- Once fully standing on your left foot, slowly lower yourself back to the starting position.
- Repeat this movement 10 to 15 times.
- Switch to the other side after completing the desired number of repetitions on your left leg.
- Stand on the right side of the steps and place your right foot on the first step.
- Use your leg muscles to lift yourself up onto the step, stand fully on your right foot, and then lower yourself back down to the starting position.
- Repeat this movement 10 to 15 times. It’s important to maintain proper form throughout the exercise to avoid injury.
Final word
There are many other reasons for pain on the outer side of the knee. One needs to take into account all the above-mentioned factors, proper diagnosis and then make a final conclusion about the pain.
Keep Reading: 6 Exercises to Strengthen Feet and Ankle to Enhance Mobility, Stability
The author is a physiotherapist who has been practising for the last 17 years. He holds a Bachelor's in Physiotherapy (BPT) from SVNIRTAR (Swami Vivekananda National Institute of Rehabilitation and Research), one of the prestigious physiotherapy schools in India.
Whatever he learns dealing with his patient, he shares it with the world through blogs and e-books. He also owns a YouTube channel, "Sunit Physiotherapist" with over 8 lakh active subscribers. Here, he shares everything he gets to learn serving the patient.


Nice post, Thank you for sharing valuable information. I enjoyed reading this post. The whole blog is very nice found some good stuff and good information here Thanks for sharing…Also visit my page.
Premium Folding Wheelchair