Last Updated on January 23, 2026 by Sunit. S. Ekka
- Definition: Flattening/reversal of the neck’s natural C-curve
- Causes: Poor posture (“text neck”), injuries, disc degeneration
- Symptoms: Neck pain, stiffness, headaches, arm tingling
- Treatments: Physical therapy, pain meds, surgery (rare)
- Prevention: Posture awareness, neck exercises, ergonomic setup
What Does Reverse Cervical Lordosis Mean?
Reverse cervical lordosis means your neck’s natural C-shaped curve (called “cervical lordosis”) flattens or bends backward.
Usually, our cervical spine is not aligned straight; there’s a curvature in the spine called cervical lordosis1, which is higher in males than females in normal individuals3.
Normally, this curve acts like a spring to absorb shock—but when reversed, it can cause pain and stiffness. Studies show 70-75% of young neck pain patients have this condition2.

Common Signs of Reverse Cervical Lordosis
- Chronic neck stiffness (especially after sleeping)
- Tension headaches at the skull base
- Arm/hand tingling (from nerve pressure)
- Reduced neck mobility when turning
This condition is often linked to disc herniation, but most cases improve with exercises. See How to Fix It for proven methods.
- What Does Reverse Cervical Lordosis Mean?
- Can the reversal of cervical lordosis be corrected?
- 6 Best Exercises to Restore Cervical Lordosis
- #1 Neck stretching exercise for loss of cervical lordosis treatment
- #2 Neck side bending for reverse of cervical lordosis
- #3 Neck rotation for loss of cervical lordosis treatment
- #4 Neck flexion-extension exercises to restore cervical curve
- #5 Chin tuck exercise to fix straightening of the cervical lordosis
- #6 Towel roll exercise to restore cervical curve
- Lifestyle Adjustments to Support Recovery
Can the reversal of cervical lordosis be corrected?
Yes—in most cases, you can restore your neck’s natural curve through exercises, posture fixes, and lifestyle changes. Studies show that 85% of young patients with loss of cervical lordosis saw improvement after targeted exercises5.
3 Key Steps to Recovery:
- Exercises: Strengthen neck muscles and improve flexibility (6 proven moves below).
- Posture Habits: Fix desk ergonomics and sleep positions.
- Consistency: Daily practice for 4–6 weeks is critical.
The exercises we are going to learn are aimed at increasing the flexibility of the cervical spine and strengthening the muscles around the neck to hold the correct position.
Start with the #1 exercise (neck stretches) below—or jump to sleep tips if pain wakes you up at night.
6 Best Exercises to Restore Cervical Lordosis
#1 Neck stretching exercise for loss of cervical lordosis treatment
Whenever we have a loss of cervical lordosis, the muscles around our neck get tight, and stiffness occurs. This can cause discomfort and even pain. So we need to relax those muscles, and stretching exercises can be very beneficial in this regard.
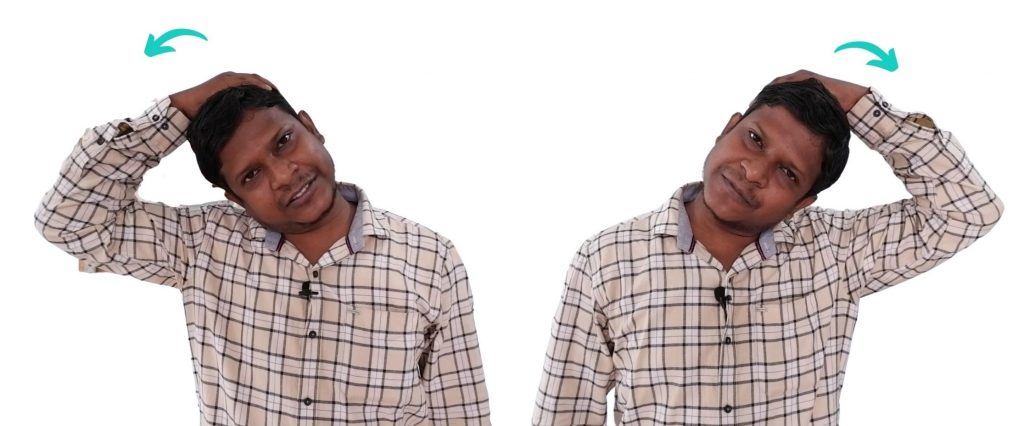
One simple stretching exercise that can help is to stretch the left side neck muscles.
- To do this, place your right hand just above your left ear, over the temple area.
- Now, using your right hand, gently pull your head towards the right side direction. You should feel a comfortable stretch in your left neck muscles.
- Hold this position for at least 30 seconds to a minute. You may feel a gentle stretching sensation, but it should never be painful. If you feel any discomfort, ease off the stretch slightly until you feel comfortable again.
- Once you’ve held the stretch for the recommended time, release it and let your head relax.
- Then, in the same way, you will use your left hand to stretch the muscles of the right side. Place your left hand in the temple area and gently pull your head towards the left side, until you feel a comfortable stretching sensation in your right neck muscles.
- Again, hold this position for at least thirty seconds to one minute.
- After the recommended time, release the stretch and let your head relax.
#2 Neck side bending for reverse of cervical lordosis

As we discussed earlier, neck mobility exercises are crucial in reversing cervical lordosis. Our next neck mobility exercise is the neck side bending exercise.
This exercise is quite simple and easy to perform, but it can help you significantly improve your neck mobility and flexibility.
- To perform this exercise correctly, you should start by sitting or standing straight with your head in a neutral position.
- Then, slowly bend your neck to the left side, as far as you can comfortably.
- Hold this position for 2-3 seconds, then return your neck to the neutral position.
- Next, bend your neck to the opposite side, i.e., to the right side, and hold it for 2-3 seconds.
- Bring your neck back to the neutral position, and repeat the process at least 10 times on each side. This means that you will be performing a total of 20 repetitions in each session.
#3 Neck rotation for loss of cervical lordosis treatment

The next exercise is neck rotation, which helps in improving the mobility of your neck.
- To perform this exercise, you should start in a comfortable sitting or standing position, just like the previous exercise.
- Once you’re in position, begin by rotating your neck to the right side as far as you can comfortably go.
- Hold this position for a few seconds, then slowly bring your neck back to the centre position. From there, rotate your neck to the left side similarly, holding for a few seconds before returning to the centre.
- Alternate between rotating your neck to the right and left sides, moving slowly and smoothly through each rotation.
- It is recommended that you repeat this exercise a minimum of 10 to 15 times in a single session or until you feel comfortable and relaxed.
#4 Neck flexion-extension exercises to restore cervical curve
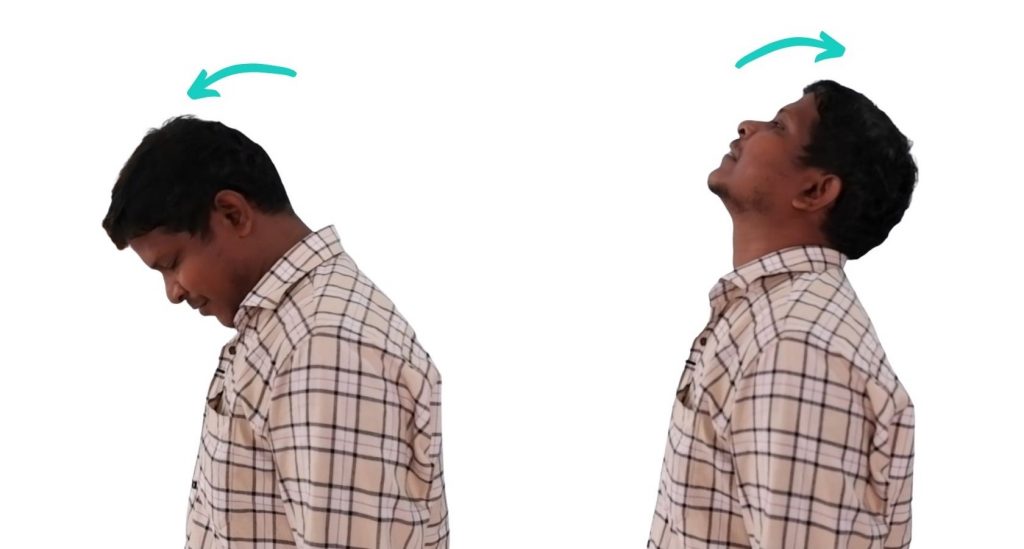
The next exercise for loss of cervical lordosis is neck flexion and extension, which involves forward and backward bending movements of the neck.
- To perform this exercise, start by standing or sitting in an upright position with your shoulders relaxed and your chin parallel to the floor.
- Slowly bend your neck forward, bringing your chin towards your chest.
- Hold this position for a few seconds, then slowly bring your head back up to the starting position.
- Next, bend your neck backwards, looking up towards the ceiling while keeping your shoulders relaxed.
- Hold this position for a few seconds, then return to the starting position.
- Repeat this movement at least 15 to 20 times in a session. It’s important to perform this exercise slowly and gently.
#5 Chin tuck exercise to fix straightening of the cervical lordosis

The chin tuck exercise is a great way to help fix the straightening of the cervical lordosis.
- To perform this exercise, start by tucking your chin towards your neck, as shown in the figure.
- It’s important to note that you should not bend your neck forward but instead focus on tucking your chin to your neck.
- To make it a little bit easier, you may keep a finger over your chin to give the direction of movement.
- Hold this position for ten seconds, maintaining the tuck throughout the hold.
- Then, release the tuck and relax your neck muscles.
- You should perform this exercise 10 to 15 times in a session. You should notice a slight release of tightness or stiffness in the back muscles as you exercise.
There’s a high chance that one may also develop shoulder pain along with this issue of straightening the cervical spine. There are effective exercises to manage shoulder pain; we recommend following these 9 Best Exercise for Shoulders to Fix stiff, painful shoulder.
#6 Towel roll exercise to restore cervical curve

Our last exercise for loss of cervical lordosis is the towel roll exercise. To perform this exercise, you will need a standard bath towel and a firm surface such as the floor or a firm bed. This simple yet effective method helps to enhance the curvature of your neck.
- To start, lie flat on your back with your head and shoulders fully resting on the surface.
- Place the towel roll directly in the curve of your neck. As you lay on the towel roll, you should feel slightly upward pressure on your neck. The roll is too thin if you don’t feel the upward pressure. We suggest starting with a towel roll that exerts a slight upward push on your neck without lifting your head or shoulders off the surface. If the roll is too thick and your head or shoulders aren’t in contact with the floor, unroll the towel slightly to decrease its size and try again.
- You can initially maintain this position for up to 10 minutes and gradually increase the duration to 15 minutes per session as you improve.
We recommend doing this exercise at least three times per week, but increasing the frequency to 5 to 6 times is beneficial as long as it doesn’t increase soreness.

- Help relief neck pain in just 10 minutes every day.
- The neck and shoulder relaxer is ergonomic design, the curve of neck relaxer matches the cervical spine. When you lie do…
- Restclouds stretch (traction) your neck giving relief from neck pain and headaches. They are portable, comfortable and e…
Lifestyle Adjustments to Support Recovery
Best Sleeping Position for Cervical Lordosis
It’s important to consider your sleeping position and how you use your pillow when you have reverse cervical lordosis. Here are a few simple tips which are very easy and important to consider.
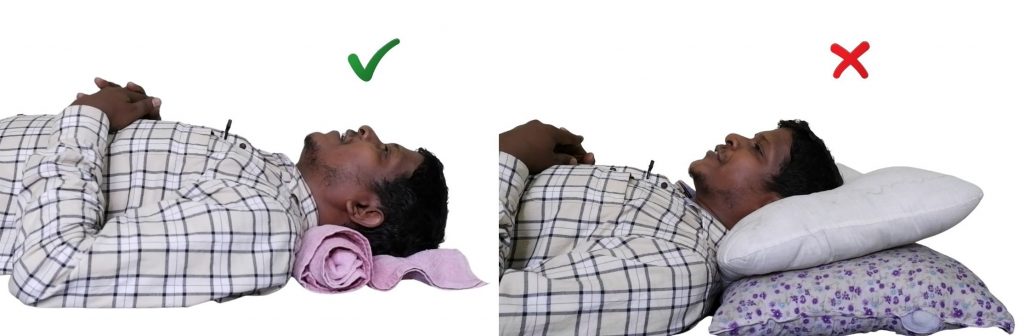
- The first and very important point is to avoid using a thick pillow. Using a thick pillow can worsen the problem of reverse cervical lordosis and may not be suitable for you.
- You can use a specially designed cervical pillow.
- You may also use a towel or bedsheet roll. For this, place the roll under your neck, not under your head, so that your head touches the bed while you remain comfortable. Adjust the thickness of the roll as needed.
This position provides support to the natural curvature of your neck and helps maintain a healthy neck curve, preventing flattening.
You can also consider using a contoured cervical pillow (like this ergonomic memory foam option) helps maintain proper neck alignment while you sleep, reducing morning stiffness.
How to Use Your Phone Without Straining Your Neck

Using computing devices like mobile phones, tablets, laptops, and desktops in a flexed or hyper flexed neck can result in loss of cervical lordosis.
In a study conducted in Istanbul, Turkey, the researcher studied 156 neck pain sufferers and questioned their usage of these computing devices. The study linked the loss of neck curves with the use of computing devices, especially mobile telephones, in a neck-flexed posture4.
Ergonomic Tips for Desk Workers
The study also stresses the ergonomic way of sitting on a desktop and using a mobile that prevents excessive neck bending4.
Raise your screen to eye level with an adjustable laptop stand (like this lightweight aluminum model) to avoid hunching. So next time, when working on a mobile or laptop, take note of your neck posture.

- Broader Compatibility: Nulaxy C3 laptop stand is compatible with all laptops between in 10-16 inches such as MacBook 12/…
- Ergonomic Riser: The laptop holder works as a riser to elevate the laptop screen to 7’’ and brings it to a perfect eye l…
- Detachable & Simple Installation: This portable laptop stand has premium CNC cut aluminum alloy material that will make …
There is a small wearable device called Strack, developed to keep reminding and prompting you to straighten yourself when unknowingly, you would stoop forward working on a desktop. You can learn more about Strack here.
Try these exercises for 30 days and share your results in the comments!
Keep Reading: How to Cure Vertigo Permanently? These tips & exercises would help.
FAQ on loss of cervical lordosis
The author is a physiotherapist who has been practising for the last 17 years. He holds a Bachelor's in Physiotherapy (BPT) from SVNIRTAR (Swami Vivekananda National Institute of Rehabilitation and Research), one of the prestigious physiotherapy schools in India.
Whatever he learns dealing with his patient, he shares it with the world through blogs and e-books. He also owns a YouTube channel, "Sunit Physiotherapist" with over 8 lakh active subscribers. Here, he shares everything he gets to learn serving the patient.


Pingback: 4 Causes of Neck Pain Left Side| Best Home Remedies - Physiosunit