Of all the joints in our body, the shoulder joint is the most prone to dislocation. This is due to its anatomy. The shoulder joint is a ball-and-socket joint. A joint with a ball and socket.
So, if the socket is deep, the joint is more stable. Like our hip joint. The socket in the hip joint is quite deep. But the socket in our shoulder joint is quite shallow, and because of its ball, there’s a greater chance of dislocation.
In this article, we will cover the classification of shoulder dislocation, its clinical features and treatment. Following the reduction of the dislocation we must also follow shoulder dislocation rehabilitation exercises.
- Shoulder Dislocation Types: Anterior, Posterior & Luxatio Erecta
- Anterior Shoulder Dislocation: Diagnosis, Features & Treatment
- Causes of Anterior Shoulder Dislocation: Injury Mechanisms
- Signs and Symptoms of Anterior Shoulder Dislocation
- Diagnosis of Shoulder Dislocation: X-ray & Imaging
- Treatment Protocols for Anterior Shoulder Dislocation
- Closed Reduction Techniques: Kocher’s & Hippocrates’ Methods
- Associated Pathologies: Bankart Lesion, Hill-Sachs, Tuberosity Fracture
- Complications of Shoulder Dislocations (Axillary Nerve Injury, Recurrent)
- Shoulder Dislocation Exercise Rehabilitation Protocol (by Phase)
- Posterior Shoulder Dislocation: Causes, Features & Management
- Luxatio Erecta: Rare Shoulder Dislocation Explained
- FAQ on shoulder dislocation
Shoulder Dislocation Types: Anterior, Posterior & Luxatio Erecta

The shoulder is the most common joint in the human body to dislocate. It’s common in adults and rare in children. There are three important types of shoulder dislocations.
- Anterior
- Posterior
- Luxatio erecta
So, we’ll study each of these types in detail, including their management and clinical features.
Anterior shoulder dislocation: So, you can see it in the diagram of a normal shoulder joint. It consists of the scapula, the humerus. It consists of the head of the humerus forming the ball and the glenoid cavity of the scapula, the socket of the shoulder joint.
Look, the ball fits snugly in its socket, and it’s a normal joint.
But in an anterior dislocation, the head of the humerus has dislocated anteriorly, toward the front. That’s why we call it an anterior dislocation.
Posterior dislocation of shoulder: Now, the next type is a posterior dislocation. In this case, the head of the humerus is dislocated posteriorly. It’s moved posteriorly. That’s why we call it a posterior dislocation.
Luatio erecta: In the luxatio erecta type, the head of the humerus is dislocated directly below the glenoid cavity. And look at the direction of the shaft. It’s facing upwards, so we call this type of dislocation luxatio erecta.
Anterior Shoulder Dislocation: Diagnosis, Features & Treatment

So, first, we’ll study anterior dislocations. We’ll study the clinical features and treatment of anterior dislocations. The other two types, posterior dislocations and luxatio erecta, are quite uncommon and very rare. Therefore, we focus all our attention on anterior dislocations1.
So, what does anterior dislocation involve?
The head comes out of the glenoid and lies anteriorly. This is what we call an anterior dislocation of the shoulder. The anterior dislocations of the shoulder can be understood in three types.
- Preglenoid,
- Subcoracoid, which is the most common, and
- Subclavicular.
So, let’s try to understand these three anterior types of dislocations through this figure. As you can see in the figure, the first one is a normal joint. A normal shoulder joint, in which the head of the humerus fits into the glenoid cavity.

Preglenoid: So, the first type is preglenoid. In the preglenoid, the head dislocates anteriorly and remains just around the glenoid.
Subcoracoid: The second subcoracoid is called the subcoracoid. In this, it remains just below the coracoid process.
Subclavicular: The third is the subclavicular. In the subclavicular the shoulder joint dislocates, and the head of the humerus comes just below the clavicle. That’s why we call it subclavicular.
Causes of Anterior Shoulder Dislocation: Injury Mechanisms
There can be two mechanisms.
- A fall onto the outstretched hand with shoulder abduction and external rotation. If we fall in this position, there’s a chance of shoulder dislocation.
- Direct injury from the back. Someone hitting us from behind can also cause a shoulder dislocation.
Signs and Symptoms of Anterior Shoulder Dislocation
- There will be pain,
- Swelling around the shoulder, and
- The inability to use the limb. The person won’t be able to use that arm. They won’t be able to lift it. They won’t be able to use it in any way.
Physical Examination Findings in Shoulder Dislocation
When we examine the shoulder joint, what will we find?
- Shoulder contour is lost. There’s a normal shoulder contour with a curve on the outer side. It will be lost, you won’t see this curve. The shoulder will appear flat.
- Fullness in the anterior aspect at the clavicular area, which normally remains flat.
- There’s absolute immobility. He won’t be able to move his shoulder and hands at all.
- There will be tenderness there. That means, when we touch it, the patient will complain of pain.
Clinical Tests for Anterior Shoulder Dislocation (Dugas’, Hamilton, Callaway)
So, to test for a shoulder dislocation, there are a few signs we need to look for.
Duga’s sign:
The first sign is what we call Dugas’ sign. The inability to touch the opposite shoulder with the affected hand.
Let’s say I have a shoulder dislocation on the left side. So if I ask it to touch the opposite (right) shoulder, you won’t be able to do it when the shoulder is dislocated.
So this test is called the Dugas sign.
Hamilton ruler test:
The most popular test is the Hamilton ruler test. It’s very simple. Let me explain.
So, in a normal shoulder joint, when we place the scale on the outer arm, the acromion process and the lateral epicondyle are not in a straight line. This is because the greater tuberosity lies between them.
But if we do the same thing in an anterior dislocation of the shoulder, they will lie in a straight line. We’ll call the Hamilton ruler test positive, which is a test for anterior dislocation.
Callaway’s test:
This is also a test that measures the increased vertical circumference of the axilla in dislocations. What this test does is that the anterior-posterior circumference is normally this much.
However, in an anterior dislocation, this circumference will increase because the dislocated shoulder joint will move forward. The head of the humerus will move forward. So, this is the Calloway test.
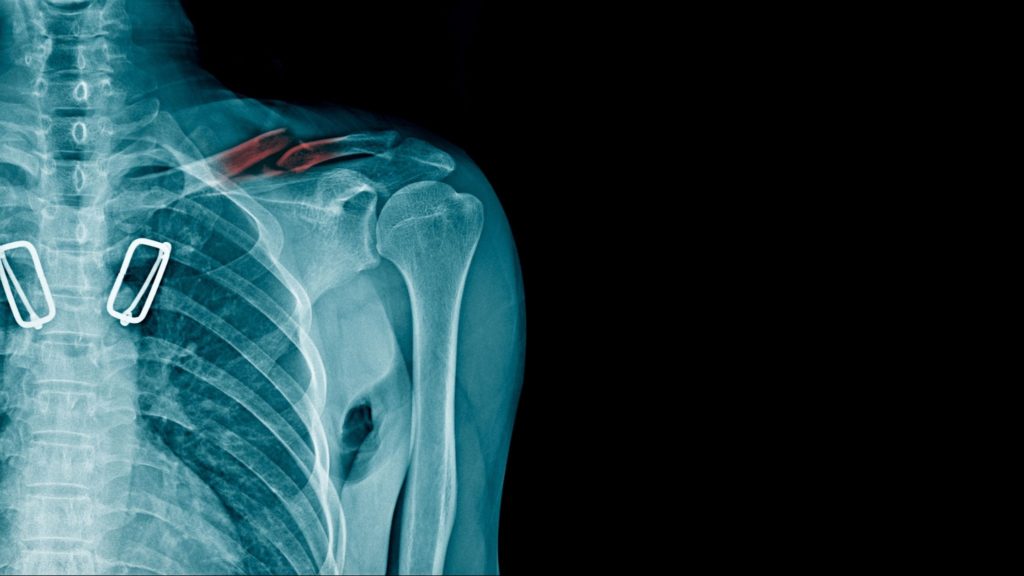
Diagnosis of Shoulder Dislocation: X-ray & Imaging

We’ll take an X-ray. In the X-ray, we’ll take an anteroposterior view.
Refering to the figure, the x-ray on the left side is of a normal shoulder joint with the head of the humerus and the glenoid cavity. All of these are in their respective places.
But look the X-ray on the right, this is a case of an anterior dislocation, where the head of the humerus has moved from this cavity and is dislocated. So, this is how you can diagnose a shoulder dislocation by examining the muscles.
Treatment Protocols for Anterior Shoulder Dislocation
So, what is its treatment?
- Immediate emergency procedures. Emergency procedures are necessary.
- Then, closed reduction under anaesthesia and sedation. followed by strapping and chest arm bandages for three weeks. After the closed reduction, the arm should be immobilised by chest strapping/ chest arm bandages for 3 weeks.
Closed Reduction Techniques: Kocher’s & Hippocrates’ Methods
There are many types of reduction. Friends, to be honest, when I was preparing for this post, and I pulled out research papers. So, there are many different reduction methods available these days.
But I’ll share the most common ones. One is the Kocher’s method. Okay? And the other is the Hippocrates method.
Stepwise Guide: Kocher’s Technique
The Kocher’s method is often used first to perform reduction. But when the Kocher’s method fails, the Hippocrates method is used. Or maybe there’s a brachial plexus injury. So let me explain this method in detail.
Kocher’s Method involves:
- Flexing the elbow to 90°,
- Then applying traction downward. Pulling downward3.
- Then externally rotating the shoulder. After that, the shoulder has to be adducted and finally internally rotated.
- The shoulder should be immobilized in this position for three weeks.
Hypocrite’s method
If this method doesn’t work, we’ll move on to the Hippocrates Method2.
The Hippocrates Method involves:
- The surgeon places one foot here in the axilla of the dislocated shoulder.
- Then, he performs a gentle forearm pull in the semi-abducted position.
- Then carefylly, the head of the humerus is levered back into position using the foot as the fulcrum.
- Following reduction, a chest and arm bandage is given for three weeks.
Associated Pathologies: Bankart Lesion, Hill-Sachs, Tuberosity Fracture
That is, what other damages can occur along with shoulder dislocation?
- Rupture of the glenoid labrum: Normally, the glenoid cavity isn’t very deep. It’s very shallow. But there’s a cartilage rim around the glenoid cavity that helps increase its depth. This is what we call the glenoid labrum. If there’s a lesion in the anterior rim of the glenoid labrum, we call it a Bankart’s lesion.
- Hill sach’s lesion: If there’s any kind of depression or fracture in the posterolateral aspect of the humeral head, it’s called the Hill-Sach’s, and this is commonly seen in shoulder dislocations.
- Associated fractured greater tuberosity: Sometimes a fracture of the greater tuberosity is also found with shoulder dislocations. But when we reduce, reposition it with close reduction, the greater tuberosity fracture automatically reduces itself.
Complications of Shoulder Dislocations (Axillary Nerve Injury, Recurrent)
Immediate complication:
- Injury to the axillary nerve: So, the most immediate complication is injury to the axillary nerve. If the axillary nerve is damaged, there will be restriction of abduction. This movement is restricted because the axillary nerve supplies the deltoid muscle. The deltoid muscle is our main muscle, used for abduction. If the nerve supply to these muscles is damaged, abduction doesn’t occur.
- Deltoid not contracting—as I mentioned, the deltoid doesn’t contract.
- Hyperesthesia over the lateral aspect of the upper arm. Hyperesthesia means that you won’t feel any sensation when you touch something. Loss of sensation is found where there is sensation.
Late complication:
- Recurrent dislocation: The late complication is recurrent dislocation of the shoulder. This means the shoulder could dislocate again. This could be due to improper immobilization or isn’t done for the required period.
- An unstable shoulder in an epilepsy patient, where the patient suddenly experiences a shock, causes the muscles to contract, increasing the risk of a re-dislocation.
Treatment for recurrent dislocation
Surgery is the only treatment. One is the Bankartt’s operation, the Putty Platt operation, or the Bristow operation. These are the three types of operations that are preferred here.
Shoulder Dislocation Exercise Rehabilitation Protocol (by Phase)
Phase 1: Acute/Early (0-2 weeks)
- Immobilize in a sling (support healing, prevent further injury)
- Begin gentle shoulder mobility exercises—forward flexion, abduction, and external rotation (pain-free range)
- Apply ice after exercise sessions to reduce pain and swelling
- Avoid overhead lifting and sleeping on injured side
For a comprehensive guide to shoulder rehabilitation exercises, see our full post: 17 Top Shoulder Dislocation Exercises to Prevent Recurrence.
Phase 2: Subacute/Intermediate (2-6 weeks)
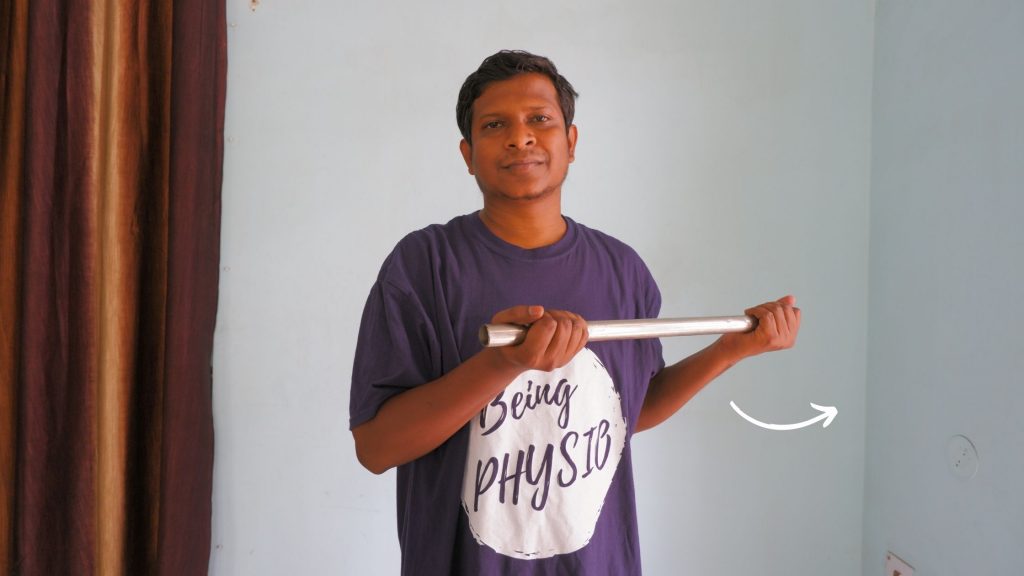
- Progress range of motion with active-assisted movements (using a cane/PVC pipe)
- Start isometric strengthening—press shoulder, elbow, and forearm gently into wall without joint movement
- Initiate gentle resistance band exercises only if pain-free
- Continue sling for support if needed; gradually wean off
Phase 3: Advanced/Return to Function (6+ weeks)
- Dynamic resistance exercises: internal and external rotation, flexion, and abduction with bands or weights
- Wall push-ups, kneeling push-ups; transition to full push-ups when comfortable
- Emphasize scapular stability and rotator cuff strengthening
- Gradually resume sports/overhead activity as per physiotherapist guidance
General Guidelines
- Perform exercises 2–3 times daily (early/acute); 3–5 times weekly (advanced)
- Stop exercise if sharp pain occurs; use ice packs after sessions
- Recovery: Most individuals regain full function within 12–16 weeks
- Adhere to exercise protocol to prevent recurrence of dislocation
- Always consult a physiotherapist for personalized exercise progressions
Posterior Shoulder Dislocation: Causes, Features & Management

As you can see in the figure, in a posterior dislocation, the head of the humerus is posteriorly dislocated.
So why does this happen?
- It’s caused by direct trauma from the front.
- It’s common in epilepsy. An epileptic attack occurs, causing sudden muscle contraction. This overcontraction increases the chance of dislocation.
- An accidental electric shock also causes violent sudden muscle contraction. So, this can also increases the chance of dislocation.
- Even a reduced recurring dislocation also has a chance of re-dislocation.
Luxatio Erecta: Rare Shoulder Dislocation Explained

So, friends, our final type is luxatio erection. In luxatio erecta the humeral head is displaced directly below and slightly medial to the glenoid fossa. As you can see in the image, the humeral head gets displaced directly below it and slightly medially to the glenoid fossa.
In this dislocation, the patient comes with their arm lifted by the side of their head. This is because in this dislocation that the arm is completely abducted.
I have taken an X-ray from a research paper. You can see that in this, this patient is with his arm in abduction and external rotation position. So you can see in the X-ray of the same person, the luxatio erecta, a type of dislocation, is clearly visible here.
FAQ on shoulder dislocation
The author is a physiotherapist who has been practising for the last 17 years. He holds a Bachelor's in Physiotherapy (BPT) from SVNIRTAR (Swami Vivekananda National Institute of Rehabilitation and Research), one of the prestigious physiotherapy schools in India.
Whatever he learns dealing with his patient, he shares it with the world through blogs and e-books. He also owns a YouTube channel, "Sunit Physiotherapist" with over 8 lakh active subscribers. Here, he shares everything he gets to learn serving the patient.