Last updated on June 19th, 2025 at 11:41 am

The fracture at the lower end of the humerus (arm) bone and just above the elbow joint is a supracondylar humerus fracture. Surgical reduction followed by plaster immobilisation is required in displaced fractures, or just immobilisation may be enough for undisplaced fractures.
But the actual problem begins after the removal of the cast, the stiffness and joint restriction of the elbow joint.
The exact location of the fracture is just above the humerus condyles, which is why it is termed a supracondylar fracture. Many vital structures (like nerve, blood vessels) pass through this part and thus are associated with primary and secondary complications.
This article will also try to understand the various treatment procedures for this fracture and ways to manage the associated complications. The most important is the exercises and physiotherapy after plaster removal.
- What Is a Supracondylar Humerus Fracture? (Causes & Anatomy)
- Phase 1: Early Post-Op Exercises (Weeks 0-3) – Protecting the Elbow
- Phase 2: Transitional Exercises (Weeks 3-6) – Preventing Stiffness
- Phase 3: Active Elbow Rehabilitation (Weeks 6-10) – Regaining Motion
- Phase 4: Strengthening & Return to Activity (Weeks 10-12+)
- Serious Complications of Supracondylar Fractures (And How to Avoid Them)
- Get Your Step-by-Step Recovery Plan (PDF) Today!
What Is a Supracondylar Humerus Fracture? (Causes & Anatomy)
If we go through the anatomy of the humerus bone, the lower end of the humerus has condyles (two condyles) that take part in the formation of the elbow joint.
If the fracture happens just above the condyles, it is termed a supracondylar fracture. Sometimes it is also associated with intercondylar fracture humerus further complicating things.
A supracondylar fracture happens when a person falls on an outstretched hand or a direct blow to the elbow. If you are reading this article, you may remember how you had to outstretched your hand when falling to protect yourself.
When the elbow is subjected to the direct impact of a fall, along with a fracture, it also displaces the fractured segment.
The supracondylar fracture can be:
- Displaced fracture: Displaced fracture often requires surgical reduction,
- Undisplaced fracture: It is managed conservatively.
In both conditions, the elbow is immobilised at 70° of flexion by a posterior mould splint for 3 to 4 weeks. Immobilising the elbow joint for such a long period has a few complications, like muscle stiffness around the elbow with joint movement restriction.
We advise physiotherapy right after the joint plaster cast immobilisation. Early intervention through exercise helps to reduce these complications. When still with a plaster cast, here are the exercises you should do.
Phase 1: Early Post-Op Exercises (Weeks 0-3) – Protecting the Elbow
To reduce the complications, one should start exercises immediately post-operatively. With the splint on, we have to start exercises for the wrist and shoulder joints.
Remember, we have to avoid active elbow extension 6 weeks post-operatively. So, let us begin with wrist joint range of motion exercises.
5 Safe Exercises to Do While in a Cast or Splin
1) Wrist Flexion-Extension to Improve Blood Flow (Phase 1)
During this phase, it’s vital to perform exercises that aid in recovery without compromising the healing process. One such exercise involves moving the wrist joint up and down while keeping the forearm comfortably supported on the sling.
This helps prevent stiffness in the wrist joint, promotes healthy blood circulation throughout the forearm, and helps maintain muscle tone.
- To perform this exercise, position your forearm on the sling and move your wrist joint up and down, as shown in the figure.
- Aim to perform at least 20 repetitions per session, but feel free to do more if you’re comfortable.
- You can easily incorporate this exercise into your daily routine whenever you have a spare moment, such as sitting and watching television.
2) Wrist circumduction
The next exercise that we will be discussing is wrist circumduction. This is explicitly designed to prevent wrist stiffness. It’s a straightforward exercise that requires only wrist rotations, as demonstrated in the figure provided.
- To perform this exercise, rotate your wrist in clockwise and anti-clockwise directions while your forearm is supported inside the sling.
- Begin by rotating your wrist slowly in a circular motion. Make sure you feel the stretch in your wrist and forearm muscles while doing so.
- You can also perform this exercise while sitting or standing, whichever is more comfortable for you.
- It’s essential to do as many repetitions as possible, and you can increase the speed of rotations as you become more comfortable with the exercise.
3) Grip Strengthening with a Therapy Ball – Why It Matters

It is quite common to experience weakness in grip strength after a prolonged period of immobilisation. This weakness can manifest in something as simple as holding onto a glass of water.
It is therefore essential to focus on strengthening the grip and other exercises that may be prescribed. One such exercise involves the use of a gel or sponge ball.
- Take the ball in your affected hand and give it a good squeeze.
- This exercise helps to improve blood circulation around the hand, which in turn can aid in the healing of any fractures.
- Try to repeat this exercise as many times as possible to work those grip muscles and promote better healing.

- The 3-in-1 LiteTour hand squeeze balls are great for athletes, office staff, students, musicians and more who do trainin…
- The squeeze balls are made from premium silicone material that is odorless and latex free.
- The tool kit comes in three resistance levels for gradual practices; come with a portable keeping bag so that you can ca…

4) Shoulder Mobility Drills to Prevent Secondary Stiffness
Stiffness in shoulder joints is another common issue that can arise from long-term immobilisation. It’s important to prioritise exercising to improve your flexibility and mobility.
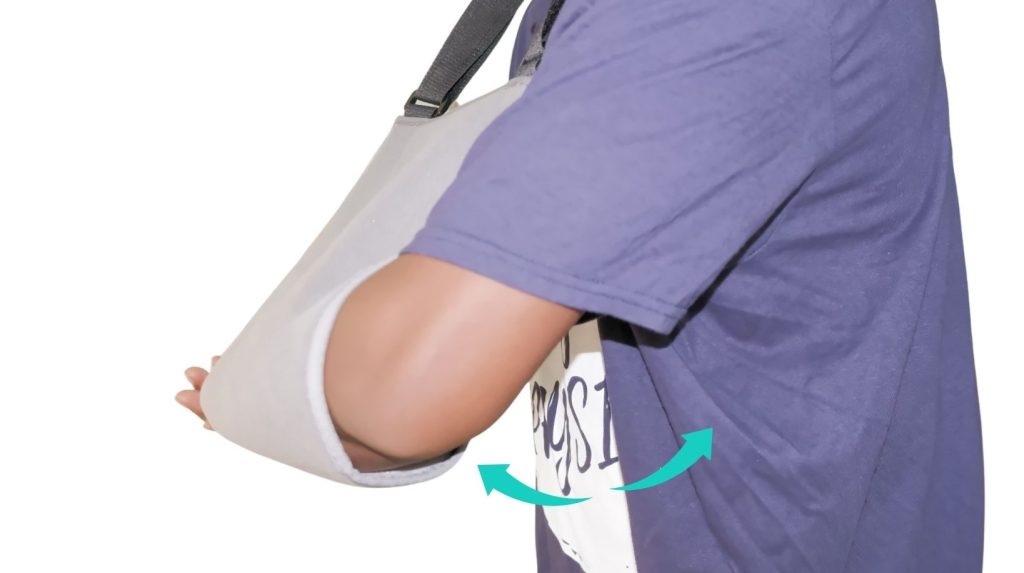
One shoulder exercise that can be done in a standing position is particularly effective for easing stiffness.
- To begin, stand comfortably and support the affected forearm on your opposite hand. This will help to stabilize the joint and prevent further discomfort.
- Once you’re in position, slowly move your shoulder in a right-to-left direction, not pushing yourself too hard.
- Follow the figure provided as a guide, and repeat the movement 15 to 20 times per session. With regular practice, this exercise can help to reduce pain and improve your range of motion.
5) Shoulder flexion exercise
- To perform shoulder flexion and extension, begin by supporting your forearm on your other hand.
- Start moving your shoulder slowly forward, flexing it until you can take it comfortably. This helps to stretch and strengthen the shoulder muscles.
- Once you have reached the maximum point of comfort, begin moving your shoulder slowly back.
- Repeat this exercise 15 to 20 times to get the most benefit. With regular practice, this exercise can help to improve your shoulder mobility and strength.
Phase 2: Transitional Exercises (Weeks 3-6) – Preventing Stiffness
How to Gradually Restore Wrist and Shoulder Mobility
After the 3rd week and between the 6th week, you can remove the splint during exercise. You have to repeat all the exercises we discussed for the wrist and shoulder joint.
You can increase the repetitions of exercises. However, you should still avoid movement at the elbow joint.
Repeat these exercises:
- Active wrist flexion-extension,
- Wrist circumduction,
- Grip strength exercise,
- Shoulder adduction abduction,
- Shoulder flexion exercise
Phase 3: Active Elbow Rehabilitation (Weeks 6-10) – Regaining Motion
Key Exercises for Elbow Flexion, Extension, and Forearm Rotation
By the 6th week, the posterior elbow brace will be removed, and now we should focus on elbow ROM and strengthening exercises. We must take care of elbow flexion, extension, forearm pronation, and supination.
6) Active wrist flexion-extension
To restore elbow flexion and extension motion, it’s important to perform specific exercises.
- So, let’s start by sitting comfortably in front of a table and placing the affected arm on the table. Keeping the arms flat on the table provides a good base of support to perform elbow exercises.
- To begin, straighten the elbow as much as possible, known as an extension of the elbow.
- Hold the position for a few seconds before slowly bending the elbow, i.e. flexing it to the maximum point.
- Repeat this alternate flexion-extension movement at least 15 to 20 times in a single session.
- It’s important to perform this exercise regularly to restore the normal range of motion of the elbow.
7) Stretching of wrist flexor and extensor
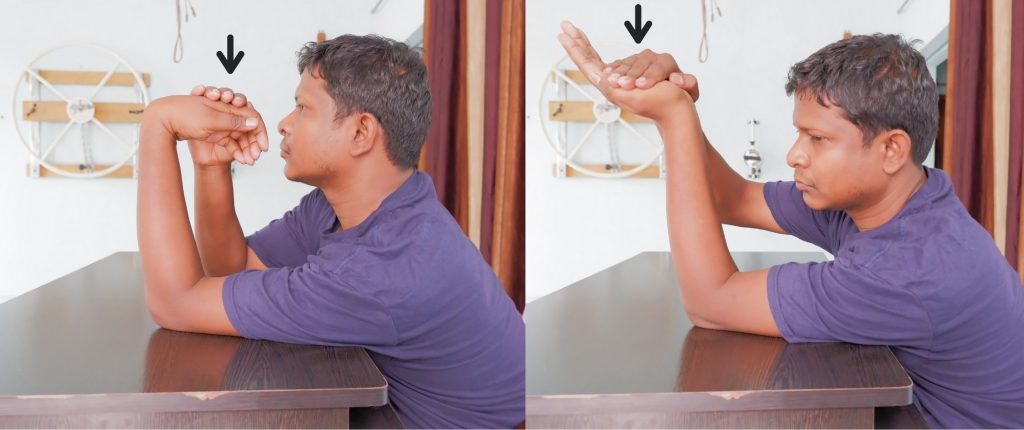
This stretching exercise is specifically designed to help relieve tension and increase flexibility in the wrist.
- To begin, assume your starting position with your arm extended in front of you.
- Apply gentle pressure to the wrist at the end range of flexion and extension using your opposite hand.
- To stretch the flexor muscles, start by slightly extending your wrist and then use your other hand to apply pressure over the palm.
- Hold this position for a minimum of 30 seconds, allowing the muscles to relax and stretch fully. You may feel a gentle pulling sensation in your wrist, but it should not be painful.
- Next, repeat the same process by extending the wrist to stretch the extensor group of muscles.
- Once again, use your opposite hand to apply pressure to the back of your hand, holding for a minimum of 30 seconds.
8) Forearm supination, pronation exercise
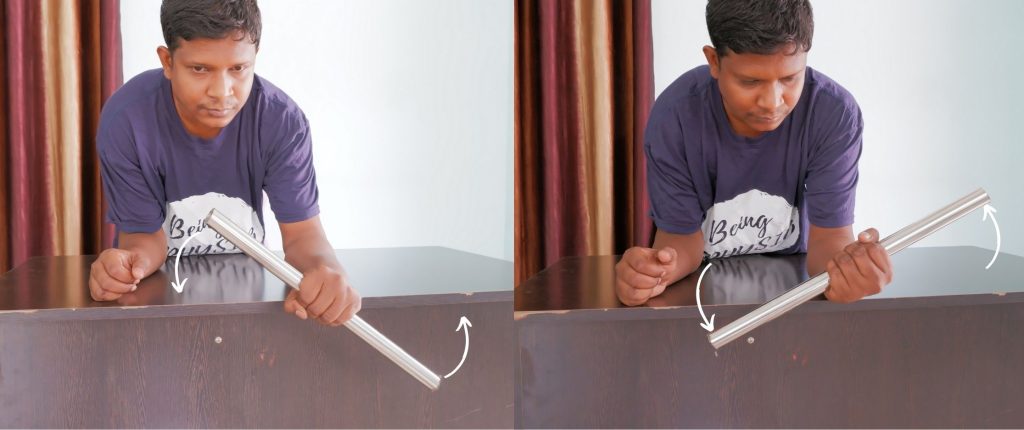
When it comes to recovering from a shaft of humerus fracture, forearm pronation and supination exercises are crucial for maintaining elbow joint mobility.
One of the most effective exercises for this purpose involves stabilizing your forearm on a flat surface, such as a table, and then rotating it clockwise and anticlockwise.
- First, position your forearm flat on the table, ensuring it is stable and secure.
- Then, slowly rotate your forearm in a clockwise direction, known as supination.
- After a few repetitions, switch to rotating your forearm in an anticlockwise direction, known as forearm pronation.
- As you become more comfortable with this exercise, you can try it without external support.
- However, to make the exercise more effective, you can hold a cane or lightweight rod as you rotate your forearm. This will help create momentum and provide more resistance, making the exercise more challenging and beneficial for your recovery.
9) Shoulder forward elevation exercise for fractured elbow
It’s common to overlook shoulder joint stiffness in certain conditions. However, this problem can quickly become troublesome if left unaddressed.
That’s why it’s crucial to incorporate shoulder exercises into your daily routine. One such exercise is the simple yet effective shoulder elevation exercise.
- To perform this exercise, start by grasping your hand and slowly elevate it to the maximum point you can comfortably reach.
- Hold it there for a few seconds before slowly lowering it back down.
- Repeat this process 15 to 20 times in a single session.
- For best results, try to do this exercise twice daily.
Range of motion (ROM) exercises for the shoulder will benefit in the prevention and reduction of shoulder stiffness. There are so many exercises for shoulder like shoulder elevation, abduction, flexion and extension.
I have written an article on shoulder stiffness exercises you may refer to it for more detailed information.
10) Stretching of elbow flexor muscle

This exercise targets the elbow flexors and extensors, which are two groups of muscles that play a crucial role in elbow movement. The flexor muscles are located on the front of the elbow and are responsible for bringing flexion movement to the elbow joint.
On the other hand, the extensor muscle is located on the back of the elbow and is responsible for the extension or straightening of the elbow joint.
- To begin with, the stretching exercise for elbow flexors, straighten your elbow to the maximum and position your opposite hand on the front of the elbow.
- Apply slight overpressure until you feel a comfortable stretch on the front of the elbow.
- Hold this stretched position for a minimum of 30 seconds to allow the muscles to relax and release tension.
- Next, it’s time to stretch the elbow extensors. For this, you must bend your elbow and place your opposite hand on the back of the elbow.
- Apply slight overpressure until you feel a comfortable stretch on the back of the elbow, holding the position for at least 30 seconds.
- Repeating this process 3 to 5 times in a single session is recommended, ensuring you don’t overdo it and cause further damage.
Progress Tracking: Use a plastic goniometer to measure elbow flexion/extension improvements weekly.

- Package Includes: You will receive 1 piece of a physical therapy goniometer, which aids in physical therapy by determini…
- Accurate Readings: The digital and clear markings on the 360-degree goniometer allow for precise measurements. It can be…
- Primary Material: Made from transparent plastic, it is lightweight and easy to carry. The semi-transparent design of thi…
Phase 4: Strengthening & Return to Activity (Weeks 10-12+)
Gradually return to light activity and exercise. No further activity restrictions after 12 weeks.
Progressive Resistance Training for Full Functional Recovery
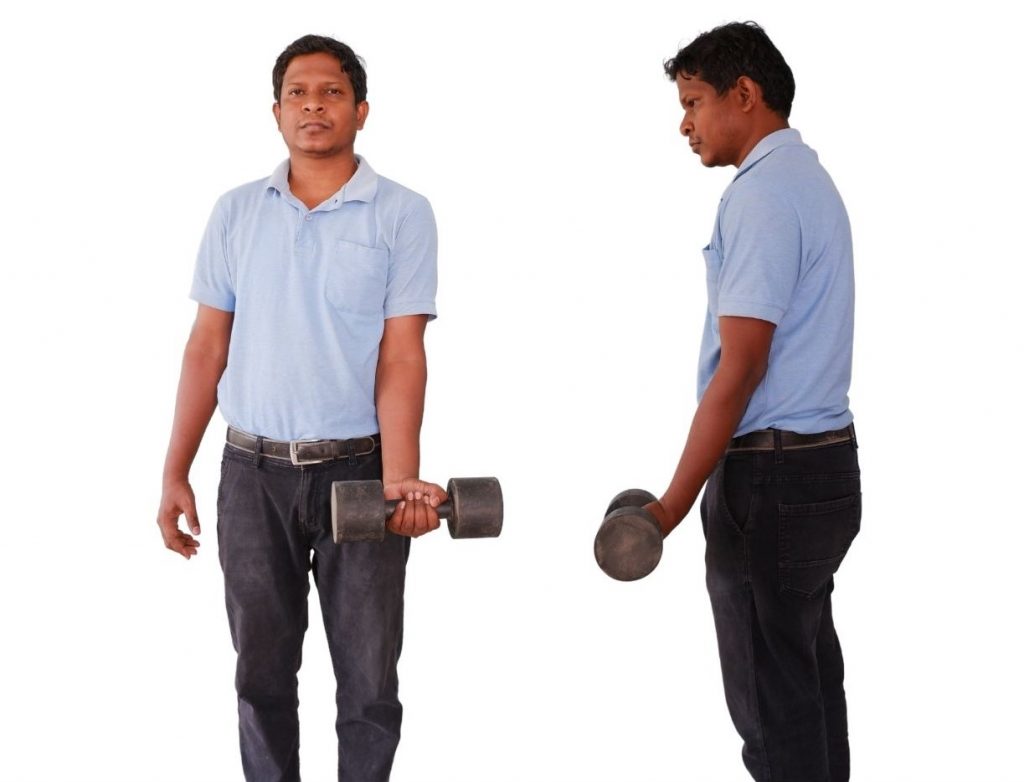
As part of your recovery, it is important to gradually return to light activity and exercise. After 12 weeks, there are no further activity restrictions. For this exercise, you will need a set of dumbbells weighing between 1.5 to 2 kg.
However, it is important to note that this exercise is recommended only if you have gained sufficient grip strength to hold the dumbbell firmly.
- To begin, stand up straight and hold the dumbbell with the affected side hand. Make sure to hold it firmly and allow the weight of the dumbbell to exert a gentle stretching sensation on your elbow joint.
- Hold this position for 1 minute to 5 minutes, as per your convenience.
- As you become more comfortable with this exercise, you may gradually increase the weight of the dumbbells up to 5 kg.

- 【TEN WEIGHT OPTIONS】Adjustable dumbbell features a 10-in-1 system, providing flexible weight options ranging from 11LB t…
- 【QUICK WEIGHT ADJUSTMENT】With adjustable dumbbells, simply twist the handle to effortlessly select your desired weight, …
- 【EXCEPTIONAL QUALITY】Made from durable, rust-resistant materials, these adjustable dumbbells are designed for long-lasti…
Serious Complications of Supracondylar Fractures (And How to Avoid Them)
Depending on the condition, it may lead to primary and secondary complications. Or there might be no complications at all. The complications that arise are managed accordingly.
Primary complications: The primary complication is the direct bad effect of the fracture. One of them is an injury to the brachial artery. The brachial artery travels down anteriorly through the arm all the way to the forearm.
In a supracondylar fracture, the sharp end of the proximal fracture segment may damage the brachial artery, leading to complications such as vasospasm and thrombosis.
Volkmann’s Contracture: Early Warning Signs and Prevention
Secondary complications: Now comes the secondary complication that occurs after the elbow is put under the plaster cast. A serious contracture issue known as Volkmann’s Ischemic Contraction could arise out of it.
It is due to the swelling and oedema of the forearm; when the forearm is still under a plaster cast, the swelling exerts compressive pressure over the blood vessels of the forearm.
This results in the sluggish or restricted flow of blood through the forearm that may further get complicated with a tight plaster cast.
If this is not addressed immediately, it leads to serious complications such as ischemia, necrosis of muscle, and damage to the nerve termed VIC (Volkmann’s Ischemic Contraction).

The early sign of VIC is:
- Reduced pulse in the forearm.
- Palm becomes pale.
- Movement of fingers becomes painful.
Late VIC cases exhibits these signs
- With wrist extension, it causes flexion of the finger.
- In wrist flexion, the finger comes to the extension.
Gartland Classification Explained: Types I-IV Fractures
Gartland had classified supracondylar fractures into three types1. Later, it was modified and classified into four types depending on the displacement of the fractured segment.
Usually, the distal fracture segment is pushed backwards, leading to backwards displacement. In this case, there is a flexion deformity of the elbow, which restricts the full extension.
If the distal fracture segment tilts laterally, it alters the carrying angle of the elbow. Due to the impact, there can also be a rotational displacement of the fracture segment. If supination of the fracture segment, then it leads to valgus deformity and, with pronation, it results in varus deformity.
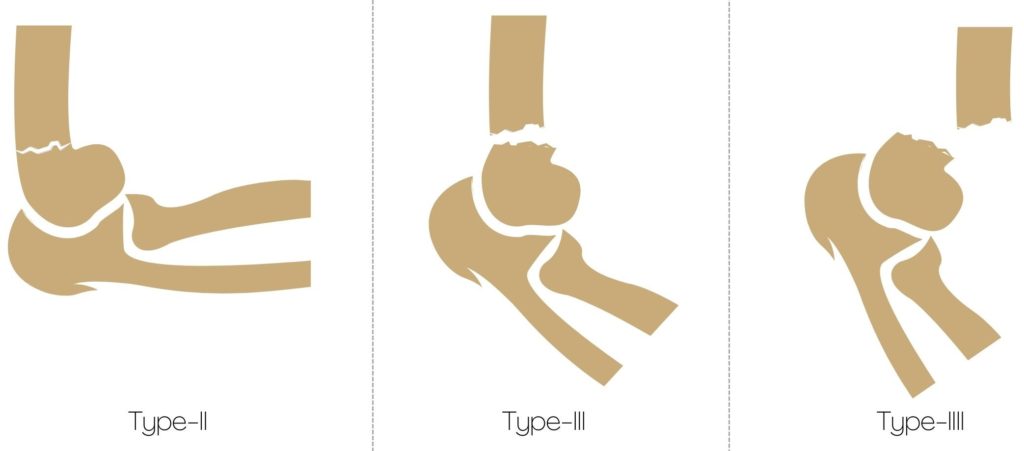
| Fracture type | Characteristics | |
|---|---|---|
| I | Minimal displacement | Fat pad elevation on radiographs |
| II | Posterior hinge | Anterior humeral line anterior to capitellum |
| III | Displaced | No cortical contact |
| IV | Displaced in extension and flexion | Flexion and extension instability demonstrated radiographically |
| Medial comminution | Collapse of medial column | Loss of Baumann angle |
In this article, we will learn just an overview of the protocol. However, if you need a complete step-by-step guide with clear illustrations and instructions, you can download the “PATIENTS’ GUIDE Supracondylar Fracture Rehabilitation Exercises” just by donating $2.00. We will use this amount to maintain the website so I can provide helpful information.
Get Your Step-by-Step Recovery Plan (PDF) Today!
What you will get in this ebook:
- Introduction
- Phase-1: Week 0 to 3
- Active wrist exercises
- Wrist circumduction.
- Grip strength exercise.
- Shoulder exercises
- Phase-2: Week 3 to 6.
- Phase-3: Week 6 to 10
- Active wrist exercises
- Wrist circumduction exercise
- Stretching of wrist muscle
- Forearm supination, pronation exercise
- Shoulder exercises
- Phase-4: Weeks 10-12+ 15
- Progressive strengthening exercises
FAQ on supracondylar fracture rehabilitation
The author is a physiotherapist who has been practising for the last 17 years. He holds a Bachelor's in Physiotherapy (BPT) from SVNIRTAR (Swami Vivekananda National Institute of Rehabilitation and Research), one of the prestigious physiotherapy schools in India.
Whatever he learns dealing with his patient, he shares it with the world through blogs and e-books. He also owns a YouTube channel, "Sunit Physiotherapist" with over 8 lakh active subscribers. Here, he shares everything he gets to learn serving the patient.


Fascinating post. I have been pondering about this issue, quite cool post. It’s actually great post. Thanks
Physiotherapy Hospital in Warangal