Last updated on June 25th, 2025 at 12:03 pm
Key Takeaways:
✅ Non-surgical rehab works for mild SC joint dislocations.
✅ Post-surgery recovery takes 4–6 months, with sling use for 6 weeks.
✅ Phase 1 (0–6 weeks): Focus on wrist/elbow exercises.
✅ Phase 2 (6–12 weeks): Start passive shoulder motions.
✅ Phase 3 (13–20 weeks): Strengthen with resistance bands.
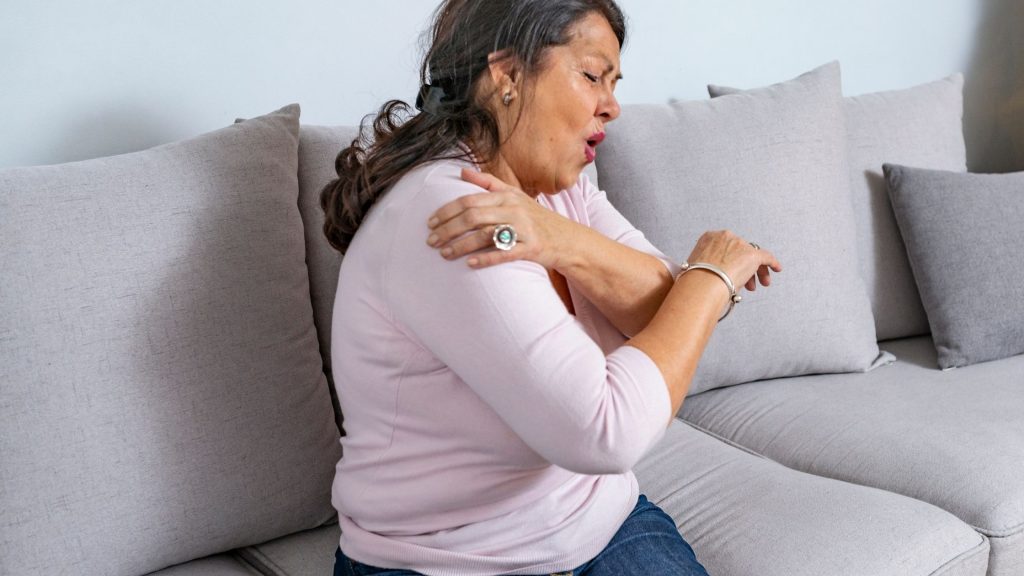
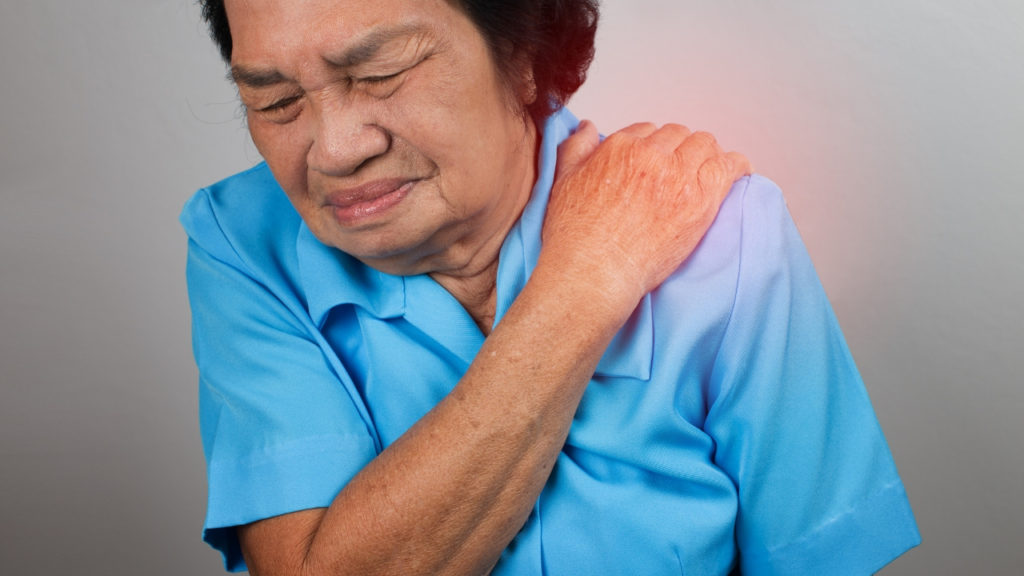
Suppose you have experienced an injury resulting in pain or discovered a lump on the inner side of your collarbone near your voice box. In that case, it is likely due to SC (sternoclavicular) joint dislocation.
Most cases of SC joint subluxation can be treated through non-operative exercise, although reconstruction surgery may be necessary for unstable dislocations.
Unstable joint dislocations can be particularly difficult to manage without surgery, resulting in severe pain and discomfort. However, post-operative physical therapy is essential for preventing joint stiffness and aiding recovery.
In this article, I will cover the physiotherapy management and exercises necessary for effective recovery after sternoclavicular joint dislocation reconstruction surgery. These exercises will also assist in the conservative management of SC joint instability for those cases where surgery is not recommended.
- Best Exercises for Sternoclavicular Joint Dislocation (With Step-by-Step Guide)
- SC Joint Surgery Recovery Timeline: What to Expect (0–20 Weeks)
- When Can You Safely Return to Sports After SC Joint Dislocation?
- FAQ
Best Exercises for Sternoclavicular Joint Dislocation (With Step-by-Step Guide)
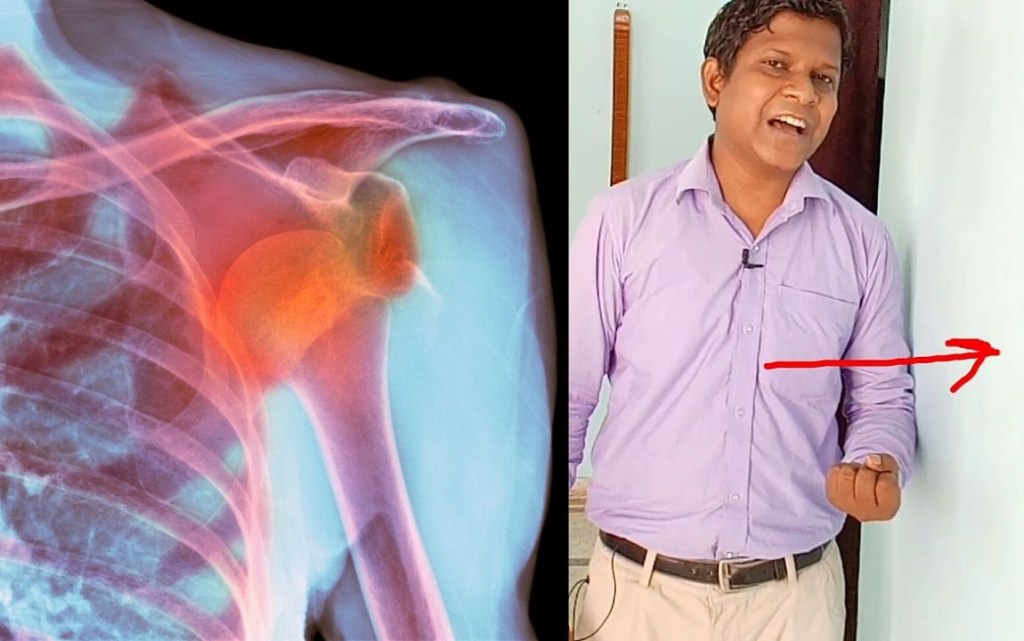
Sternoclavicular joint dislocation is rare and comprises 0.5% to 3% of shoulder girdle injuries1. In this injury, the medial part of the clavicle (collarbone) is displaced from its joint.
We call it anterior dislocation when it displaces and moves forward, and backward displacement is termed posterior dislocation. Among them, anterior dislocation is most common and posterior dislocation is rare.
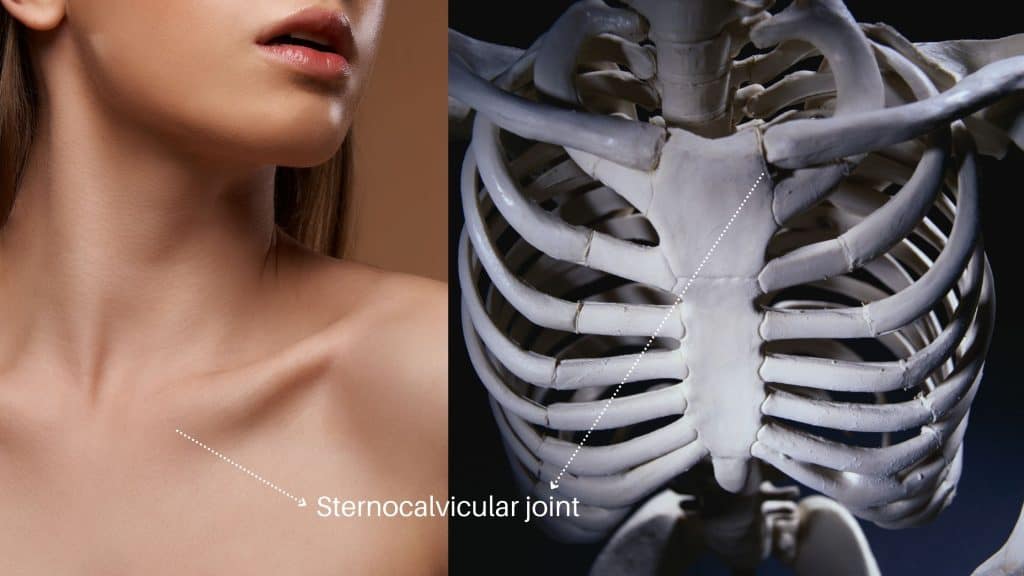
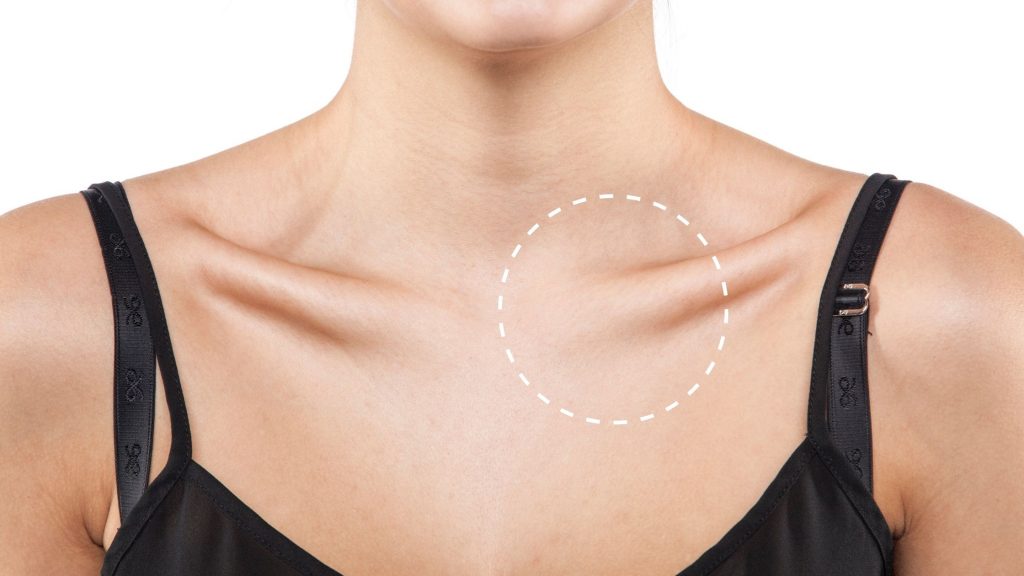
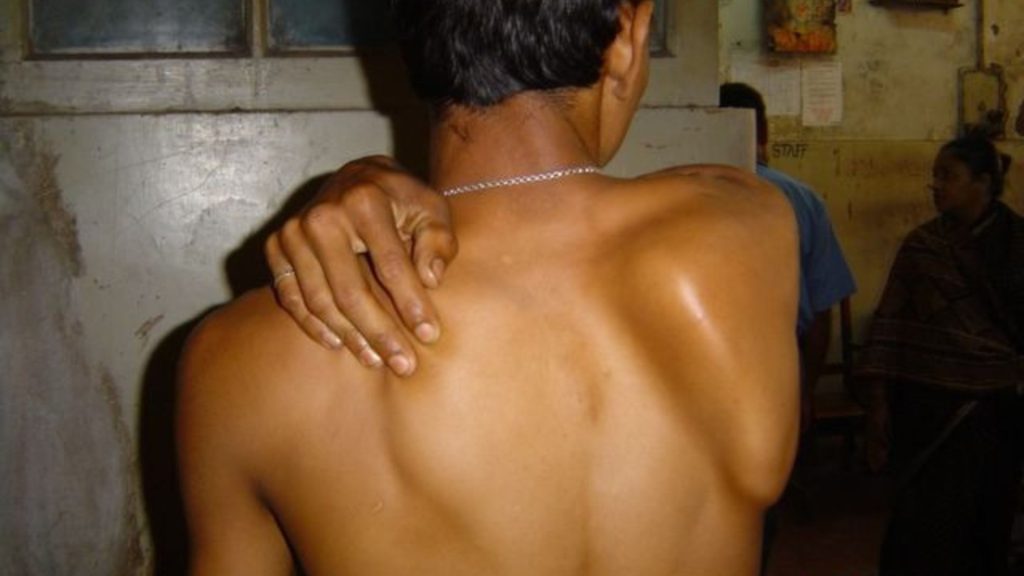
The Sternoclavicular joint is at the base of our neck on the chest, just by the side of the sternum. Just palpate the bony prominence by the side of the voice box; it is a sternoclavicular joint.
The inner part of the clavicle bone and the sternum form this joint. It is a synovial type of joint surrounded by capsules and ligaments. This joint moves in four directions. Upwards, downwards, forwards, and backwards. It also occurs in rotational movement.
So, what led to this injury?
Common Causes of Sternoclavicular Joint Dislocation (Trauma, Sports & More)
Diagnosis of the Sternoclavicular Joint Dislocation through X-ray is very difficult. This is because it is very difficult to visualize, but clinically, its diagnosis is simple. The point is that sternoclavicular dislocation is often associated with clavicle fracture.
The most common reason for this kind of dislocation is traumatic injury. Let us try to understand traumatic sternoclavicular dislocation with this case study.
Sternoclavicular joint dislocation is common after a fall injury, and it may occur after falling from a motorbike or falling on an outstretched hand. Let us try to understand with a case study.
Real-Life Case Study: How a Bike Accident Led to SC Joint Dislocation
Approximately four months ago, I fell off my pedal bike (20mph) and hit my shoulder hard on the ground. I had shoulder pain and went for rest for the next two weeks, then started swimming again for two weeks.
As days passed by, I noticed pain in my Sterno-Clavicular joint and a lump. Because of the pain, I discontinued all sports and outdoor activities and went to see the doctor.
The doctor referred me for an X-ray. The X-ray report was normal (No fracture or abnormality was detected).
Within a few months, my Sternoclavicular joint becomes inflamed, and it remains throughout the day (whilst at work, nothing too laborious, but I drive for an hour each way, which could be irritating).
Inflammation usually eases in the evening and at night (When I wake up in the morning, my Sterno-Clavicular joint is fairly flat and protrudes much less than later during the day).
Pain is minimal in the morning but worsens as the day goes on, and it “feels” as though it’s on the tip of the clavicle on the Sterno-Clavicular joint.
When I rotate my shoulder, I feel a “clicking” noise from my Sterno-Clavicular joint. I’ve tried not to reach above shoulder height; the movement is not limited, and the pain is minor.
SC Joint Surgery Recovery Timeline: What to Expect (0–20 Weeks)
Physiotherapy rehabilitation should start the very next day after the surgery. The shoulder immobilisation is done using a shoulder sling, and it should be worn for at least six weeks.
Even during immobilisation, the exercises are essential to prevent secondary complications such as disuse atrophy, muscle weakness, and shoulder, elbow, and wrist joint stiffness.
We can study the rehabilitation protocol under two phases. The first phase is the early recovery phase, lasting from 0 to 6 weeks, and the second lasts from 6 to 12 weeks.
Phase 1: Immediate Post-Op Care (Weeks 0–6)
After shoulder surgery, the affected area must be immobilised using a sling for at least six weeks. In the initial days after the surgery, there is a chance of developing swelling and pain in the area.
To manage this, cryotherapy or the application of an ice pack is crucial.
The preferred method is active compression cold therapy, where the affected area is exposed to cold therapy for 30 minutes, followed by 60 minutes of rest to avoid skin irritation. This on-off cycle should be repeated throughout the day while the patient is awake1.
After a sternoclavicular joint reconstruction, patients must avoid any movements involving scapular protraction and retraction, as well as scapular depression and elevation during the first six weeks.
Carrying or lifting objects with the affected extremity is also not permitted.
Safe Exercises for the First 6 Weeks (Avoid Shoulder Strain)
The early recovery phase is when the injured part is healing, so avoid any movement in the shoulder joint. But, it would help if you started exercising the joints distal to the shoulder, like exercising the elbow, wrist and finger joints.
So, let us start with wrist flexion-extension exercises.
How to Do Wrist Flexion-Extension (With Pictures)
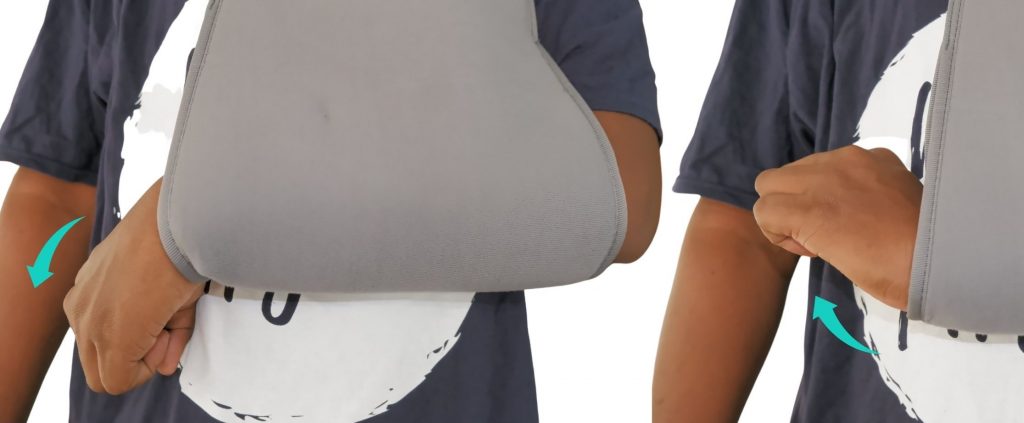
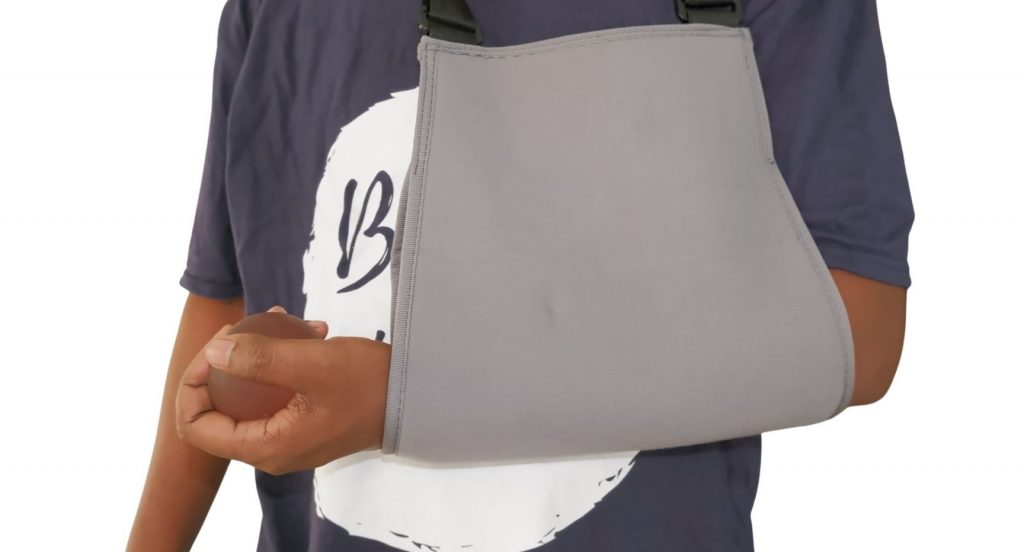
When you have an arm sling on, it’s important to start exercising your wrist joint as soon as possible. One simple exercise you can do is called wrist flexion-extension. To perform this exercise:
- Start by supporting your forearm on the arm sling.
- Slowly move your wrist upward, away from the ground, while keeping your forearm supported on the sling. The movement should be slow and smooth, and you should move your wrist to the maximum point possible without causing any pain or discomfort.
- Once you’ve reached the maximum point, slowly bring your wrist back down into flexion toward the ground.
- Again, try to localise the motion to your wrist and avoid any unnecessary movement in the shoulder.
- Repeat this motion, alternating between wrist flexion and extension, for at least 20 to 30 repetitions each time. If you can do more repetitions, that’s even better!
Doing this exercise regularly will help promote blood flow to your wrist joint, which can help speed up your recovery time and improve your overall range of motion.
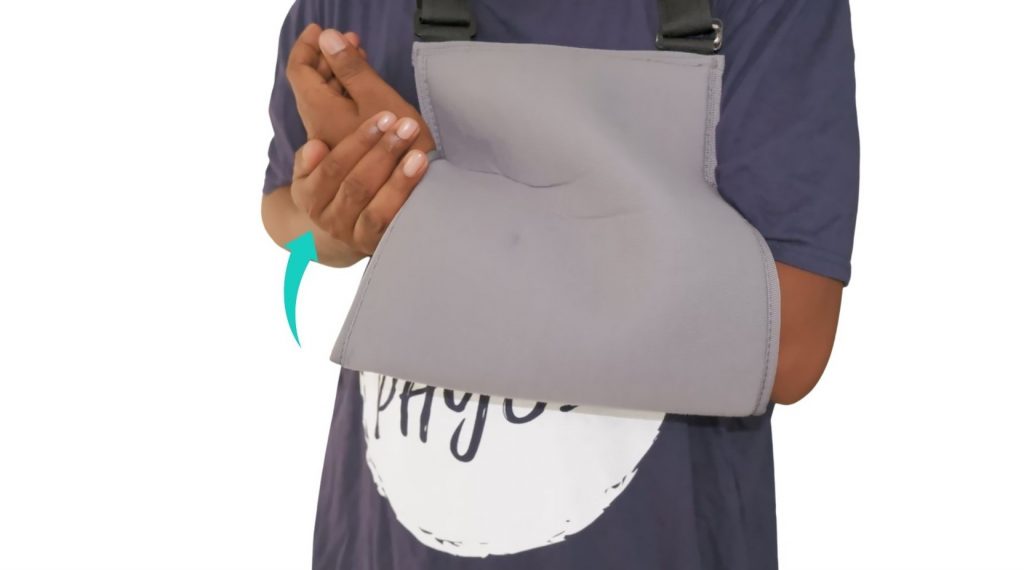
Wrist circumduction
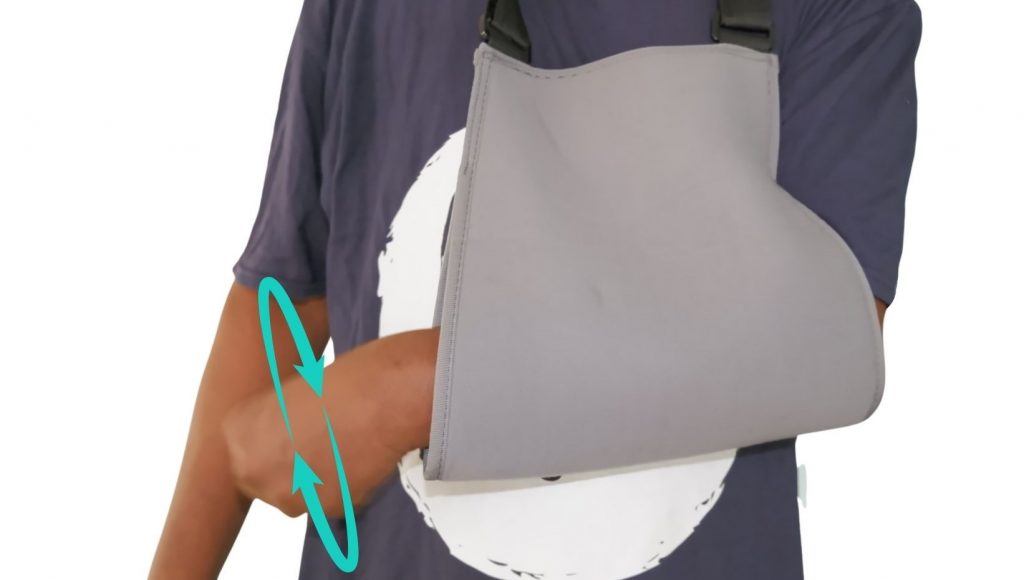
The next exercise is wrist circumduction. This exercise is performed with an arm sling, just like the previous exercise. Circumduction is a type of motion in which a body part is moved in a circular path over the joint.
- To perform the exercise, begin by making your forearm stable. Using your opposite hand to hold just proximal to the wrist joint is recommended to give a stable support base to perform the circumduction.
- Then, slowly and smoothly rotate your wrist in a circular motion.
- Make sure to rotate your wrist clockwise 10 to 15 times and switch to anticlockwise.
- To get the most out of the exercise, it is suggested to do it at least 20 to 30 times in a session. However, the more you do, the better.
- You can perform this exercise whenever you have free time or while watching television. Remember to take it slow and be gentle with your wrist.
Grip Strengthening with a Therapy Ball (Prevent Muscle Atrophy)
During the six weeks of sling immobilisation of your shoulder and forearm, it is common to experience a decrease in grip strength.
However, you can do a simple exercise to help counteract this. Using a grip strengthening gel ball, you can strengthen your hand and forearm muscles.
- To perform this exercise, place your forearm comfortably inside the sling and take the gel ball in your hand.
- Squeeze the ball as tightly as possible, holding the squeeze for a few seconds before releasing it.
- Repeat this squeezing motion as many times as possible whenever it is comfortable for you.
It is important to note that this exercise has no set routine. You can perform it as often as possible, whenever it is convenient for you.
Regularly doing this exercise can improve your grip strength and help prevent disuse atrophy of the muscles around your wrist and forearm. Additionally, it can promote healthy blood circulation.

- The 3-in-1 LiteTour hand squeeze balls are great for athletes, office staff, students, musicians and more who do trainin…
- The squeeze balls are made from premium silicone material that is odorless and latex free.
- The tool kit comes in three resistance levels for gradual practices; come with a portable keeping bag so that you can ca…

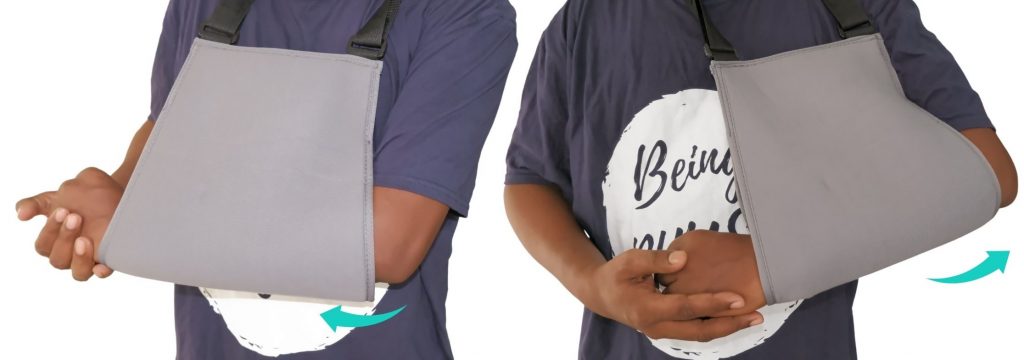
Elbow range of motion
Maintaining elbow joint mobility is crucial to prevent stiffness and maintain the arm’s functionality. One way to achieve this is to perform elbow joint exercises, which can initially be done passively with the help of the opposite hand. To do this exercise:
- Start by supporting the forearm on an arm sling and holding the wrist with one hand.
- On the other hand, gently bend the elbow joint to its maximum point of motion.
- Then, slowly lower it back down. It is important to avoid applying excessive pressure while bending the elbow, as this can cause strain on the shoulder joint.
- Repeat this exercise 10 to 15 times in a single session and aim to perform 2 to 3 sessions daily.
Over time, you can gradually increase the range of motion and decrease the support from the opposite hand until you can perform the exercise independently.
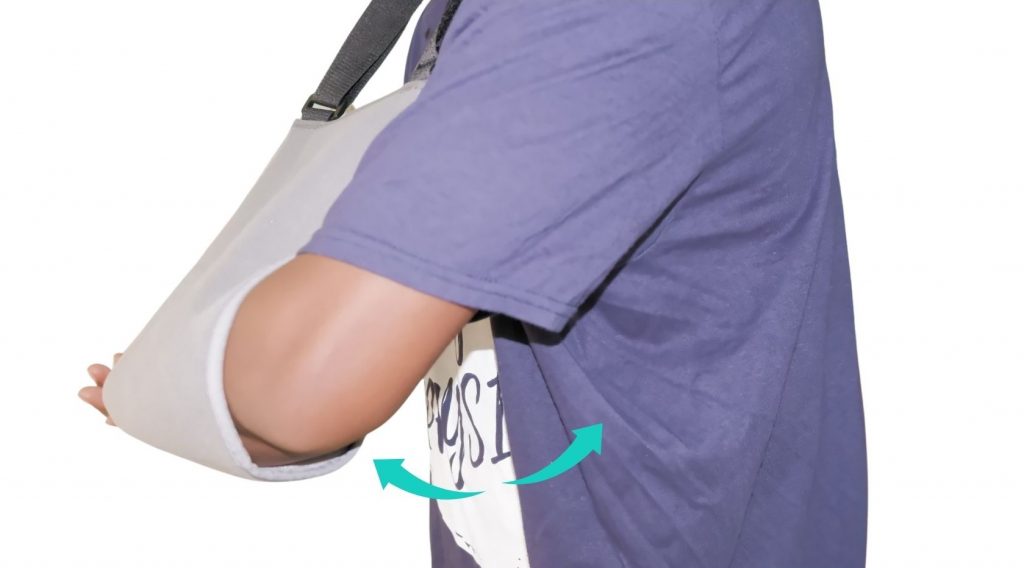
Passive Shoulder Flexion Exercise (Week 3+)
Shoulder joint range of motion is paramount to prevent shoulder joint restriction. Therefore, it is essential to start exercising on the 3rd week post-surgically while the forearm is still supported over the arm sling.
This exercise is passive and requires the support of the other hand to perform shoulder flexion and extension passively. To start this exercise:
- Stand straight with your arms by your sides.
- Take your opposite hand and support the affected forearm by holding it at the wrist.
- Now, gently move the affected arm away from the body, taking it to a point where your pain permits. Hold this position for a few seconds, then slowly bring the arm back to its normal position.
- Next, gently and slowly bring the affected arm across the chest towards the body midline. Again, hold this position for a few seconds and slowly bring the arm back to its normal position.
- Repeat this motion alternately 10 to 15 times in a session.
Ensure that the movement is slow, gentle, and within the pain-free range. It is important not to push beyond your limits as it may cause further damage to the shoulder joint.
Shoulder elevation
First, to perform the shoulder elevation exercise, ensure you are comfortably seated with your back straight and your feet firmly planted on the ground.
- While your forearm is still in an arm sling, grasp your forearm at the wrist with your other hand.
- Then, gently raise your arm forward until you feel your shoulder muscles engaging. Taking the arm to a point within the pain-free range is essential to avoid discomfort or injury.
- Hold the position for a few seconds while maintaining proper form, and then slowly lower your shoulder back down to the starting position.
- It is essential to perform the movement controlled, without any sudden or jerky movements that may cause injury.
- Repeat this exercise 10 to 15 times per session to strengthen your shoulder muscles effectively.
Phase 2: Regaining Shoulder Mobility (Weeks 6–12)
At around six weeks after your surgery, your shoulder sling will be removed. From this point onward, it is important to start with full-fledged exercises for the shoulder.
We will begin with full passive and active-assisted range of motion (AAROM) exercises, with active range of motion starting at eight weeks post-operation.
Until eight weeks post-op, only passive and AAROM exercises are permitted. The main objective of this phase is to restore the glenohumeral range of motion and promote proper scapulothoracic motion.
We may need to restrict your exercise progression if you experience persistent or recurrent pain and/or swelling.
Shoulder wand/cane exercise for SC joint instability(weeks 6 to 8)
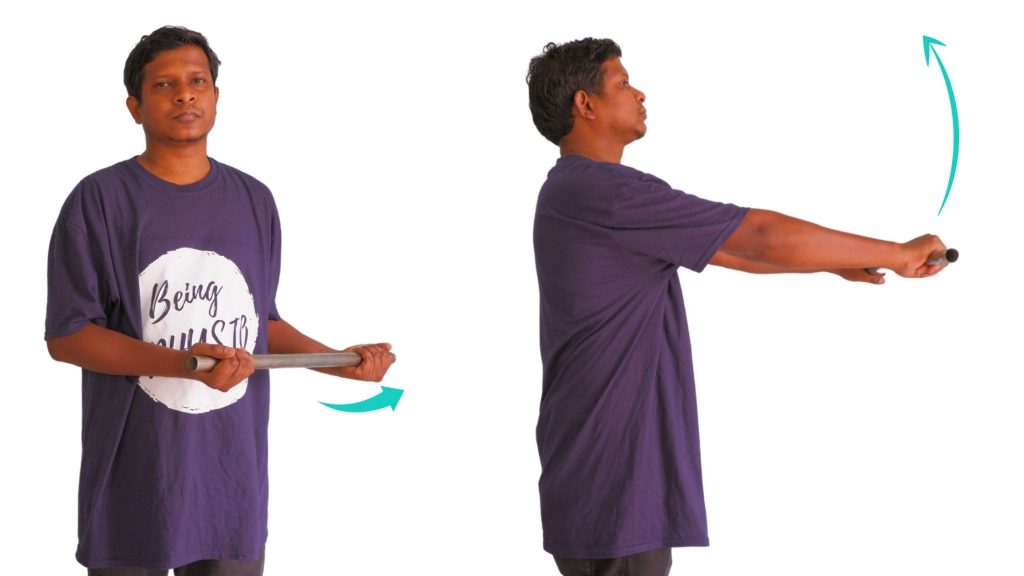
You will need a cane or a wand to perform the active-assisted exercise to regain the range of motion in your shoulder.
I have covered these exercises in a detailed manner in one of my previous articles titled “4 Best Shoulder wand exercises for painful, stiff shoulder“. You can visit this link to learn those exercises.
These exercises include:
- Shoulder elevation
- Abduction and adduction of the shoulder
- Shoulder flexion-extension.
- Internal and external rotation of the shoulder.
Active Shoulder Movements (Weeks 8–12): Restore Full Motion
By the 8th week, almost all pain and stiffness in the shoulder would have gone, and it’s the perfect time to shift from passive shoulder ROM exercises to active ROM exercises.
Active exercises also promote muscle strengthening. As we progress with exercises, we can add a little weight to them to make it a light strengthening exercise. We can also start elbow exercises.
These sternoclavicular joint dislocation exercises include
- Active shoulder abduction and adduction,
- Shoulder flexion-extension,
- Active elevation of the shoulder.
Phase 3: Strength Training with Resistance Bands (Weeks 13–20)
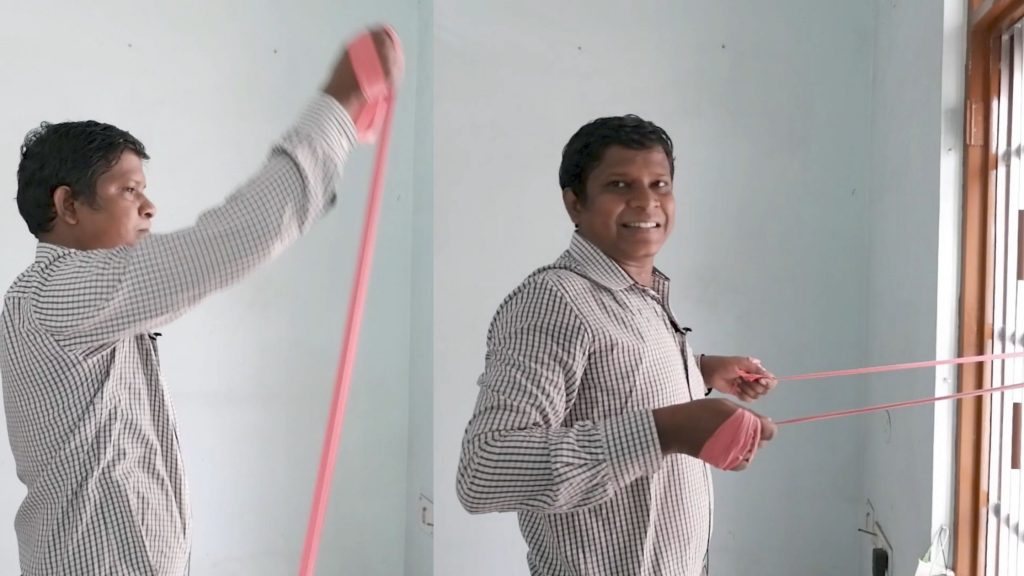
The focus of this rehabilitation phase is to increase the strength of the shoulder musculature with emphasis on proper scapulothoracic motion. The progression of weight and resistance level of the existing exercises is the focus of weeks 13 to 20.
Now, patients may progress to full upper extremity weight-bearing activities of daily living without restriction. In one of our posts, I covered various strengthening exercises using a resistance band.

- A superior band product for resistance training and rehabilitation, provides both positive and negative force on muscles…
- Simple & easy to use product for upper & lower body exercises that can be performed anywhere, is ideal for conditioning …
- Color-coded Progressive Resistance system allows users to recognize improvement as it happens, as you grow stronger you …
Read this article, “5 Top Shoulder Strengthening Exercises with Resistance Band“, to gain more insight into it.
These exercises include:
- Shoulder abductor strengthening exercise
- Flexor strengthening exercise with a resistance band
- Strengthening exercises for internal rotators
- External rotator strengthening exercise for the shoulder
- Shoulder retractor strengthening exercise
When Can You Safely Return to Sports After SC Joint Dislocation?
Returning to sports after a sternoclavicular (SC) joint dislocation isn’t just about pain relief—it’s about ensuring the joint is stable, strong, and ready for action. Here’s what the latest research and clinical experience tell us:
Key Factors That Determine Your Return
- Type of Injury
- Mild subluxations (partial dislocations) often heal with physiotherapy and bracing.
- Complete dislocations (especially posterior ones) may require surgery and longer rehab.
- Type of Sport
- Non-contact sports (e.g., swimming, running): Earlier return (6–12 weeks).
- Contact/collision sports (e.g., rugby, football): Longer recovery (3–6 months) to avoid re-injury.
- Rehab Progress
- Pain-free motion: Full shoulder movement without discomfort.
- Strength restored: Affected side should be at least 90% as strong as the uninjured side.
- Sport-specific drills: Can you throw, tackle, or swing without instability?
Evidence-Based Recovery Timeline
The 2022 systematic review by Damschen et al. (The American Journal of Sports Medicine) analyzed 31 patients with posterior SC joint dislocations treated with closed reduction2. Here’s what they found:
| Immobilization | 0–6 weeks | Sling or figure-of-8 brace to allow ligament healing. |
| Early Rehab | 6–12 weeks | Gentle range-of-motion exercises (pendulums, wand-assisted movements). |
| Strength Training | 12–20 weeks | Resistance bands, light weights, and scapular stabilization drills. |
| Full Return to Sports | 3.1 months (average) | 74% of patients returned to pre-injury levels; NFL players returned in as little as 5 weeks. |
Key Stats from the Study:
- 74% of athletes returned to sports after closed reduction.
- Mean time to return: 3.1 months (range: 1–6 months).
- Risks of rushing back: 12.5% reported lingering restrictions; 3% needed surgery due to instability.
Expert Recommendation
“Even if you feel ‘ready,’ get medical clearance. Imaging (X-ray/CT) and functional tests (e.g., push-ups, sport-specific drills) are non-negotiable before returning to competition.”
— Sunit Sanjay Ekka, Physiotherapist
FAQ
The author is a physiotherapist who has been practising for the last 17 years. He holds a Bachelor's in Physiotherapy (BPT) from SVNIRTAR (Swami Vivekananda National Institute of Rehabilitation and Research), one of the prestigious physiotherapy schools in India.
Whatever he learns dealing with his patient, he shares it with the world through blogs and e-books. He also owns a YouTube channel, "Sunit Physiotherapist" with over 8 lakh active subscribers. Here, he shares everything he gets to learn serving the patient.


Pingback: Easy Clavicle Fracture Physiotherapy Exercises - Physiosunit