For the conservative management of osteoarthritis knee pain, exercise is crucial. Research also supports that incorporating TENS can increase the positive impact of exercises in managing knee pain.12
This article explains how to use a TENS unit for knee pain (video) and covers electrode placement, recommended settings, and a practical unboxing of a popular portable unit.
What is TENS?
TENS is a non-invasive, drug-free method of pain relief that uses low-voltage electrical currents to stimulate the nerves in the affected area. This stimulation helps block pain signals from reaching the brain and can promote the release of endorphins, the body’s natural painkillers3. Research has also explored its benefits for other conditions, such as TENS for fibromyalgia pain.
Benefits of TENS for Knee Pain
- Effective pain relief — Provides quick, targeted relief for many people with knee pain.124
- Non-invasive and drug-free — No surgery or medication required.
- Customizable — Adjustable intensity, modes, and session length let you tailor treatment to your needs.
- Portable — Most modern units are compact and easy to use at home.
Using a TENS Unit for Knee Pain
Here are the practical steps for using a TENS unit for knee pain relief:
- Step 1: Prepare the TENS Unit — Ensure the device is in good working condition. Insert fresh batteries if it is battery-powered, or charge it fully. Clean reusable electrodes or pads before use.
- Step 2: Locate the Painful Area — Identify the specific location of your knee pain so you can place the electrodes accurately.
- Step 3: Prepare the Skin — Clean and dry the skin where the electrodes will be placed. Use a cotton pad or mild soap and water if needed. Avoid lotions or oils.
- Step 4: Apply the Electrodes — Use one channel (two electrodes) for a smaller area or two channels (four electrodes) for the whole knee. Place them according to the guidance in the next section. Never place electrodes on open wounds, broken skin, or irritated areas.
- Step 5: Set the Parameters — Start with low intensity and gradually increase until you feel a comfortable tingling or pulsing sensation (not pain). We will cover specific mode recommendations when we look at a sample device below.
- Step 6: Begin Therapy — Turn on the unit and run the session for 15–30 minutes (or as recommended by your device and healthcare provider). Stay relaxed and still during treatment.4
- Step 7: Monitor Your Comfort — Stop immediately if you feel discomfort, burning, or skin irritation, and consult your healthcare provider if needed.
TENS Electrode Placement for Knee Pain
Electrode placement depends on the size of the painful area. For smaller areas, a single channel with two electrodes is usually enough. For the entire knee joint, two channels with four electrodes work better.
The basic principle is to place the electrodes on either side of the pain area so the current flows through the painful region.
Single-channel placement (two electrodes):

- Use two electrodes on one channel.
- If the pain is around the patella (kneecap), place one electrode on the inner side of the knee next to the patella.
- Place the second electrode on the outer side of the knee next to the patella.
- This sandwich placement allows the current to target the painful area effectively.
Two-channel placement (four electrodes – recommended for whole-knee pain):

- Use two channels (four electrodes total).
- Place the two electrodes of the first channel on the inner and outer sides of the knee (one higher, one lower relative to the pain area).
- Place the two electrodes of the second channel so they cross the first pair — one on the inner side at the opposite height and one on the outer side at the remaining height.
- The crossing pattern helps cover the entire painful region of the knee joint.
- Never place electrodes directly on open wounds, broken skin, or irritated areas.
Unboxing a Popular TENS Unit (HealthMateForever Example)
Many people use portable units such as models from HealthMateForever. Below is a practical look at what typically comes in the box and how to set one up. (Specific button layouts and mode numbers can vary slightly between models.)
- The main handheld unit and user manual.
- Self-adhesive electrode pads (usually four electrodes / two pairs) and a pad holder for storage.
- Lead wires to connect the unit to the pads.
- A charging cable (most modern units are rechargeable).
Setting Up the Device
- Connect the lead wires to channels A and/or B on the unit.
- Attach the electrode pads to the other ends of the wires.
- Charge the unit fully before first use (USB port is usually at the top).
- Power the unit on using the power switch.
- Select a suitable mode. On many HealthMateForever models with multiple modes, a gentle or “massage-style” mode is often comfortable for knee pain (check your specific model’s manual — mode numbers differ).
Using the Device for Knee Pain
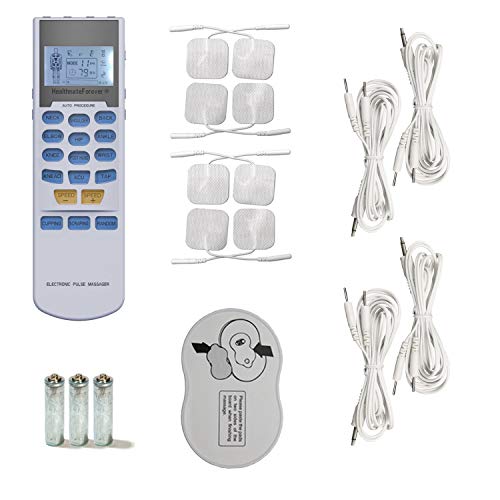
After placing the electrodes:
- Connect the electrodes to the main unit using the lead wires (channel A only for a smaller area, or both A and B for wider coverage).
- Switch the unit on and select your preferred mode.
- Gradually increase the intensity until you feel a strong but comfortable tingling or pulsing sensation. Avoid pain or muscle twitching if the goal is pure TENS (sensory) relief.
- Set the timer. A typical session lasts 15–30 minutes. Many units default to 10–20 minutes — adjust as needed and according to your comfort and any professional advice.
- When the session ends, turn the unit off, carefully remove the electrodes, and store the pads on the holder to preserve the adhesive.
Final Take
A TENS unit can be a helpful, drug-free tool for reducing knee pain and improving daily comfort. The same principles apply to other musculoskeletal areas such as the shoulder, neck, or lower back. Results depend on correct electrode placement, appropriate settings, consistent use, and the quality of the device.
Remember that TENS works best as part of a broader plan that includes appropriate knee strengthening exercises for osteoarthritis and professional guidance when needed.
Keep reading: Why This Knee Cap for Knee Pain
FAQ

The author is a physiotherapist who has been practising for the last 17 years. He holds a Bachelor's in Physiotherapy (BPT) from SVNIRTAR (Swami Vivekananda National Institute of Rehabilitation and Research), one of the prestigious physiotherapy schools in India.
Whatever he learns dealing with his patient, he shares it with the world through blogs and e-books. He also owns a YouTube channel, "Sunit Physiotherapist" with over 8 lakh active subscribers. Here, he shares everything he gets to learn serving the patient.