
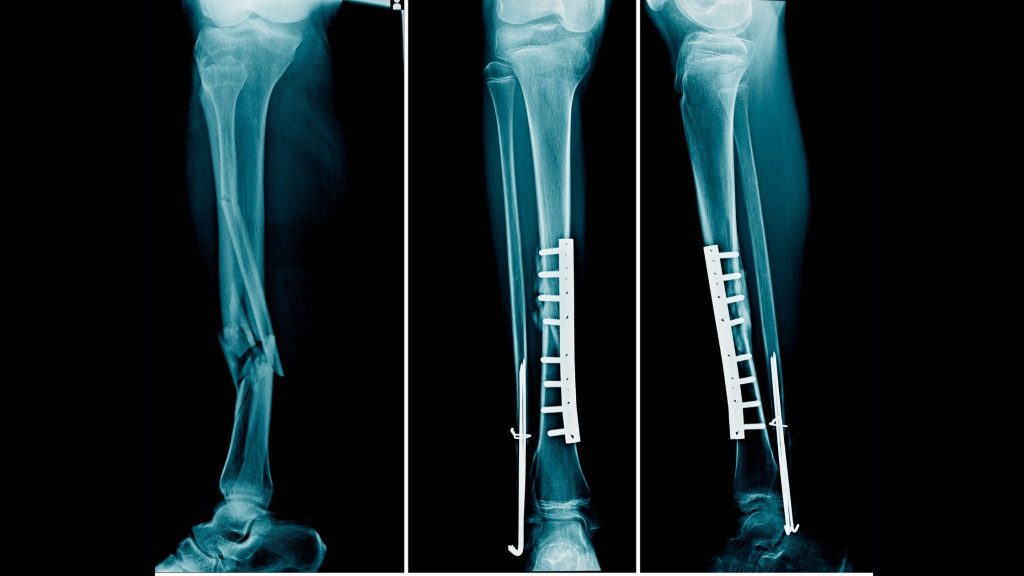
After the leg fracture and plaster cast removal, the patient’s most important concern is when they will resume walking. For this, they have to follow proper tibia fibula fracture rehabilitation protocol.
This article covers the tibia fibula fracture rehab protocol — step-by-step physiotherapy exercises after a tibial shaft fracture. However, we suggest you perform these exercises/protocols under the supervision of a qualified physiotherapist.
We have covered the rehabilitation protocol for each day, from day one, when the fractured leg is operated on, to the final day, when a person starts walking. So, let’s get started.
- Tibia and fibula fracture physiotherapy: step-by-step rehab plan
- Types of tibial shaft fractures (AO/OTA classification)
- Distal tibia and fibula fracture: What's different in rehab
- Tibia fracture surgery: ORIF, casting, and post-op care
- Broken tibia/fibula complications: atrophy, stiffness & more
- Tibia fracture rehabilitation protocol: 4 phases to recovery
- Download: Tibia fibula fracture rehabilitation protocol pdf
- Phase 1: Immediate post-op care (weeks 0–6)
- Phase 2: Restoring movement & strength (weeks 6–12)
- Phase 3: Weight-bearing & progressive strengthening (weeks 6–12+)
- Phase 4: Full weight-bearing & functional training
- Conclusion: How long until you walk normally after a tibia fracture?
- FAQ
Tibia and fibula fracture physiotherapy: step-by-step rehab plan
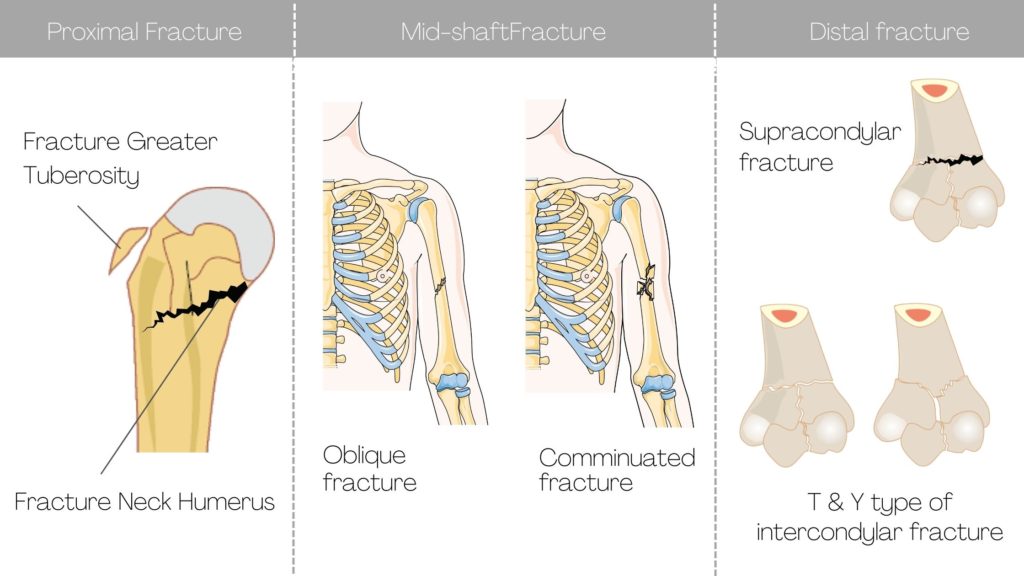
The tibial shaft fracture is among the most common long bone fractures. The management and prognosis of tibial shaft fractures are influenced by their location in the bone (proximal, middle, or distal third) and orientation (transverse, oblique, spiral, or comminuted).
So, it is essential to know the classification of tibial shaft fracture before we read further. For a broader overview of how bone fractures are classified in general, see our Bone Fracture Types Explained guide.
Types of tibial shaft fractures (AO/OTA classification)
AO/OTA (AO Foundation/Orthopaedic Trauma Association) is the commonly used classification system. It uses the alphanumeric system of classification based on the bone involved and the particular region of the bone involved.
The AO/OTA classification designates the region of the bone by a letter (A, B, C) for the severity of the fracture and a number (1, 2, 3) indicating increasing complexity and comminution1.
- The letter A is used to designate simple fractures,
- Letter B is for multi-fragmentary (comminuted) fracture and
- The letter C is designated for multi-fragmentary complex fracture, respectively.
- Type 1 represents mild to moderately severe fractures with superficial abrasions or contusions.
- High-energy fractures and deep abrasions with associated swelling comprise Type 2 injuries, often with impending compartment syndrome. Finally,
- Type 3 injuries include extensive skin and muscle damage, often caused by a crush injury, a severe fracture pattern, and compartment syndrome.
Distal tibia and fibula fracture: What’s different in rehab
Not every tibia and fibula fracture follows the same rehab timeline. Fractures at the distal third of the shaft — closer to the ankle — carry their own precautions and progression.
Why distal fractures behave differently
The distal tibia sits close to the ankle joint and the syndesmosis, the ligament complex that holds the tibia and fibula together near the ankle. Fractures in this region have less surrounding bone stock for solid fixation and carry a higher risk of ankle stiffness, particularly loss of dorsiflexion, compared with mid-shaft fractures3.
Fixation and weight-bearing differences
Mid-shaft tibial fractures are often treated with an intramedullary (IM) nail, which provides strong axial stability and frequently allows immediate weight-bearing as tolerated.
Distal fractures are more often managed with plating (ORIF) or an IM nail supplemented with additional fixation — such as cerclage wiring. This is to control shear and rotational movement near the fracture line, since this region is inherently less stable under load3.
Because of this reduced construct stability, many surgeons prescribe a longer non-weight-bearing or toe-touch weight-bearing period — often through 6 weeks — before progressing to partial weight-bearing, compared with mid-shaft IM-nailed fractures.
Rehab focus: protect the ankle early
Because the fracture line sits close to the ankle, ankle range-of-motion work deserves earlier attention than in mid-shaft fractures. Gentle dorsiflexion mobility and ankle pumps should begin as soon as your surgeon clears movement, to prevent an equinus (toe-down) contracture from setting in during immobilization. Once your surgeon clears more active work, our ankle strengthening exercises guide can help rebuild stability before you’re back on your feet full-time.
Does the 4-phase protocol above still apply?
Yes — the same four phases (protection → ROM/early strength → weight-bearing → full function) apply to distal fractures. The two key differences are a longer weight-bearing restriction through Phase 1–2, and more deliberate ankle-specific ROM work built into every phase.
Always follow your surgeon’s individual weight-bearing clearance rather than a general timeline, since distal fixation stability varies by fracture pattern and hardware choice.
Note: fractures that extend into the ankle joint surface itself (pilon fractures) are a distinct, more complex injury and aren’t covered by this protocol.
Tibia fracture surgery: ORIF, casting, and post-op care
Different types of fractures need different treatment approaches. A long leg cast can manage a closed, minimal displacement fracture (Type 1). Types 2 and 3 injuries almost always are managed operatively, with poorer outcomes related to the severity of soft tissue injury and fracture comminution1.
The surgical process typically involves intramedullary nailing, plate fixation (ORIF), or external fixation, depending on the fracture pattern. After the surgery, the operated limb is immobilised for a month and a half.
Immobilisation means making the operated limb not move. The purpose is to allow the surgical process to take its own time to heal without any disturbance.
The immobilisation process differs from doctor to doctor, but applying a plaster cast is the most common method. Most of the secondary complications develop during this long-term immobilization period due to a lack of proper care.
Broken tibia/fibula complications: atrophy, stiffness & more
Most of the complications happen secondary to long-term post-operative immobilization.
- Disuse atrophy- Decrease in muscle bulk due to long-term rest.
- Muscle weakness
- Muscle contracture- Long-term immobility causes muscle contracture
- Joint stiffness- Muscle contracture, in turn, leads to joint stiffness
- Oedema (swelling).
We can prevent such secondary complications by starting calculated movement and physiotherapy at the right time. Physiotherapy intervention prevents such complications by maintaining muscular and joint flexibility and blood circulation — see the strengthening exercises below for how this is done phase by phase.
Tibia fracture rehabilitation protocol: 4 phases to recovery
The goal of the surgical and rehabilitative team focuses on the return of a patient to their previous level of function, often in the setting of competing for short-term goals2. Before reaching the walking point, we must ensure all the walking components are intact. And this is the main motive of the protocol.
These include the flexibility of lower limb joints, like the hip, knee, and ankle joints. We also need to ensure sufficient strength of anti-gravity muscles and, most importantly, the weight-bearing capability of the affected limb.
We need to start postoperative physiotherapy the very next day of the surgery after the leg is immobilised and the patient is still in bed.
Download: Tibia fibula fracture rehabilitation protocol pdf
In this article, we are going to learn just an overview of the protocol. However, if you need a complete step-by-step guide with clear illustrations and instructions, then you can download the “Tibia Fibula Fracture Rehabilitation Protocol Patients’ Ebook “.
Proceeds from the ebook help fund ongoing updates to this website’s free content.
Phase 1: Immediate post-op care (weeks 0–6)
This phase comes immediately after the surgery, and leg immobilisation is the main process here. During this phase, the most important concern is pain and swelling.
To prevent this, elevate the leg using a layer of two pillows, move the ankle and toes for as many repetitions as possible. Contrast bath therapy can also help manage swelling once your surgeon clears it.
We have to be careful while selecting exercises during this period; the exercises should be static in nature, with minimal or no movement at the surgical site.
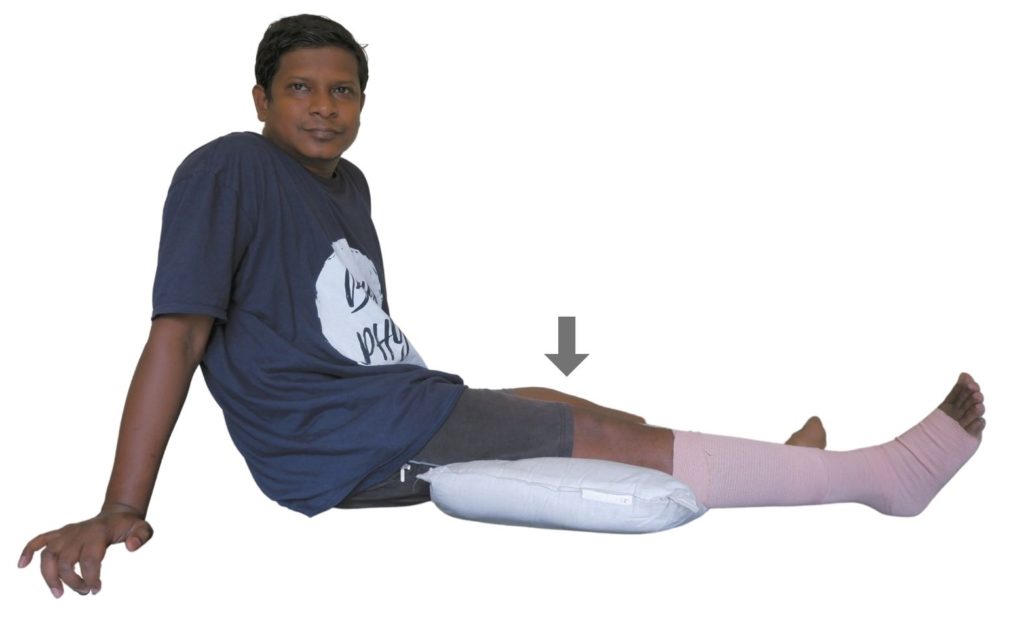
The exercises I would recommend are static quadriceps exercise (knee press), ankle plantar flexion and dorsiflexion (foot movement).
Phase 2: Restoring movement & strength (weeks 6–12)
By this period, surgical pain should have subsided. Here, we have to begin exercises to improve the joint range of motion and focus on strengthening all the muscles of the lower limb.
Why Range of Motion (ROM) Exercises Matter After a Tibia Fracture
Joint stiffness associated with surgical repair of periarticular fractures may have long-term effects on mobility, gait pattern, and function.
Knee stiffness, which is a reduced range of motion (ROM) resulting in functional limitations, can impact normal leg swing and the ability to ascend and descend stairs as well as rise from a seated position, particularly when entering or exiting a vehicle2.
The limited extension may result in a limp, quadriceps strain, functional leg-length shortening, and patellofemoral pain, thus compounding the resulting dysfunction2.
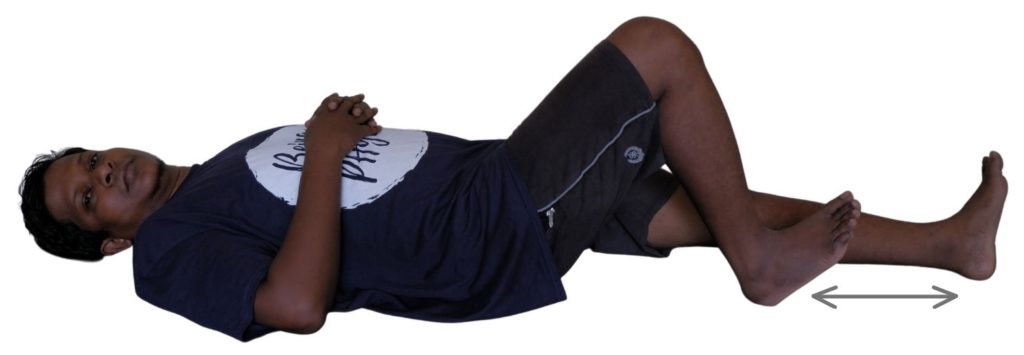
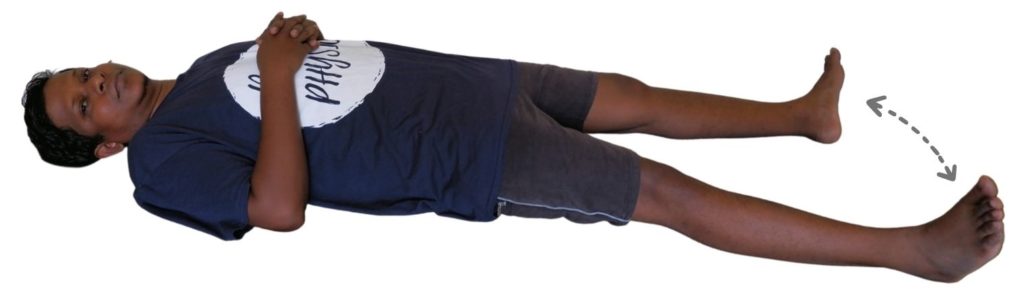
A few of the recommended ROM exercises are knee bending exercises and hip abduction, as shown in the figure.
Importance of strengthening exercises
Muscle weakness around the thigh, knee and lower leg is very common after a tibial fracture. Weakness is actually secondary to the long term rest and immobilization period. If calf tightness or pain develops during this stage, our guide on relieving calf muscle pain covers targeted stretches.
Home-based strength-training regimens moderately but significantly improve strength, balance, and functional mobility. Additionally, strength training provides a long-term reduction in patients’ perceived difficulty completing activities of daily living (ADLs) compared to controls2.
Strength training starting even as late as 6 months post-fixation can provide significant improvement of functional outcomes for an extended period of time even beyond the end of treatment.
Phase 3: Weight-bearing & progressive strengthening (weeks 6–12+)
Early weight-bearing protocols2: A 2022 systematic review and meta-analysis found that early weight-bearing after intramedullary nailing was associated with faster fracture union and fewer complications than delayed weight-bearing.
However, the safest timing still depends on fixation stability4.
| Injury type | Common fixation methods | Recommendation for initial weight bearing |
| Tibial shaft fracture | External fixation | Immediate weight bearing as tolerated |
| Intramedullary fixation | Immediate weight bearing as tolerated | |
| Comminuted/high-grade tibial fracture | ORIF | NWB for 6–12 weeks |
| External fixation | Conflicted, likely support some duration of NWB | |
| Intermedullary fixation | Immediate weight bearing as tolerated |
Start partial weight-bearing exercise using crutches. Observe the gait pattern and teach the correct gait pattern. This same progressive weight-bearing approach is used in other lower-limb fractures, such as our Patella Fracture Rehabilitation Protocol.

Phase 4: Full weight-bearing & functional training
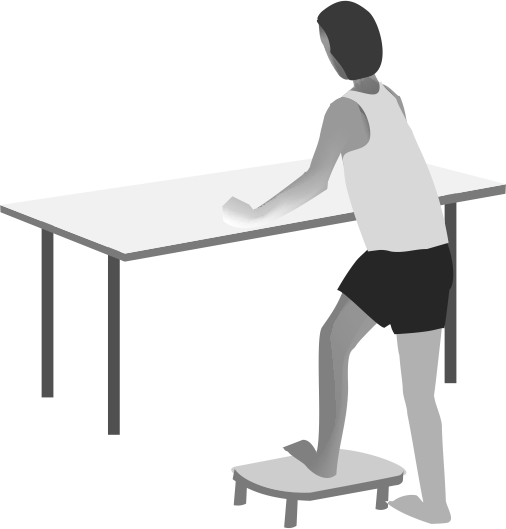
During this phase, we need to start full weight-bearing. Alongside walking without support, focus shifts to balance and proprioception drills (single-leg stance, wobble board work), stair and uneven-surface training, and gradually reintroducing higher-demand activities.
Return to running, jumping, or sport-specific training should only begin once your surgeon or physiotherapist confirms adequate bone healing on imaging, pain-free full weight-bearing, and strength within a comparable range of the uninjured leg. The same evidence-based criteria are used to clear return to running after other lower-limb injuries, such as ACL reconstruction.
Conclusion: How long until you walk normally after a tibia fracture?
Most patients begin partial weight-bearing with crutches around 6–8 weeks post-surgery, once imaging confirms adequate healing, and progress to walking without support somewhere between 3 and 6 months, depending on fracture severity, location, and fixation type. Distal and comminuted fractures generally sit toward the longer end of this range.
After the surgery, the person goes through psychological stress. Your physiotherapist has many roles, not only to come out of physical disability but also to motivate you in every step of rehabilitation. Rehabilitation should emphasize the return to functional abilities. If you’d like a day-by-day guide to follow alongside your own recovery, the illustrated ebook linked above walks through every phase in detail.
FAQ

The author is a physiotherapist who has been practising for the last 17 years. He holds a Bachelor's in Physiotherapy (BPT) from SVNIRTAR (Swami Vivekananda National Institute of Rehabilitation and Research), one of the prestigious physiotherapy schools in India.
Whatever he learns dealing with his patient, he shares it with the world through blogs and e-books. He also owns a YouTube channel, "Sunit Physiotherapist" with over 8 lakh active subscribers. Here, he shares everything he gets to learn serving the patient.




Very useful but why money for download.
Hello friend. The problem is you mention in this article is well worth a look. Very helpful article. Like
John